


.png.c9b8f3e9eda461da3c0e9ca5ff8c6888.png)
There are many tutorials on this aspect, but they are all a bit flawed. In actual operation, there are various pitfalls, in order to avoid pitfalls. This article will present the most comprehensive construction tutorial for beginners.
Installation Environment
Nginx1.2PHP7.xMysql8.0
Installing Nginx
To add the CentOS 7 EPEL repository, run the following command:
yum install epel-release install Nginx
yum install nginx starts Nginx service
systemctl start nginx boot
sudo systemctl enable nginx
Install Mysql8.0
Add mysql library
yum localinstall https://dev.mysql.com/get/mysql80-community-release-el7-1.noarch.rpm install mysql
yum --enablerepo=mysql80-community install mysql-community-server starts mysql
systemctl start mysqld.service modify root password
Because in mysql8, the default password will be set when installing the database. We can use the following command to view the default password
grep 'A temporary password is generated for root@localhost' /var/log/mysqld.log |tail -1 Initialize the database
sudo mysql_secure_installation will prompt for root's password, which is the default password obtained in the previous step. Then enter the root password again and enter Y all the way.
I don’t know why, but the program cannot connect to log in after modification. Use the following command to re-modify the root password.
mysql -u root -p
use mysql;
ALTER USER 'root'@'localhost' IDENTIFIED WITH mysql_native_password BY 'youpassword';
systemctl restart mysqld #Restart MySQL
Installation PHP
Install Remi Repository
yum install http://rpms.remirepo.net/enterprise/remi-release-7.rpm Check for available PHP 7+ versions in the Remi repository
yum --disablerepo='*' --enablerepo='remi-safe' list php[7-9][0-9].x86_64 You will see such output
Loaded plugins: fastestmirror
Loading mirror speeds from cached hostfile
* remi-safe: mirrors.ukfast.co.uk
Available Packages
php70.x86_64 2.0-1.el7.remi remi-safe
php71.x86_64 2.0-1.el7.remi remi-safe
php72.x86_64 2.0-1.el7.remi remi-safe
php73.x86_64 2.0-1.el7.remi remi-safe
php74.x86_64 1.0-3.el7.remi remi-safe
php80.x86_64 1.0-3.el7.remi enables the corresponding PHP version (see 7.4 as an example here)
sudo yum-config-manager --enable remi-php74 install php
yum -y install php php-mysqlnd php-gd php-xml php-mbstring php-ldap php-pear php-xmlrp php-zip php-cli php-fpm php-gd php-mysqlnd php-mbstring php-opcache php-pdo php-json
Configuration File
Configure php-fpm file
vim /etc/php-fpm.d/www.confuser and group variables default to apache. We need to change these to nginx
Finding listen php-fpm will listen on specific hosts and ports over TCP. We want to change this setting so that it listens for local socket files, as this improves overall performance of the server.
listen=/var/run/php-fpm/php-fpm.sock; Finally, we need to change the owner and group settings of the socket file we just defined in the listen directive. Find the listen.owner, listen.group and listen.mode directives. These lines are commented out by default. Uncomment by deleting the prefix at the beginning of the line. Then, change the owner and group to nginx:
listen.owner=nginx
listen.group=nginx
listen.mode=0660 Last restart php-fpm
systemctl start php-fpm 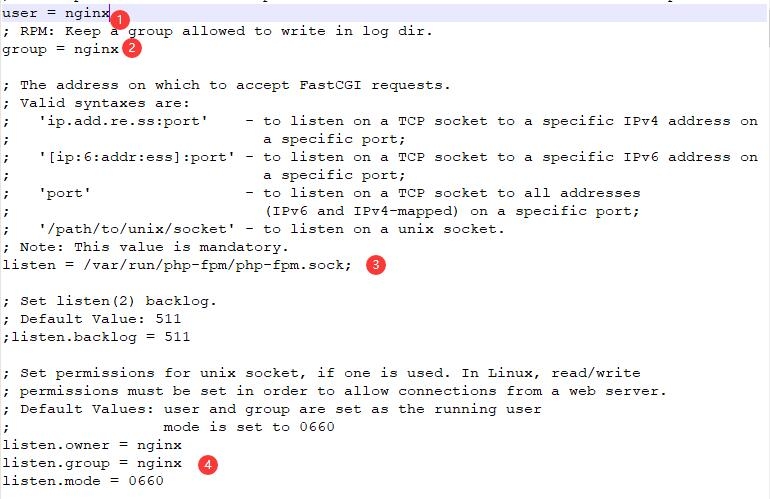
Configure Nginx to handle PHP
The current configuration is that the php file cannot be accessed, and we still need a simple configuration.
Nginx has a dedicated directory where we can define each hosted website as a separate configuration file using a server block. This is similar to Apache's virtual hosting.
In the default installation, this directory is empty. We will create a new file as the default PHP website on this server, which will override the default server block defined in the /etc/nginx/nginx.conf file.
Open a new file in the /etc/nginx/conf.d directory
vim /etc/nginx/conf.d/default.conf
#The content is as follows:
server {
listen 80; # port can be modified by itself, such as 8080
server_name 192.168.x.x; #If you don't have a domain name, just fill in the public or intranet IP
root /var/www/html; #Website Lu Jin
index index.php index.html index.htm;
location/{
try_files $uri $uri/=404;
}
error_page 404 /404.html;
error_page 500 502 503 504 /50x.html;
location=/50x.html {
root /var/www/html; #Website Lu Jin
}
#php configuration part
location ~ \.php$ {
try_files $uri=404;
fastcgi_pass unix:/var/run/php-fpm/php-fpm.sock;
fastcgi_index index.php;
fastcgi_param SCRIPT_FILENAME $document_root$fastcgi_script_name;
include fastcgi_params;
}
}Restart Nginx to apply the changes:
sudo systemctl restart nginx
Configure website directory user groups and permissions
Because currently both php and nginx are running as nginx, and our directory sometimes has permissions owned by root. So when visiting the website, 404 will appear.
First check the user groups of php and ngxin
ps -ef | grep php
ps -ef | grep nginx last modify user group permissions for the corresponding directory
chown -R nginx:nginx /var/www/blog and restart php and nginx again
Configure PATHINFO
Like Typecho, we need to enable PATHINFONginx, which does not support PATHINFO by default, so we need to change the configuration file of the host that supports PATHINFO.
location ~ ^(.+\.php)(.*)$ {
fastcgi_pass unix:/var/run/php-fpm/php-fpm.sock;
fastcgi_index index.php;
fastcgi_param SCRIPT_FILENAME $document_root$fastcgi_script_name;
fastcgi_split_path_info ^(.+\.php)(.*)$;
fastcgi_param PATH_INFO $fastcgi_path_info;
include fastcgi_params;
} and configure etc/php.ini
cgi.fix_pathinfo=1 Finally restart nginx and php
There are so many problems we have encountered at the moment. Let’s talk about the problems we encounter later!